To check the version of your SCIM bridge, visit the SCIM bridge domain in your browser. The version will be displayed in the top left, and you can compare it with the current version on the 1Password SCIM Bridge release notes page.
To update 1Password SCIM Bridge to the latest version, follow the instructions for your deployment environment:
If you received an email about your SCIM bridge version being deprecated, update the SCIM bridge within 90 days. If you don’t update in that time, your existing accounts will still work, but 1Password will no longer sync with your identity provider.
If you need help updating the SCIM bridge, contact a 1Password Business representative.
Azure Container Apps
- Sign in to your account on the Microsoft Azure portal.
- Go to the Azure Container Apps Portal, then select the Container App for 1Password SCIM Bridge.
- In the sidebar under Application, select Containers.
- Change the version number in the Image and tag field to match the latest version from our SCIM bridge releases notes website. For example,
1password/scim:v2.9.11. - Select Save as a new revision, then wait a moment for the deployment to complete.
- Visit your SCIM bridge domain in a web browser and enter your bearer token.
- Review the version number in the upper left of the page to make sure you’re using the latest version of 1Password SCIM Bridge.
Docker or Kubernetes
Learn how to update 1Password SCIM Bridge if you deployed it using the Docker or Kubernetes deployment examples on GitHub:
If you customized your SCIM bridge deployment on Docker
If you customized your SCIM bridge deployment, update the deployment configuration file with the new version and then apply the change:
- Visit 1Password SCIM Bridge on Docker Hub and note the tag with the most recent version number.
- Edit your
docker-compose.ymlconfiguration file and update it with the version number you noted. - Run one of the following commands to apply the update:
Deployment environment Run this command Docker Compose docker-compose upDocker Swarm docker stack deploy
If you’re using Azure Kubernetes Service
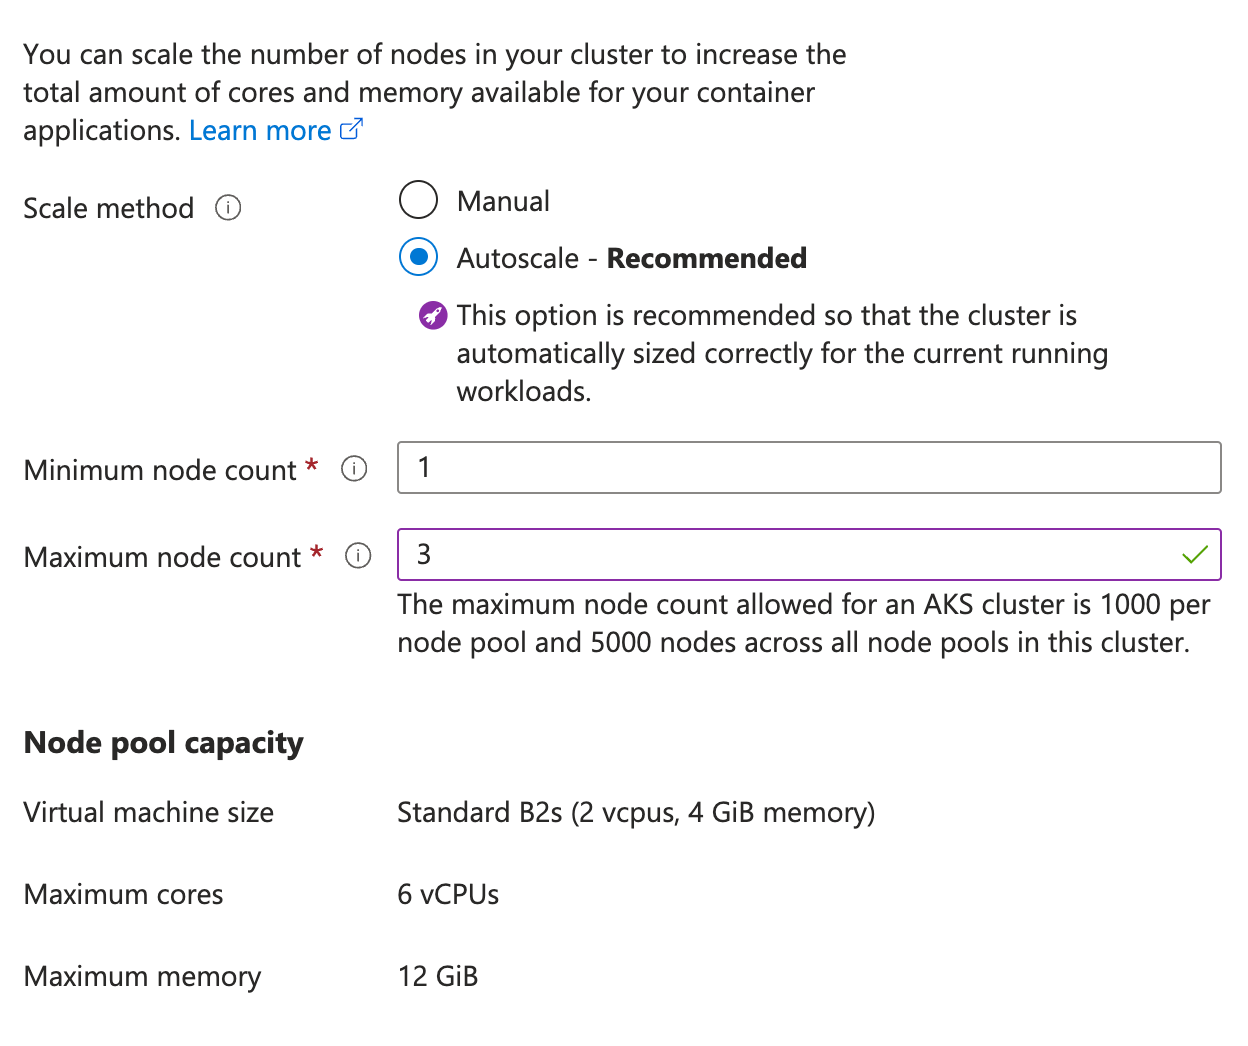
If you’re using Azure Kubernetes Service and your SCIM bridge application pods (op-scim) get stuck in a “Pending” state during the upgrade, your cluster may not have enough nodes.
- Sign in to your account on the Microsoft Azure portal.
- Locate your
op-scimKubernetes service and open it. - Under Settings in the sidebar, select Node pools, then select your node pool.
- Select the number beside “Node count”.
- Select Autoscale, then choose a node count range of 1 minimum and 3 maximum.
- Select Apply.
AWS Fargate
If you followed the instructions from the scim-examples repository on GitHub to deploy the SCIM bridge, learn how to update the SCIM bridge on AWS ECS Fargate using Terraform.
If you customized your SCIM bridge deployment
If you customized your SCIM bridge deployment, update the deployment configuration file with the new version and then apply the change:
Open the
task-definitions/scim.jsonfile and edit the following line:"image": "1password/scim:v2.x.x"Change
v2.x.xto match the tag with the most recent version number of the 1Password SCIM Bridge on Docker Hub.Run the following commands to reapply your Terraform settings:
terraform plan -out=./op-scim.plan
terraform apply ./op-scim.plan
Google Cloud Platform
Tip
If your SCIM bridge was not deployed in the default namespace, switch the context or append -n=namespace to the commands below.
Use the Cloud Shell on Google Cloud Platform to update the SCIM bridge from the marketplace:
Visit the list of Clusters on Google Cloud Platform , choose the project, then select the cluster you use for the SCIM bridge.
Select Connect, then select Run in Cloud Shell.
Allow any API permissions, then press Return to connect to the cluster.
Copy this command and paste it into the shell window, then press Return:
kubectl get deployMake a note of the deployment name for the SCIM bridge. This is the line that doesn't end with
redis-master. By default it's namedop-scim-bridge-1.Copy this command and make sure the deployment name matches what you noted in the previous step:
kubectl set image deploy/op-scim-bridge-1 op-scim-bridge-1=1password/scim:v2.x.xChange “v2.x.x” in the command to the latest version.
Find and copy the name of the SCIM bridge application:
kubectl get applicationNotify Google Cloud Platform of the update so the application page for your SCIM bridge shows the current version. Make sure
op-scim-bridge-1matches the application name you noted in the previous step:kubectl patch application op-scim-bridge-1 -p='[{"op":"replace", "path":"/spec/descriptor/version", "value":"2.x.x"}]' --type='json'Change “v2.x.x” in the command to the latest version.
If you can’t update the SCIM bridge in-place, you can also redeploy it. The SCIM bridge doesn’t maintain state information, so this won’t impact your identity provider or 1Password account, aside from downtime while you redeploy it.
Before you redeploy the SCIM bridge, pause provisioning with your identity provider. Then follow these steps:
- Visit the Google Kubernetes Engine console , select the SCIM bridge by 1Password app instance, then select Delete.
- Release the “SCIM bridge by 1Password” app’s static IP address in Google Cloud Platform.
- Deploy 1Password SCIM Bridge again in the same project using the same cluster.
- Promote the app’s ephemeral IP address to a static IP address.
- Update the DNS record for the SCIM bridge to point to the new static IP address.
- Connect the SCIM bridge to your 1Password account.
- Connect your identity provider and turn on provisioning.
DigitalOcean
Install the updated DigitalOcean Marketplace app over the old one:
- Visit 1Password SCIM Bridge on DigitalOcean Marketplace , then select Install App.
- Select the cluster where the SCIM bridge is deployed, then select Install.
The installation may take up to 10 minutes to complete.
- Visit the SCIM bridge domain in your browser and enter your OAuth bearer token to confirm that the update was successful.
If you can’t update the SCIM bridge in-place, you can also redeploy it. The SCIM bridge doesn’t maintain state information, so this won’t impact your identity provider or 1Password account, aside from downtime while you redeploy it.
Before you redeploy the SCIM bridge, pause provisioning with your identity provider. Then follow these steps:
- Visit the DigitalOcean Kubernetes console , select the cluster where the SCIM bridge is deployed, then select Kubernetes Dashboard.
- Select Cluster > Namespaces and delete the
op-scim-bridgenamespace. - Install the SCIM bridge again
using the same cluster.
The installation can take up to 10 minutes to complete.
- Go back to the Kubernetes Dashboard for your cluster.
- Select Services in the Service section.
- Find
op-scim-bridge-svcin the list and copy the IP address shown under the “External Endpoints”. - Update the DNS record to match the IP address you just copied.
- Connect the SCIM bridge to your 1Password account.
- Connect your identity provider and turn on provisioning.
Get help
Get help with the SCIM bridge, like if you lose your bearer token or session file, or if you use two-factor authentication.
By default, SCIM bridge deprecation emails are sent to people in the Administrators group. To send deprecation emails to additional people:
- Sign in to your account on 1Password.com.
- Select Integrations in the sidebar.
- Select Manage in the Notifications section.
- Add the email(s) you’d like to use, then select Save.
To get more help or share feedback, contact 1Password Business Support or join the discussion with the 1Password Support Community.
Learn more
Was this article helpful?
Glad to hear it! If you have anything you'd like to add, feel free to contact us.
Sorry to hear that. Please contact us if you'd like to provide more details.