![]()
With 1Password Business, you can integrate 1Password with JumpCloud to automate many common administrative tasks:
Provision
- Create users. Users created in JumpCloud will also be created in 1Password.
- Update user attributes. Changing user attributes in your directory will change the mapped attributes in 1Password.
- Deactivate users. Deactivating a user or disabling the user’s access to 1Password in JumpCloud will suspend the user in 1Password.
Import
- Import users. Users created in 1Password will be matched against existing JumpCloud users.
Sync groups
- Push groups. Groups created in JumpCloud will also be created in 1Password, and group membership changes in JumpCloud will also be made in 1Password.
To get started, sign in to your account on the JumpCloud Administrator Portal and follow these steps.
Before you begin
Before you can integrate 1Password with JumpCloud, you’ll need to:
- Set up and deploy 1Password SCIM Bridge.
- Make sure Provisioning users & groups is turned on in the Automated User Provisioning page of your 1Password account.
Step 1: Add the 1Password Business application to JumpCloud
These steps were recorded in April 2026 and may have changed since. Refer to the JumpCloud documentation for the most up-to-date steps.
To add the 1Password Business application to JumpCloud:
- Select SSO Applications in the Access section in the sidebar.
- Select Add New Application and search for
1Password. - From the results, select 1Password > Next.
- Enter
1Password Businessfor the display label. - In the Bookmark URL field, enter the sign-in address for your 1Password Business account. For example:
https://example.1password.com. - Select Save Application, then select Configure Application.
Step 2: Configure the application
2.1: Set up the integration
On the Identity Management tab of the 1Password Business application, follow these steps:
- Make sure Enable management of User Groups and Group Membership in this application is turned on.
- Select Configuration Settings in the Identity Management section.
- Fill out the following fields:
- Base URL: Enter the URL of your SCIM bridge (not your 1Password account sign-in address). Make sure the URL uses
httpsand doesn’t include a forward slash (/) at the end. For example:https://scim.example.comIf you don’t know your URL, make sure you’ve set up and deployed the SCIM bridge.
- Token Key: Enter the bearer token for your SCIM bridge.
Learn what to do if you don’t have your bearer token.
- Base URL: Enter the URL of your SCIM bridge (not your 1Password account sign-in address). Make sure the URL uses
- Select Update.
2.2: Set up provisioning to 1Password
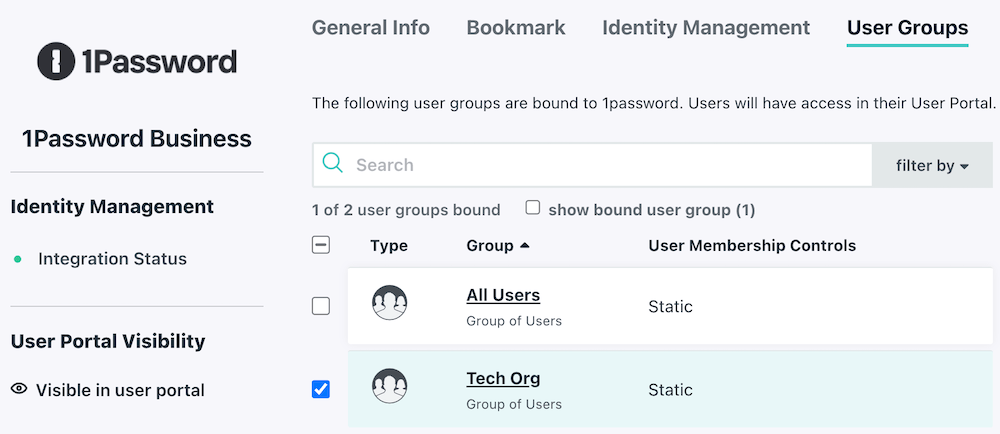
- Choose the User Groups tab.
- Select the groups you’d like to provision to 1Password, then select Save.
Next steps
When you turn on provisioning, existing 1Password users will be linked to JumpCloud users if their email address matches. If their email address is different, they’ll be invited to 1Password again, so make sure any affected team members update their email address before you turn on provisioning.
If a team member hasn’t accepted their invite after 2 days, they’ll receive a reminder email. Invites don’t expire.
If you have existing groups in 1Password that you want to sync with JumpCloud, add them to the groups managed by provisioning:
- Sign in to your account on 1Password.com.
- Select Integrations in the sidebar, then select Automated User Provisioning.
- Select Manage in the Managed Groups section, then select the groups to sync.
If you've previously used the SCIM bridge, make sure to select any groups that were already synced with JumpCloud. This will prevent problems syncing with your identity provider, including duplicate groups.
Tip
Learn about best practices for using automated provisioning.
Manage your settings
To manage assigned users and groups, open the 1Password Business application, then select User Groups.
- To add or remove a user group, select or deselect the checkbox beside the group you want to add or remove, then select Save.
- To add or remove a user, select the group where you want to add or remove a user. In the configuration panel for the group, select Users. Select or deselect the checkbox beside the user you want to add or remove from the group, then select Save.
Learn more about how to authorize users to an application in JumpCloud.
To turn off synchronization, open the 1Password Business application, then select Deactivate IdM connection. Select Confirm, then select Save.
Learn more about using JumpCloud for identity management with 1Password.
Get help
If users and groups aren’t being provisioned, make sure provisioning is turned on in your 1Password account:
- Sign in to your account on 1Password.com.
- Select Integrations in the sidebar.
- Select Automated User Provisioning.
- Make sure Provisioning users & groups is turned on.
If you update the bearer token for your SCIM bridge, you’ll also need to update it in JumpCloud:
- Open the 1Password Business application.
- Select Deactivate IdM connection, then select Confirm.
- Select Identity Management, then select Configure.
- Enter the URL of your SCIM bridge and your new bearer token.
- Select Activate, then select Save.
Was this article helpful?
Glad to hear it! If you have anything you'd like to add, feel free to contact us.
Sorry to hear that. Please contact us if you'd like to provide more details.