Tip
If you don’t use DigitalOcean, you can still automate provisioning in another deployment environment.
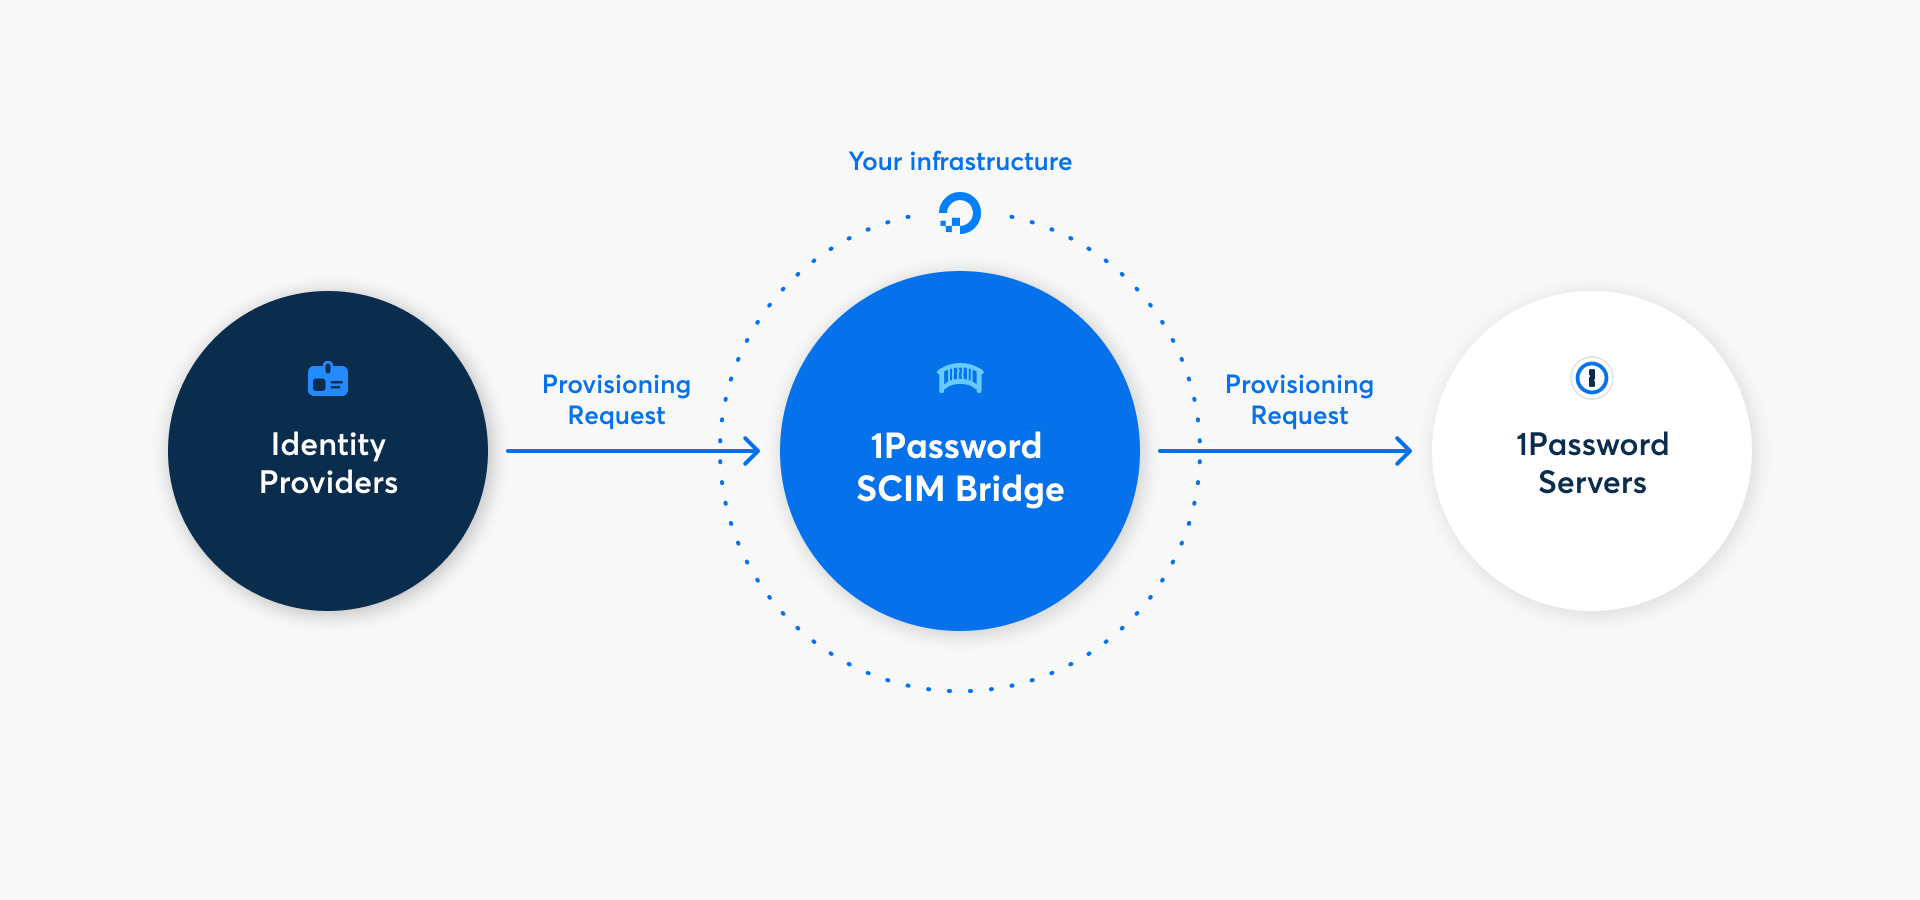
With 1Password Business, you can automate many common administrative tasks using 1Password SCIM Bridge. It uses the System for Cross-domain Identity Management (SCIM) protocol to connect 1Password with your existing identity provider, like Google Workspace, JumpCloud, Microsoft Entra ID, Okta, OneLogin, or Rippling.
You can deploy 1Password SCIM Bridge on DigitalOcean with the Marketplace app by following the steps below. Alternatively, you can deploy to the DigitalOcean App Platform, which is a more affordable and customizable deployment option.
Step 1: Deploy 1Password SCIM Bridge on DigitalOcean
If you don’t already have a DigitalOcean account, create one. Then follow these steps.
1.1: Create a cluster
The SCIM bridge must be deployed within a cluster. To create a cluster:
- Visit 1Password SCIM Bridge on DigitalOcean Marketplace, then select Install App.
- Select New cluster > Install.
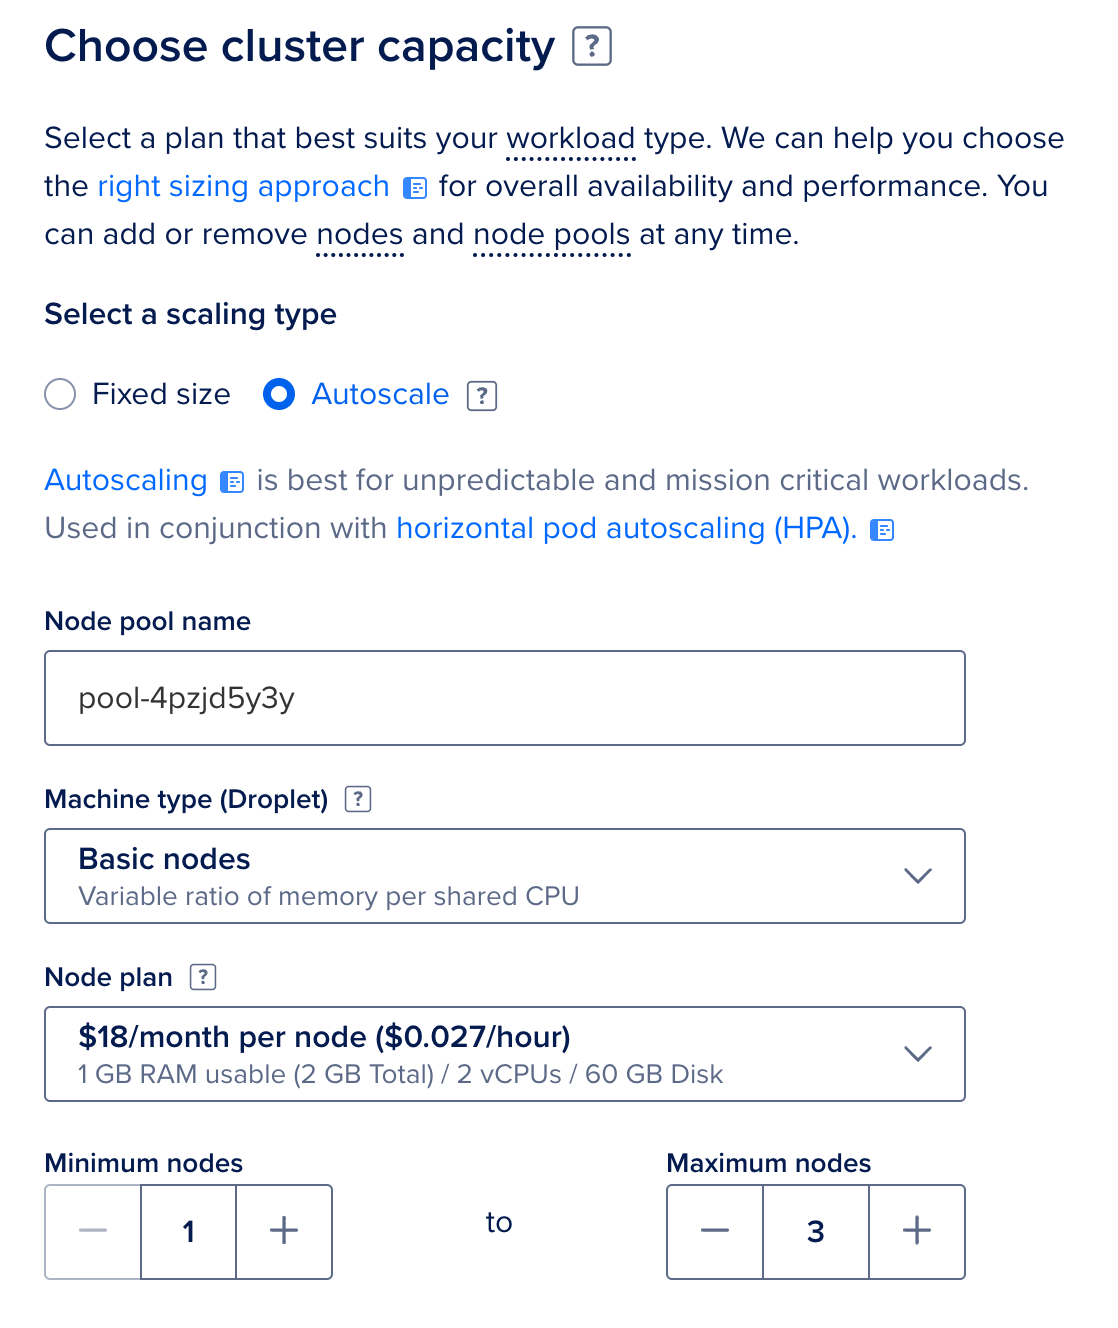
- Scroll down to “Choose cluster capacity”.
- Select Set node pool to autoscale.
- From the “Node plan” menu, select 2 GB total RAM / 2 vCPUs / 60 GB storage.
- Change “Minimum nodes” to 1, then change “Maximum nodes” to 3.
- Scroll to the bottom, then select Create Cluster.
Your cluster will now be created. After a few minutes, you’ll receive an email from DigitalOcean to confirm that your load balancer is ready.
1.2: Set up 1Password SCIM Bridge
After your load balancer is ready:
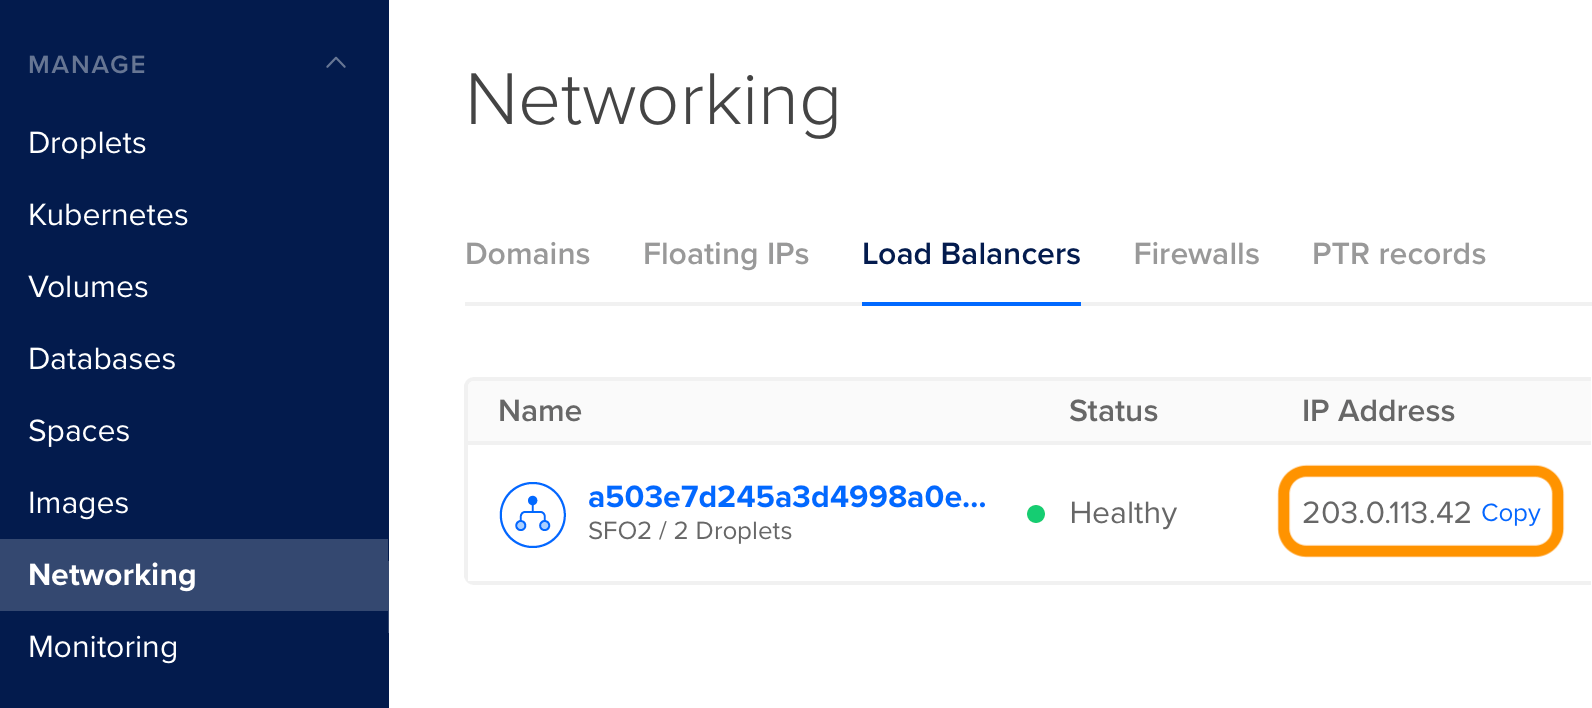
- Select Networking in the sidebar, then select Load Balancers. You’ll see the IP address for your load balancer.
- Configure a DNS A record for your chosen domain and point it to the IP address of your load balancer. For example:
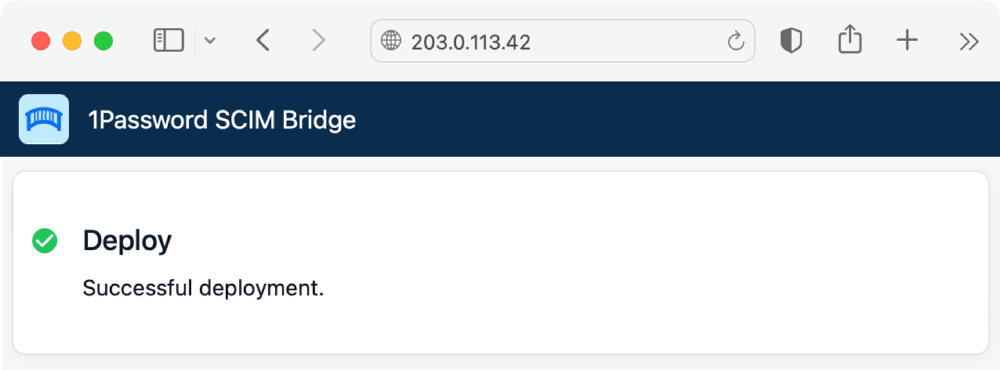
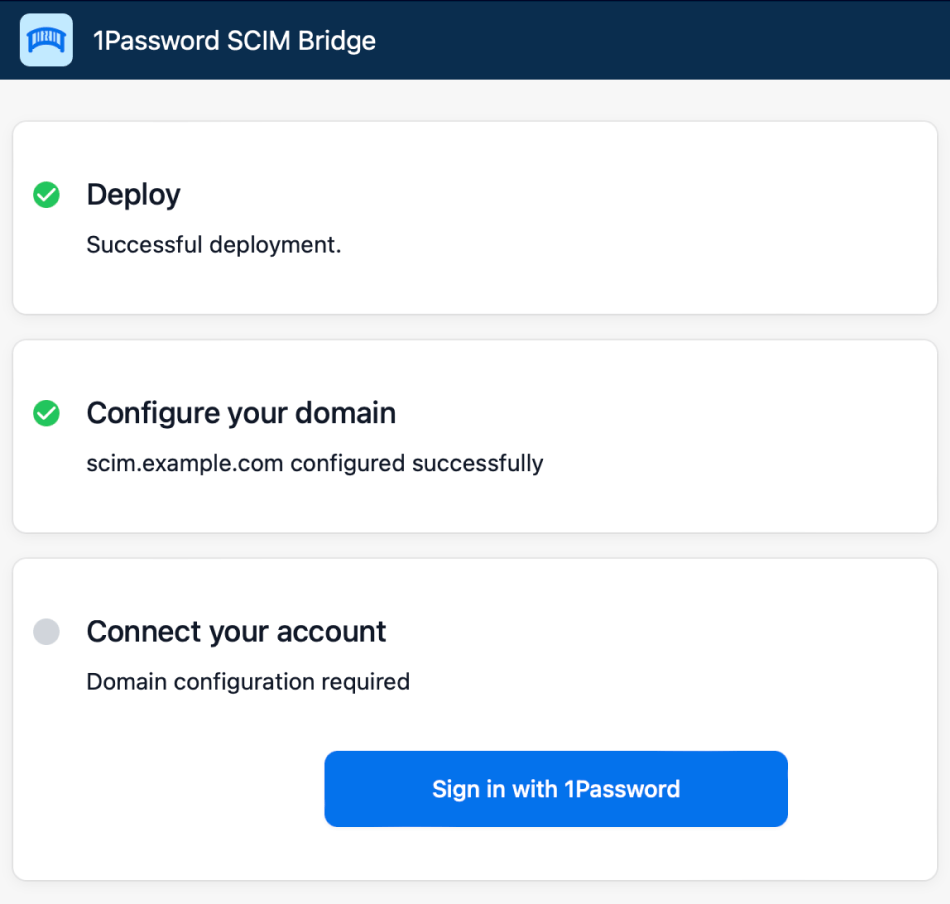
scim.example.com. - Wait for the DNS to propagate, then navigate to your SCIM bridge domain.
You’ll see 1Password SCIM Bridge Setup page.
Step 2: Connect 1Password SCIM Bridge to your 1Password account
2.1: Sign in to your 1Password account
On the 1Password SCIM Bridge Setup page:
- Enter the domain name you configured for your load balancer to verify it.
- Select Sign In and follow the onscreen instructions.
Learn what to do if you see the details for an existing provisioning integration.
2.2: Authenticate with 1Password SCIM Bridge
After you complete the setup process, you’ll get a scimsession file and bearer token. Save them both in 1Password in case you need them again.
- Select Install on <yourdomain>. You’ll see the 1Password SCIM Bridge Status page.
- Enter your OAuth bearer token, then select Verify.
Important
The bearer token and scimsession file you receive during setup can be used together to access information from your 1Password account. You’ll need to share the bearer token with your identity provider, but it’s important to never share it with anyone else. And never share your scimsession file with anyone at all.
Step 3: Connect your identity provider to the SCIM bridge
Important
If you’ve already been using 1Password Business, make sure the email addresses and group names in your 1Password account are identical to those in your identity provider.
- If anyone is using a different email address in 1Password, ask them to change it.
- If you have existing groups in 1Password that you want to sync with groups in your identity provider, adjust the group names in 1Password.
Because 1Password SCIM Bridge provides a SCIM 2.0-compatible web service that accepts OAuth bearer tokens for authorization, you can use it with a variety of identity providers.
Connect to the load balancer where you’ve configured the SCIM bridge (for example: https://scim.example.com) and authenticate using your OAuth bearer token.
Learn how to connect your identity provider:


Get help
Get help with the SCIM bridge, like if you lose your bearer token or session file.
If you have an existing provisioning integration
If you see the details for an existing provisioning integration on the setup page, select Regenerate Credentials, then follow the steps to save the new credentials to your 1Password account and install them on your SCIM bridge. Existing settings for the integration, such as managed groups you selected, will be retained.
If you don’t need to retain existing settings, select More Actions > Deactivate Provisioning. Then select Sign In on the setup page again.
To get more help or share feedback, contact 1Password Business Support or join the discussion with the 1Password Support Community.
Learn more
Was this article helpful?
Glad to hear it! If you have anything you'd like to add, feel free to contact us.
Sorry to hear that. Please contact us if you'd like to provide more details.