When you set up automated provisioning, 1Password SCIM Bridge connects your 1Password account with your identity provider so you can create and manage users and groups. You can simplify the connection by migrating to automated provisioning hosted by 1Password.
Automated provisioning hosted by 1Password currently supports Entra ID and Okta. To migrate your 1Password account to hosted provisioning, follow the steps below.
Try it yourself
Explore our interactive demo to see how 1Password hosted provisioning migration works.
Considerations
When you migrate to hosted provisioning, consider the impact it will have on your account:
- Your team’s 1Password account will connect to a SCIM bridge hosted by 1Password.
- You’ll reconnect your identity provider to 1Password with a new SCIM URL and bearer token.
- You won’t be able to switch back to your own self-hosted SCIM bridge on the account. Hosted provisioning is designed differently than 1Password SCIM Bridge, and your account won’t be compatible with the self-hosted SCIM bridge after you migrate.
- The migration may take some time to complete. You can leave the page in the meantime.
- Hosted provisioning won’t manage groups that have the Recover Accounts or Manage All Groups permissions. This is a security feature to prevent provisioning from having account-wide cryptographic access.
- Users will be confirmed without a delay. With a self-hosted SCIM bridge, there is a 5-minute delay in user confirmation after they sign up, but with hosted provisioning, team members are provisioned immediately after they complete the confirmation flow. Hosted provisioning’s immediate confirmations are more secure than a SCIM bridge’s automated confirmations because the end-user proves their identity when they accept the invitation.
Limitations
There are also some limitations to consider:
- User management with 1Password CLI isn’t supported when hosted provisioning is turned on. Support will be added in the future.
- 1Password MSP accounts aren’t currently supported.
Requirements
When you’re ready to migrate to hosted provisioning, you’ll need to:
- Be in the Owners or Administrators group in your 1Password Business account.
- Have administrator privileges in your identity provider.
- Make sure all existing 1Password team member email address domains are in the allowed domains list. Public domains, such as gmail.com, aren’t currently supported.
Step 1: Switch to hosted provisioning in 1Password
- Sign in to your account on 1Password.com.
- Select Integrations in the sidebar, then select Automated User Provisioning.
- Select Switch to hosted provisioning, then select Start setup.
- Select Set up hosted provisioning.
- Save your credentials in 1Password in case you need them in the future, then select Next.
- Leave this page open and continue to step 2.
Step 2: Update the integration in your identity provider
Entra ID
These steps were recorded in March 2026 and may have changed since. Refer to the Microsoft documentation for the most up-to-date steps.
Sign in to your account on the Microsoft Azure portal and follow these steps:
- Select Microsoft Entra ID, then select Enterprise applications in the sidebar.
- Select the 1Password EPM application.
- Select Provisioning in the sidebar, then select the Get started tab and select Connect your application.
- Fill out the following fields:
- Tenant URL: Copy and paste your SCIM URL from the hosted provisioning setup page (not your 1Password account sign-in address). Do not include a trailing slash. For example:
https://provisioning.1password.com/scim/v2. - Secret token: Copy and paste your bearer token from the hosted provisioning setup page.
- Tenant URL: Copy and paste your SCIM URL from the hosted provisioning setup page (not your 1Password account sign-in address). Do not include a trailing slash. For example:
- Select Test Connection, then select Create and wait a moment for it to be created.
Okta
These steps were recorded in March 2026 and may have changed since. Refer to the Okta documentation for the most up-to-date steps.
Sign in to your account on Okta.com , select Admin in the top right, and follow these steps:
- Select Applications > Applications in the sidebar.
- Search for the 1Password provisioning application and select it.
- Select the Provisioning tab, then select Integration.
- Select Edit.
- Fill out the following fields:
- Base URL: Copy and paste your SCIM URL from the hosted provisioning setup page (not your 1Password account sign-in address). Do not include a trailing slash. For example:
https://provisioning.1password.com/scim/v2. - API Token: Copy and paste your bearer token from the hosted provisioning setup page.
- Base URL: Copy and paste your SCIM URL from the hosted provisioning setup page (not your 1Password account sign-in address). Do not include a trailing slash. For example:
- Select Test API Credentials. After it’s complete, select Save.
- Go back to the hosted provisioning setup tab in 1Password and select Done.
Map the displayName attribute
After you set up the application, you’ll need to add mapping for the displayName attribute in Okta. This will make sure that user display names in 1Password are updated from Okta.
On the Provisioning tab, follow these steps:
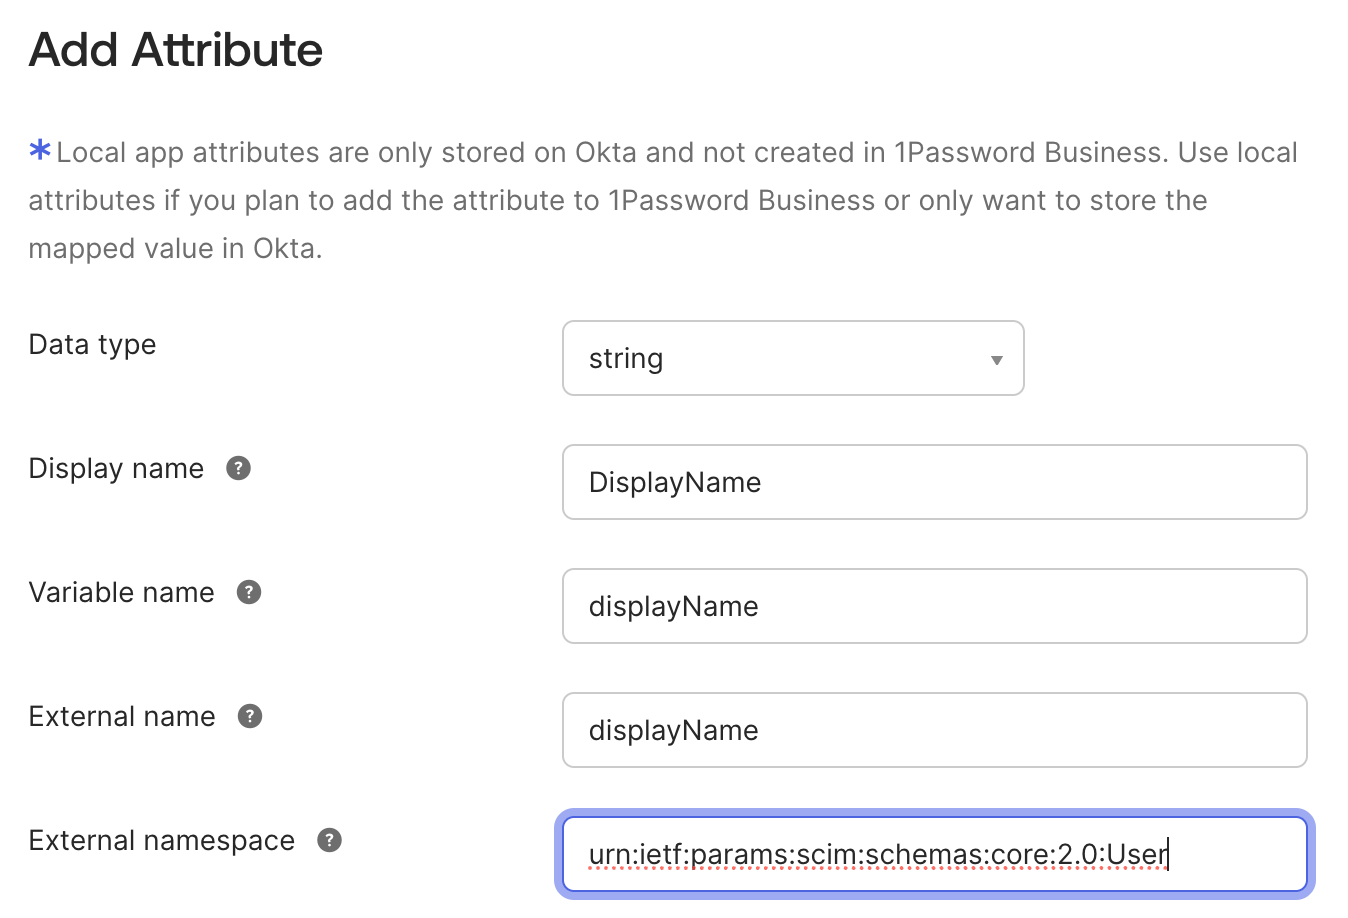
- Select Go to Profile Editor, then select Add Attribute.
- Fill in the following fields:
- Display name: Enter
DisplayName. - Variable name: Enter
displayName. - External namespace: Copy and paste the following:
urn:ietf:params:scim:schemas:core:2.0:User
- Display name: Enter
- Select Save, then select Mappings.
- Select the Okta User to 1Password … tab.
- Map the
displayNameattribute todisplayName. - Select Save Mappings > Apply updates.
Step 3: Decommission your SCIM Bridge
After you’ve migrated to hosted provisioning, you can decommission your SCIM Bridge and phase out the infrastructure you deployed it on.
Get help
If you need to manage team members with 1Password CLI, you’ll need to turn off hosted provisioning. You’ll be able to use 1Password CLI and hosted provisioning together in the future.
Learn more
Was this article helpful?
Glad to hear it! If you have anything you'd like to add, feel free to contact us.
Sorry to hear that. Please contact us if you'd like to provide more details.