The Apps feature helps Device Trust administrators discover and protect work-related web applications used by employees across their organization.
App Discovery aggregates data from usage sources such as browser activity and desktop app installations to identify which web apps employees commonly use and where company data may be stored.
Extended Device Compliance allows administrators to notify end users about device health issues and impede access to work-related apps using the 1Password Browser Extension – whether or not they support SSO.
Managed App Instances allow administrators to protect individual Google Workspace SAML SSO-configured applications, and makes sure only devices that are known and secure can authenticate.
Discover web apps
Discover web apps requirements
The Discover Web Apps feature requires:
- Extended Device Compliance. Contact 1Password Device Trust support to upgrade.
- 1Password’s Enterprise Password Manager.
- Full Disk Access permissions on macOS devices, to collect usage data.
If your organization uses MDM to manage devices, you can grant Full Disk Access using our custom configuration profile. If you don’t use MDM, have your team members turn on Full Disk Access directly in System Settings > Security & Privacy.
Set up web app discovery
To turn on web app discovery for your organization:
- In the Device Trust admin console, select Integrations in the sidebar.
- Under App Discovery, toggle on Web App Activity.
View discovered web apps
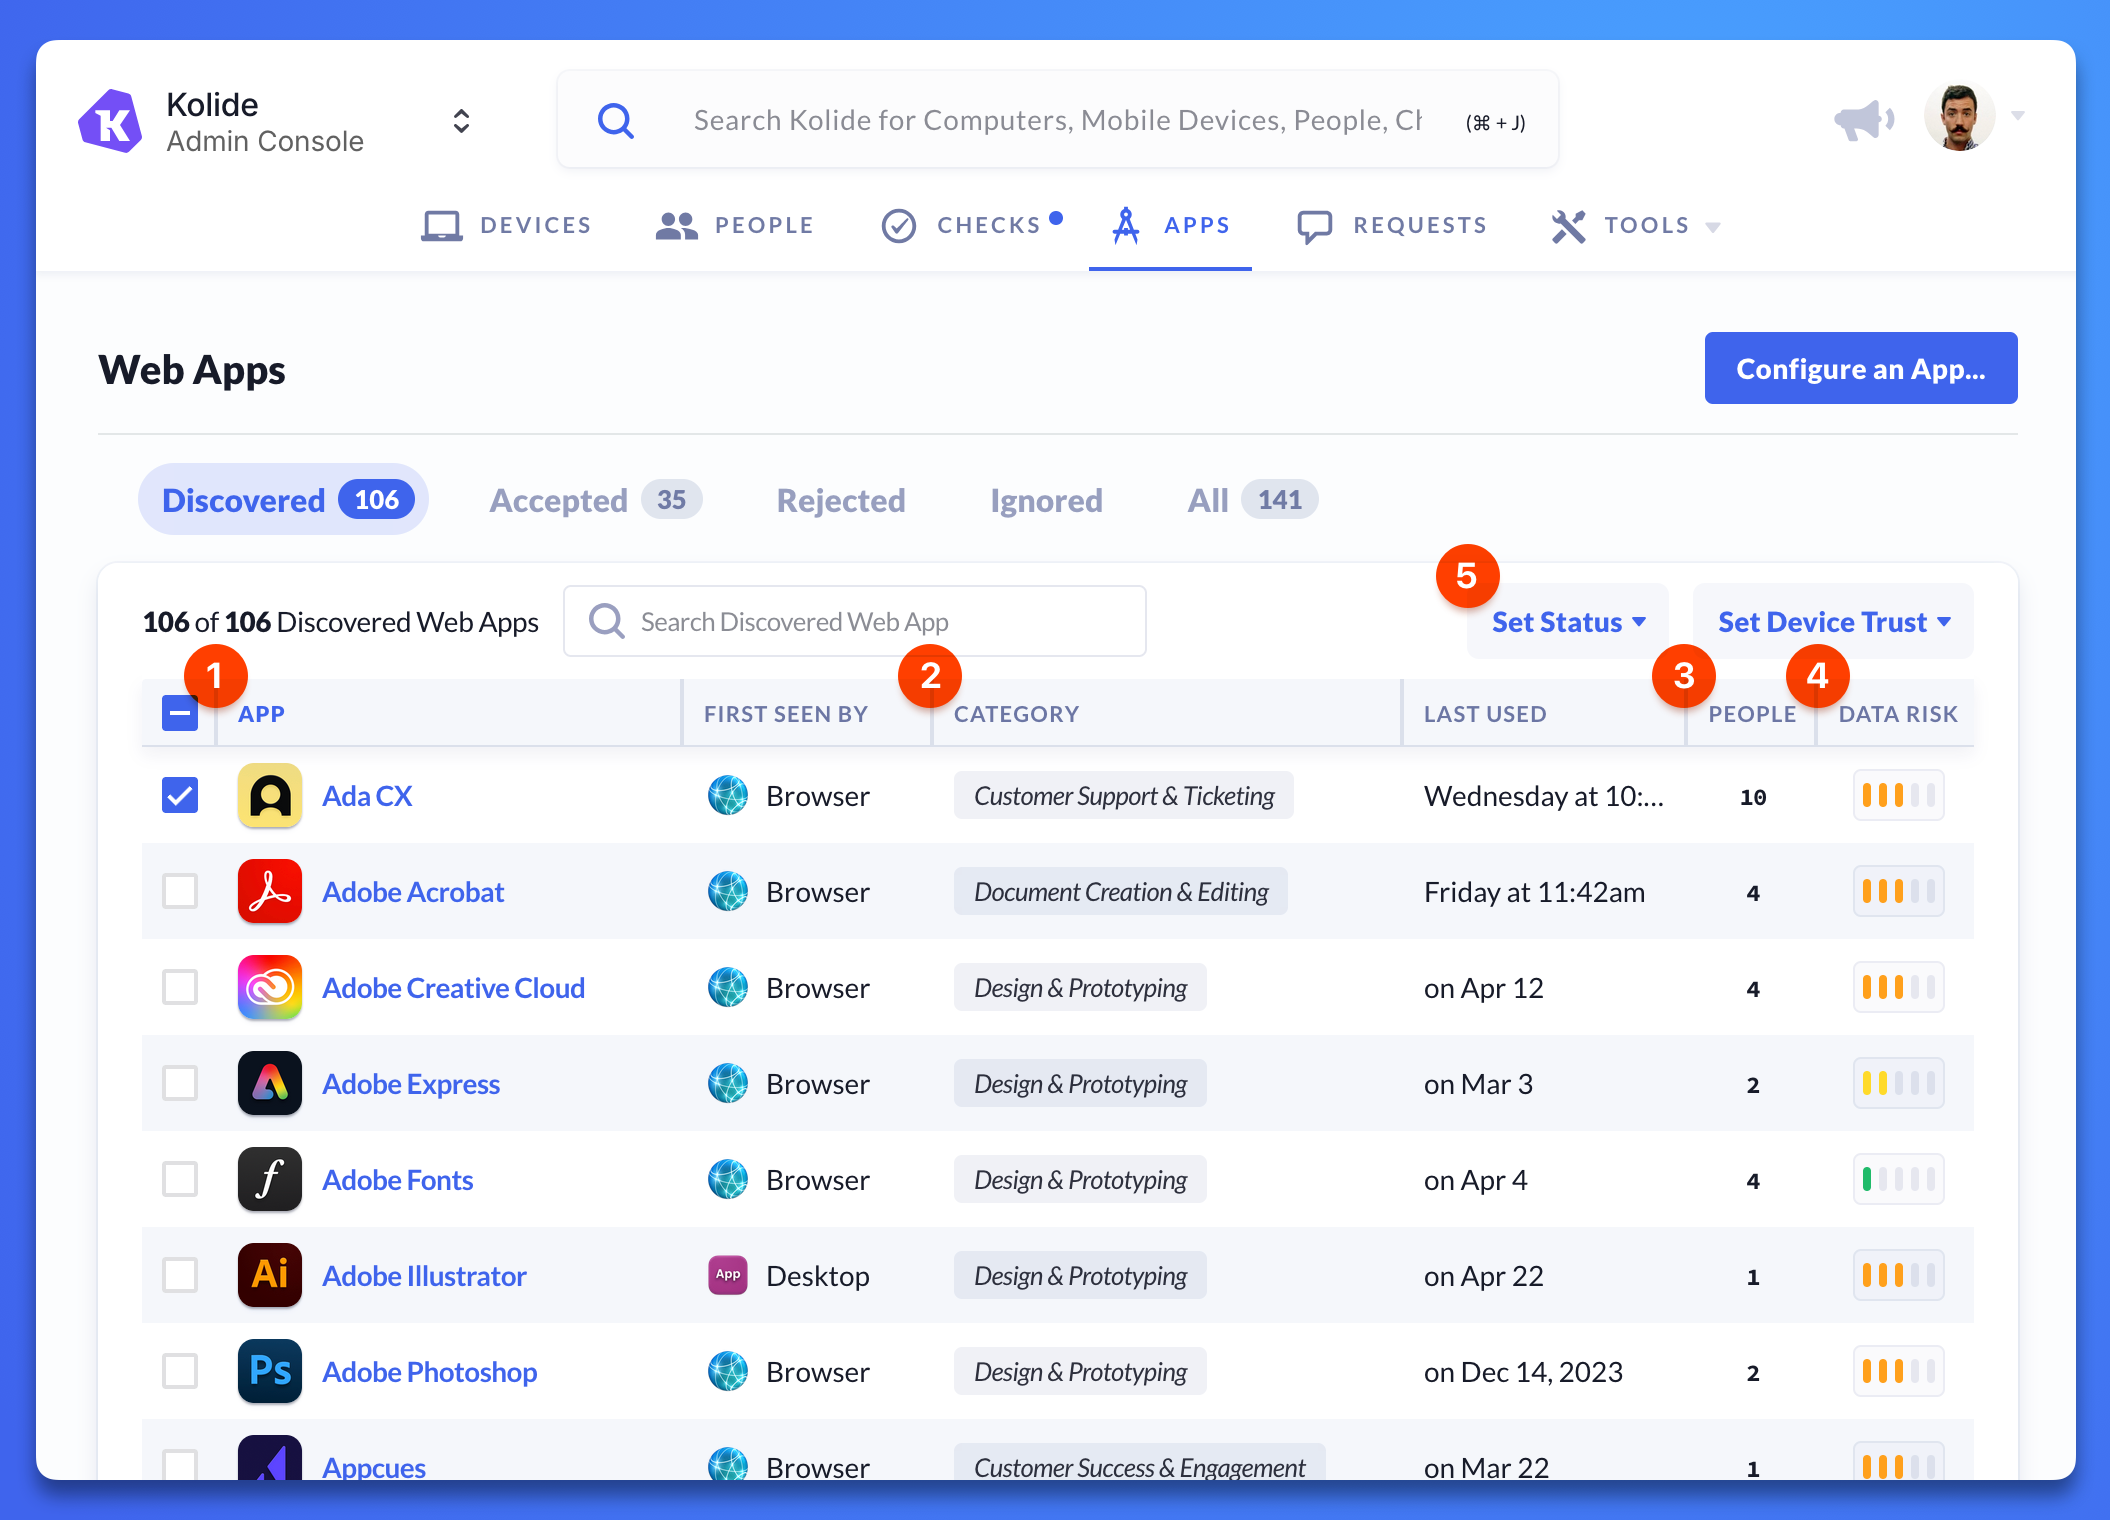
Select Apps in the Device Trust navigation menu to open the Discovered tab of the Web Apps page. This provides an overview of apps Device Trust has detected usage of by your team members.
The Discovered apps page is like an inbox – as you reason about the apps Device Trust finds, you can move them from their initial status of Discovered to Accepted, Rejected, or Ignored.
On the overview page you can:
- Review a list of all apps Device Trust has discovered usage of across your organization.
- Discover unfamiliar apps and learn what they might be used for.
- Determine popularity of discovered apps by the number of people using them.
- Review apps’ data risk scores to evaluate which apps represent the greatest concern.
- Assign a status or configure Extended Device Compliance for applications by clicking the checkbox next to an app’s name.
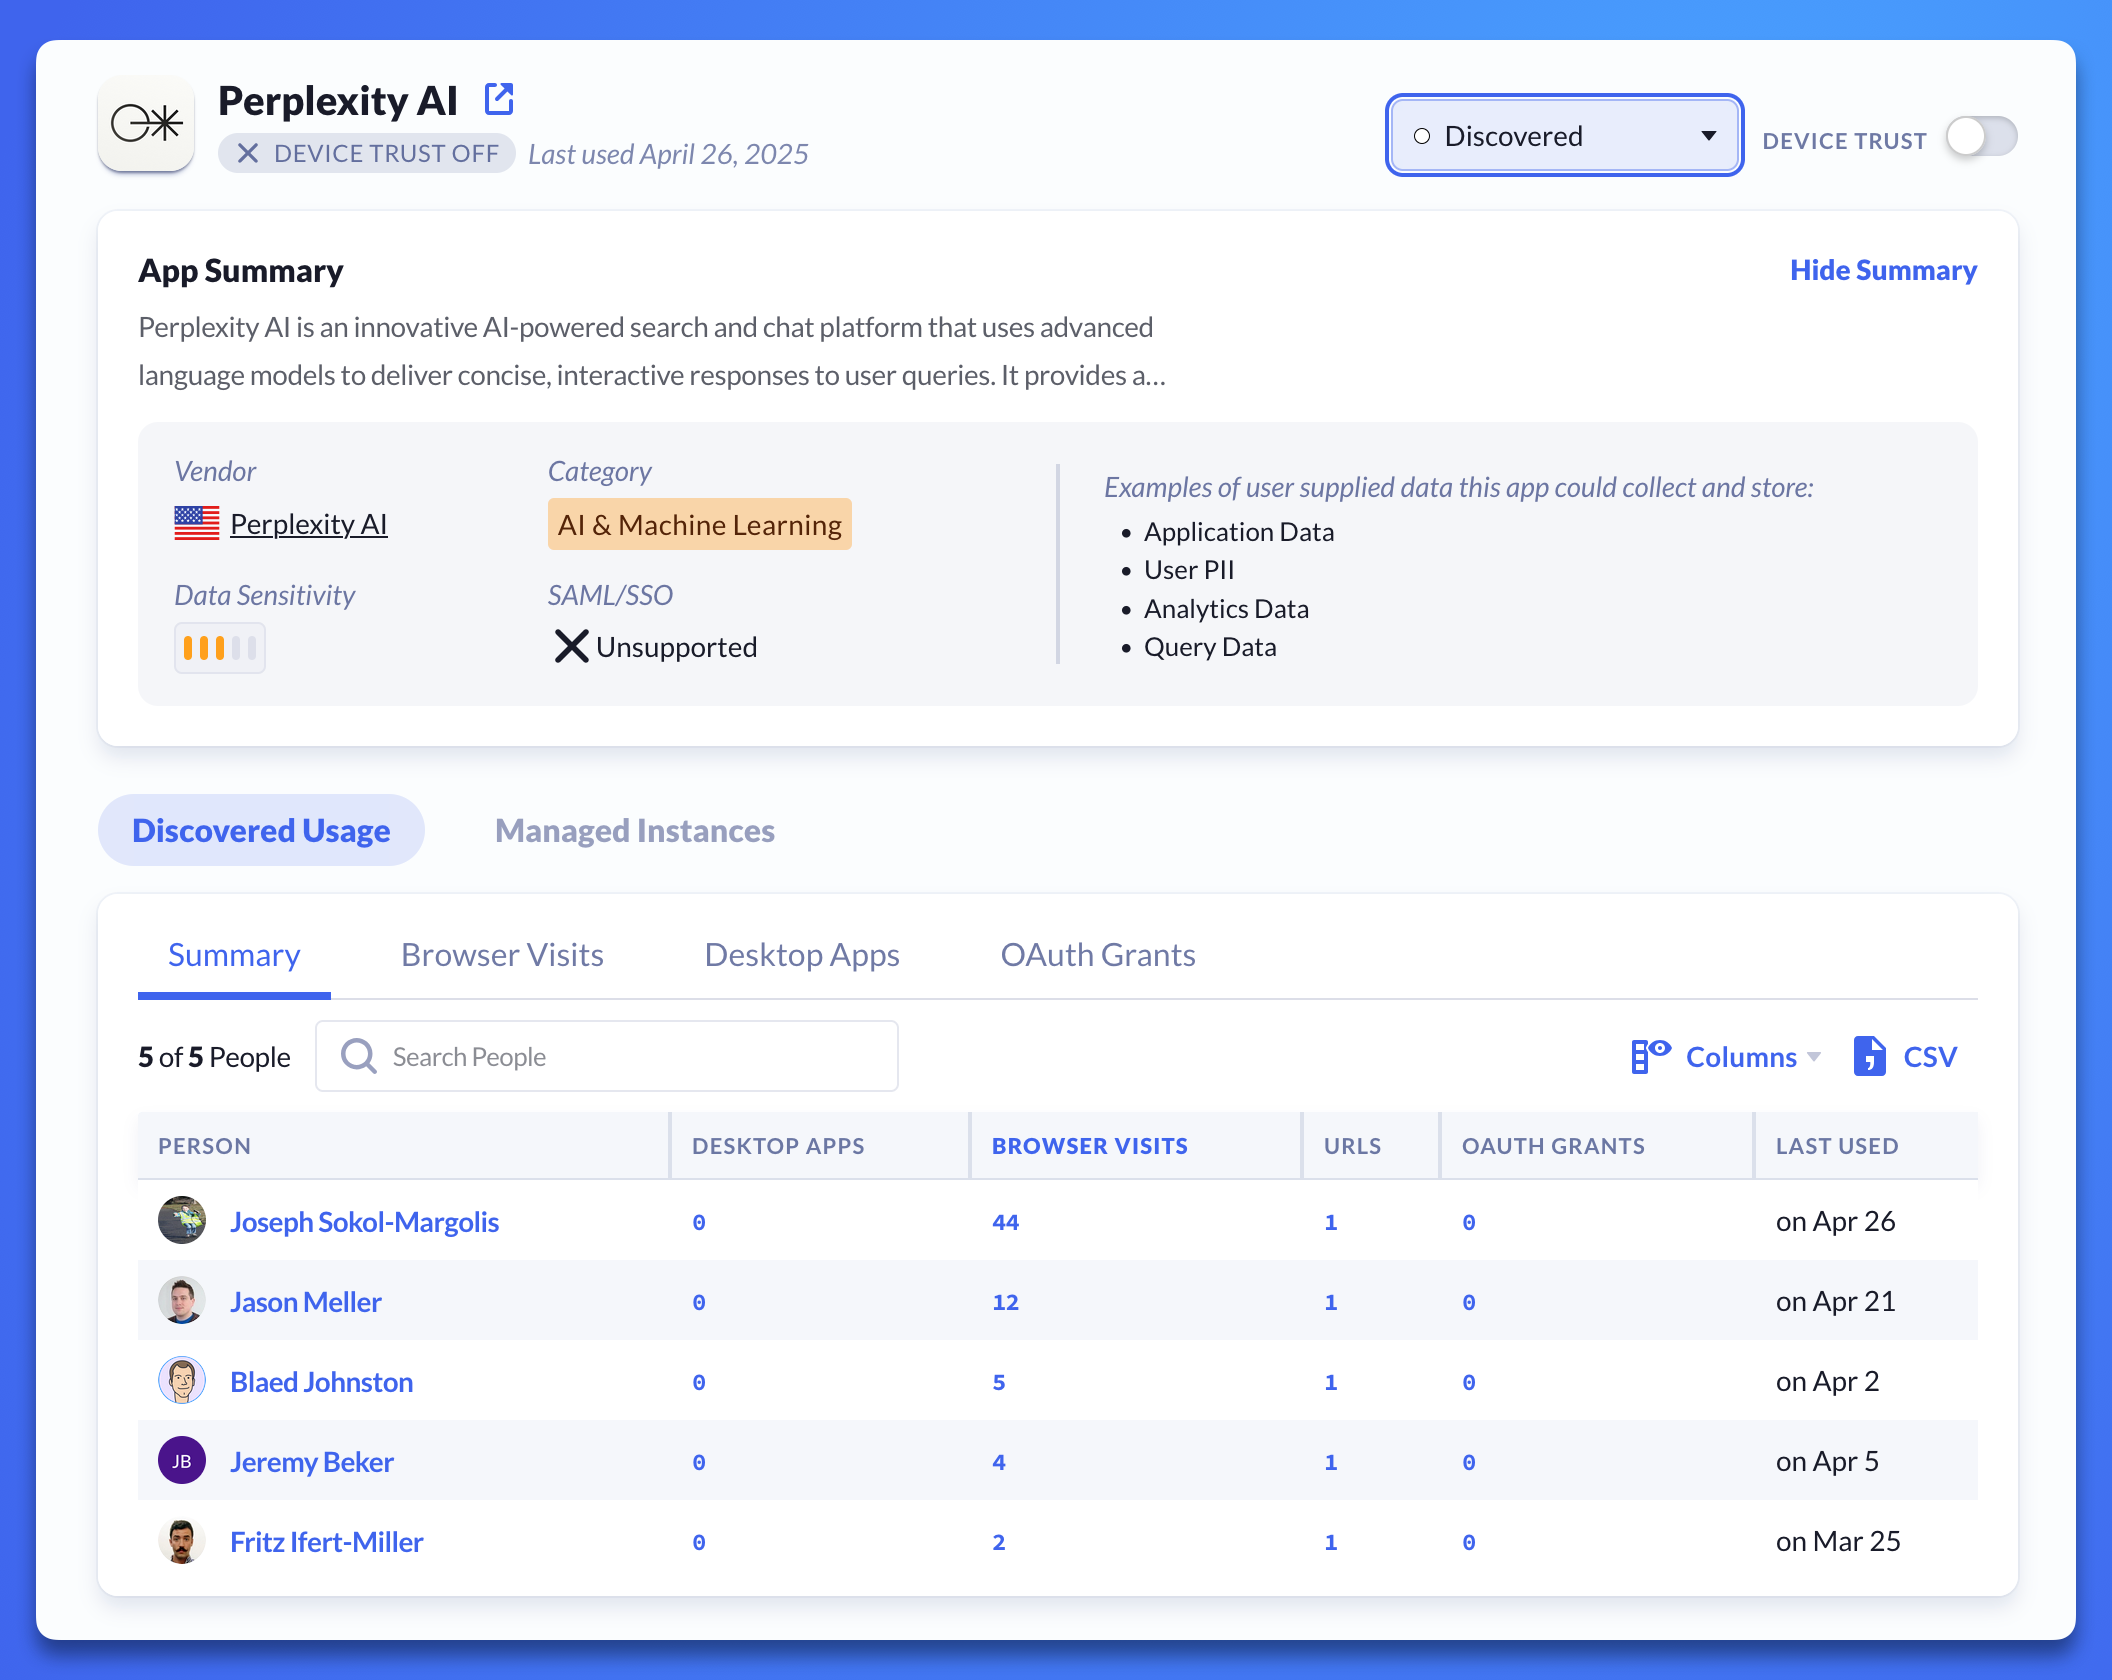
From the Discovered apps overview, you can click any individual app to open its detail page. This detail page provides a description of the app, suggestions about the types of data it may process and store, and a detailed breakdown of its usage across your employees, such as how often it is used and when each employee last used it.
How usage is determined
Device Trust determines web app usage through on-device queries run by its agent. These queries retrieve a count of total visits the end user has made to work-related web apps in their browser, and also detect installations of companion desktop apps (for example, Grammarly Desktop). Device Trust makes sure app discovery preserves your employees’ privacy by limiting what data is collected, and scoping that collection to only apps belonging to a pre-defined list of work-related web apps.
Usage information detected by Device Trust is an estimate only. It does not capture browser visits that are made through Private Browsing or Incognito sessions. It will also not report any visits made that were subsequently cleared from the browser’s history.
Learn more about how Device Trust limits its data collection to preserve employee privacy.
Assigning a status to a web app
You can assign apps one of four statuses: Discovered, Accepted, Rejected, and Ignored.
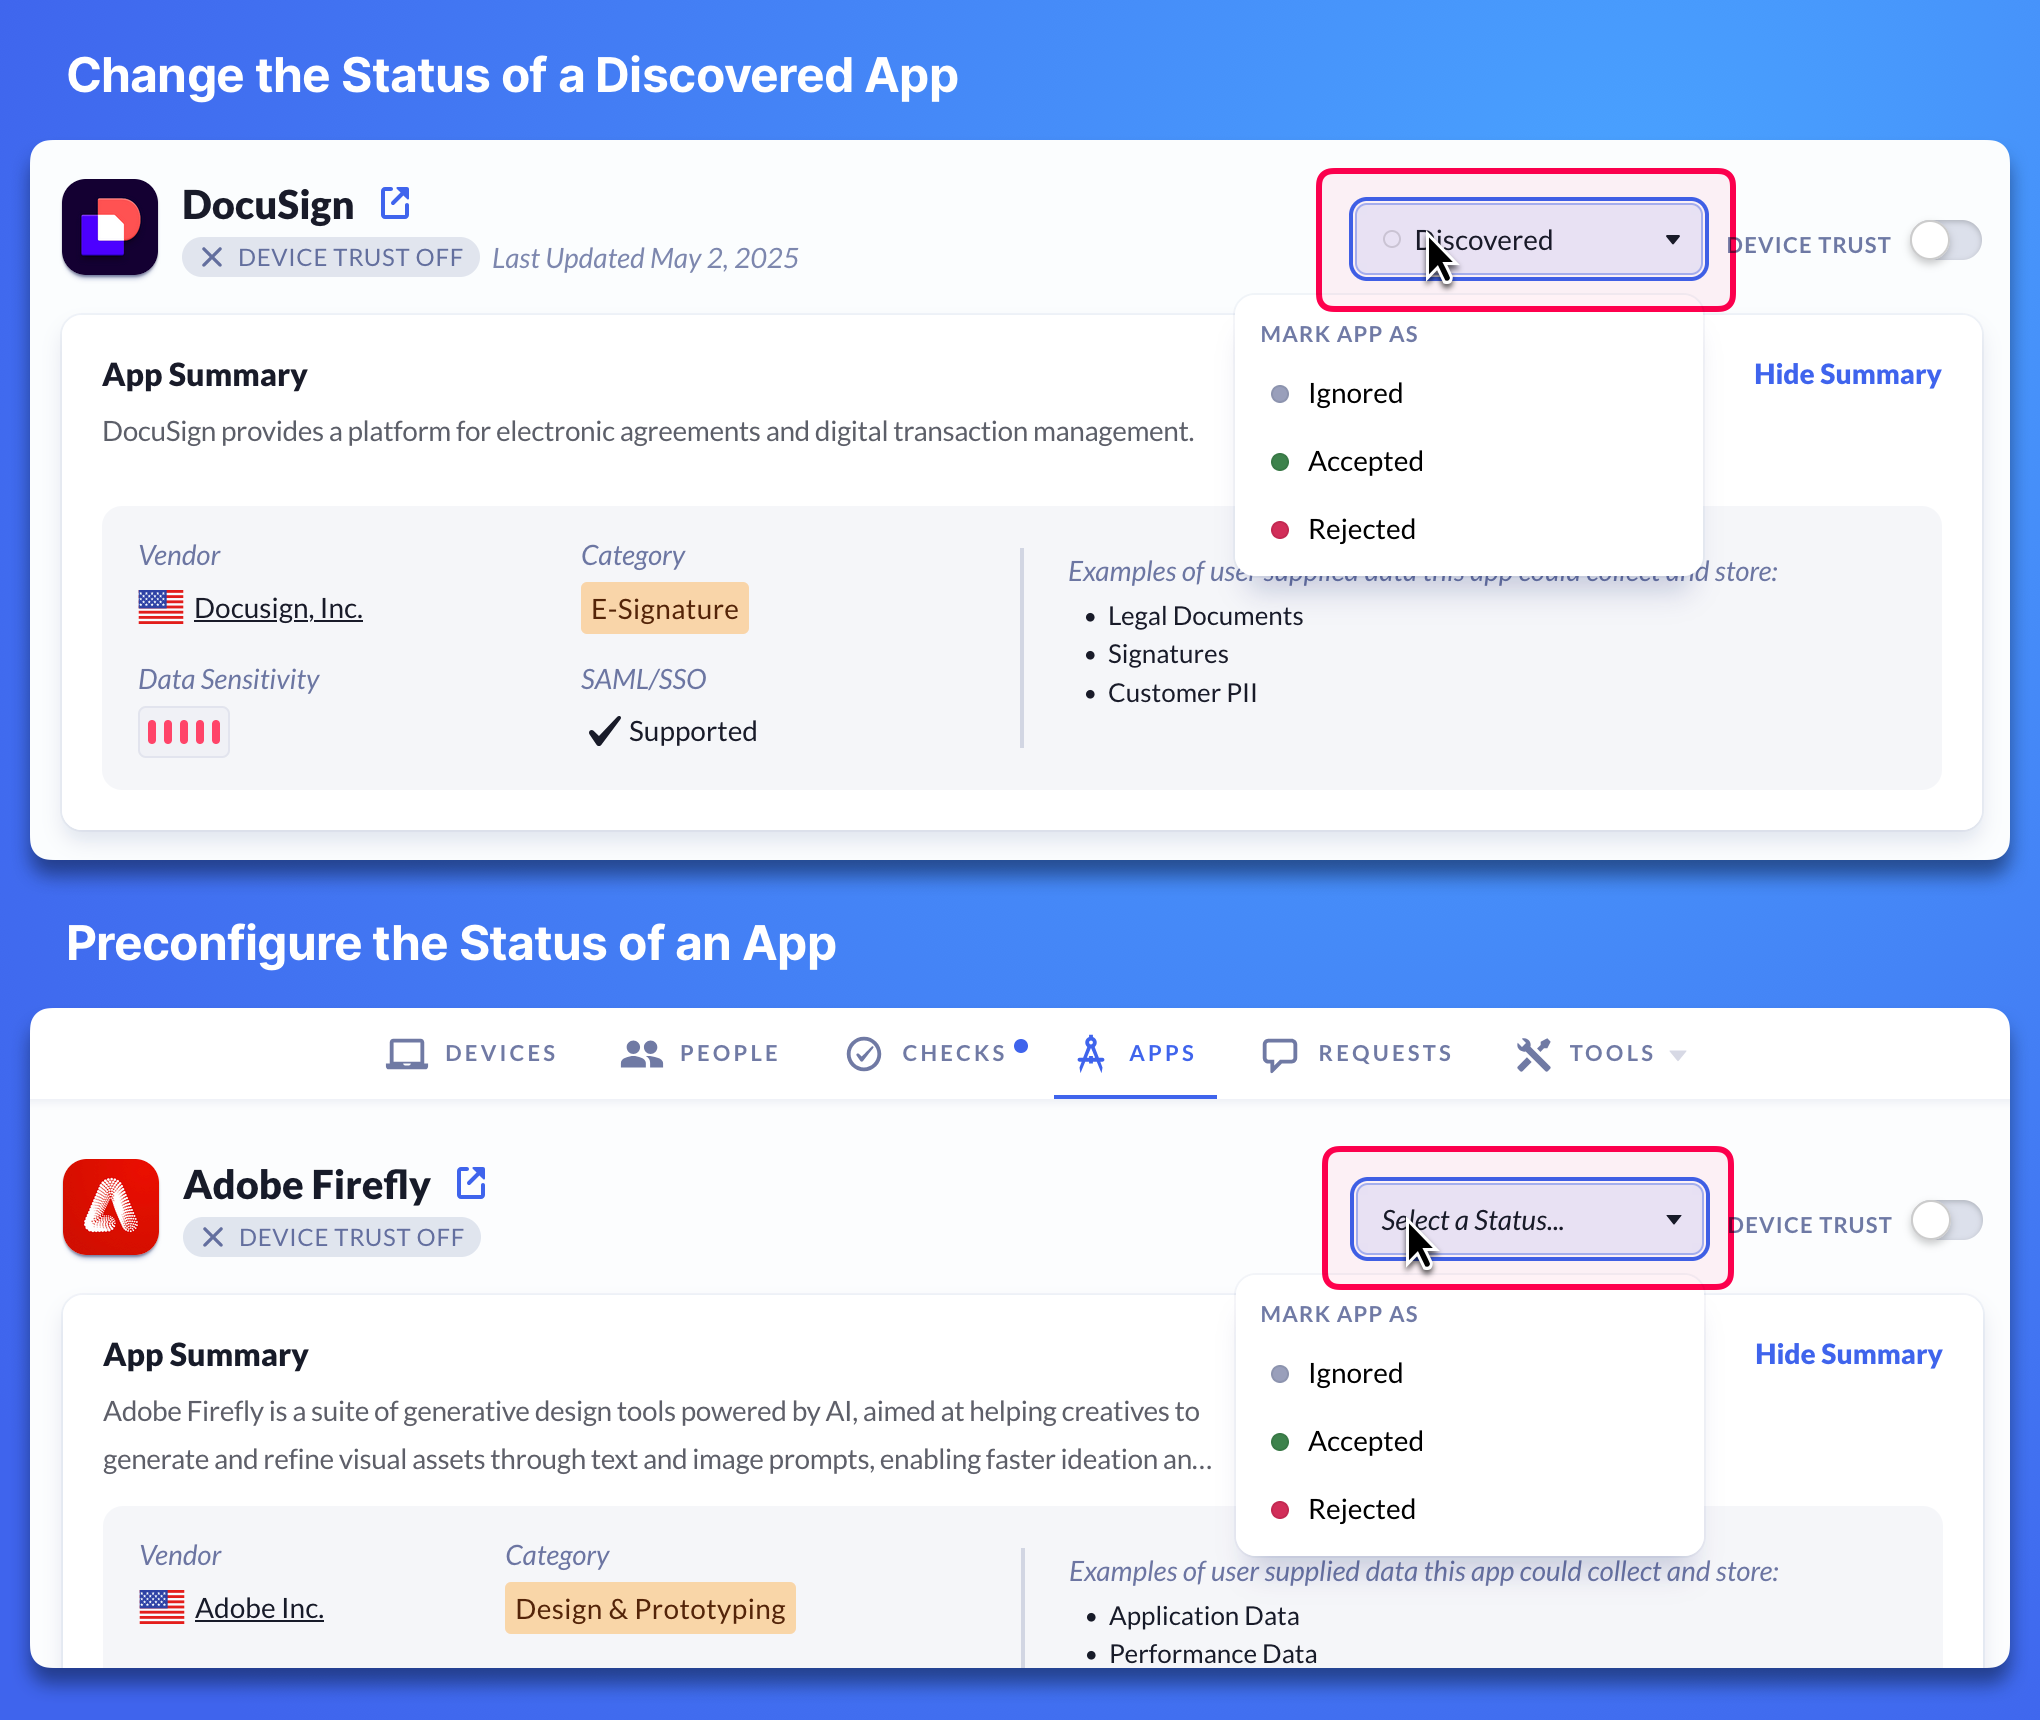
When Device Trust first detects an app, it automatically marks the app as Discovered, unless you’ve preconfigured the app with another status. To preconfigure an app with a status of Accepted, Ignored, or Rejected, select the Configure an App… button at the top right of the page.
To set a status for an app:
- Select the checkboxes next to one or multiple apps.
- Select the Set a Status dropdown and choose a status.
Alternatively, you can click into an individual app’s detail page, then select the Mark App As dropdown and choose a status.
You can choose one of the four following statuses:
- ⚪ Discovered: Web apps your team members are using that match Device Trust’s pre-defined list of business-related apps. You can review discovered apps and choose if you want to protect them with Device Trust. (Only apps with discovered usage can be set to this status.)
- 🟢 Accepted: When you turn on Device Trust for an app, it will be automatically marked Accepted. Marking an app Accepted does not automatically turn on Device Trust.
- ⚫ Ignored: If you don’t want an app to appear in your Discovered apps list, select Ignored. The app will be moved to the Ignored apps list on the Web Apps page, and you can choose to accept or reject it at a later date.
- 🔴 Rejected: If you aren’t interested in adding Device Trust to an app, select Rejected. When you mark an app Rejected, Device Trust is automatically turned off for that app.
App data risk
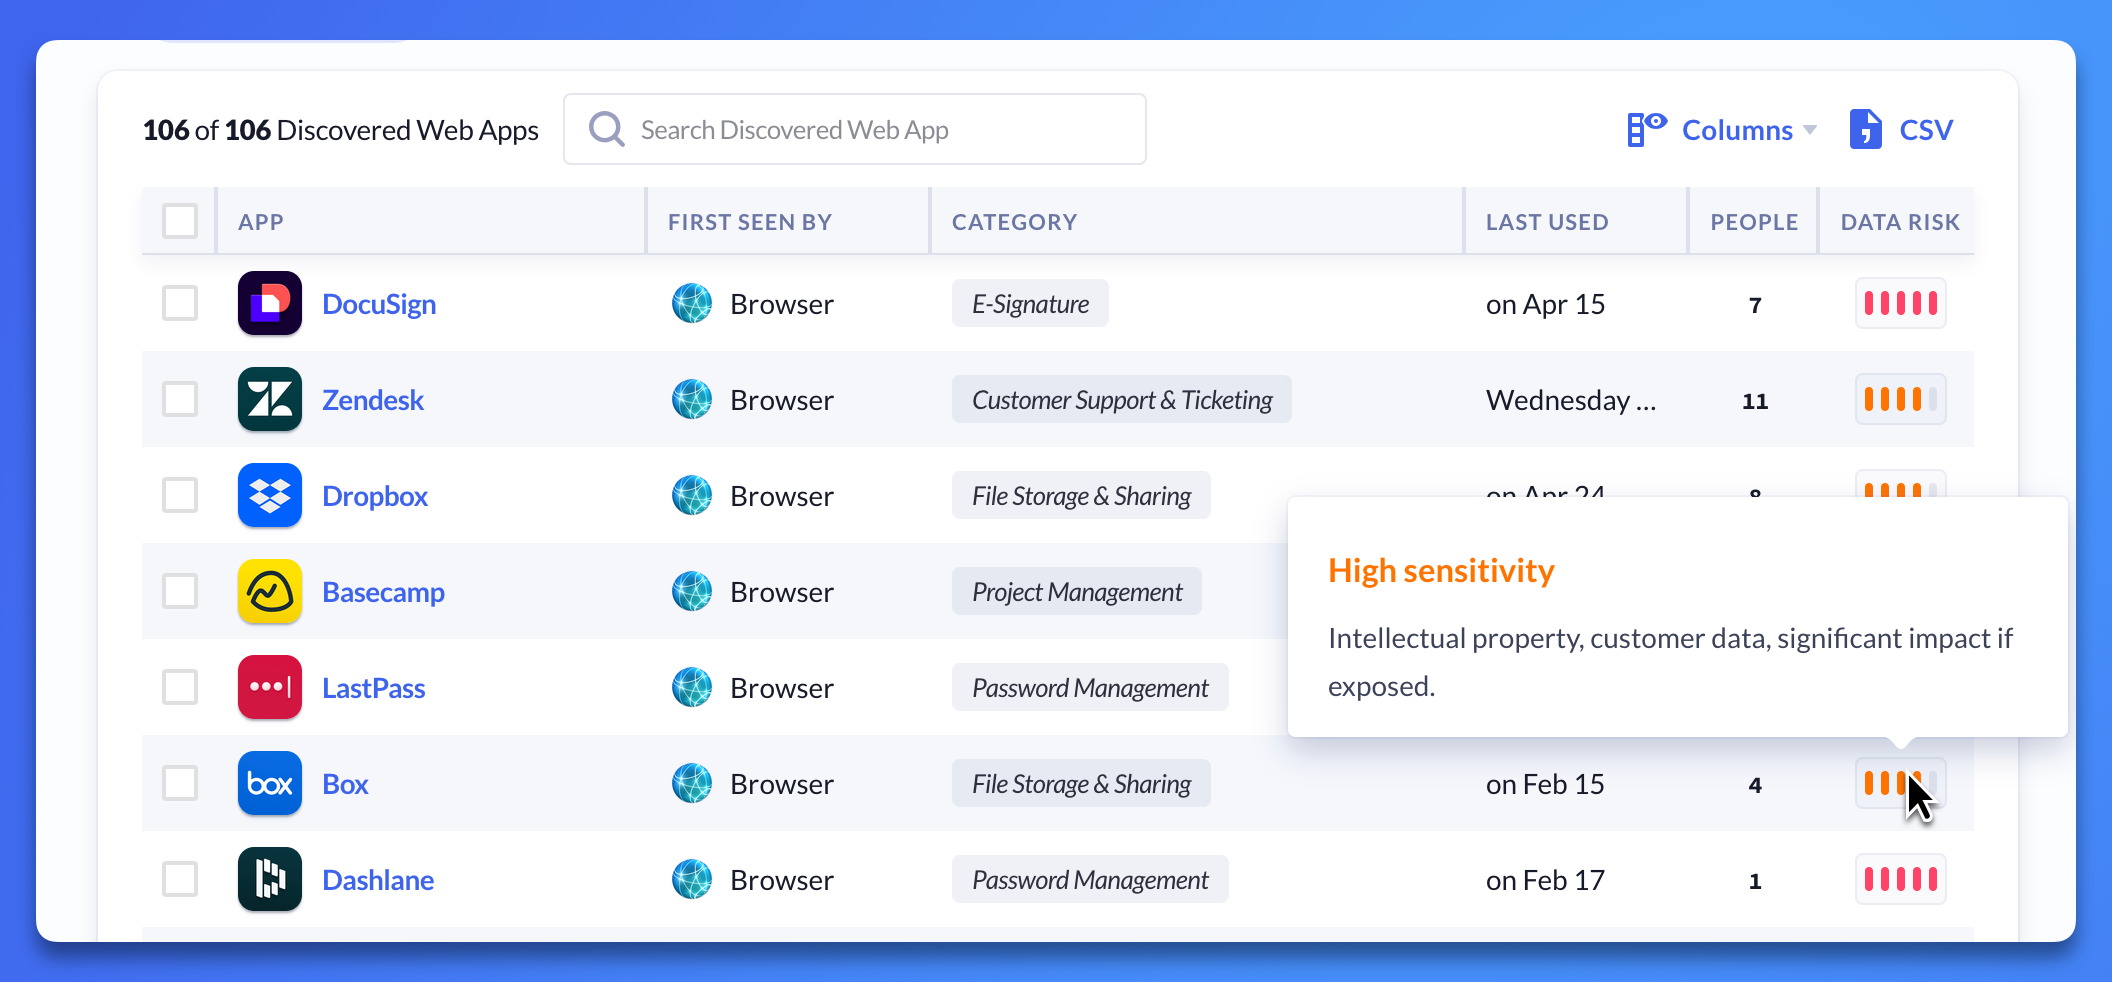
Each web app has an associated data risk level. You can sort by data risk to quickly identify which apps may be important to protect with Device Trust. Device Trust uses the following labels to categorize data risk:
| Data risk level | Description |
|---|---|
| 1: Non-sensitive data | Publicly available, minimal risk |
| 2: Low sensitivity | Basic internal data, general operations |
| 3: Moderate sensitivity | Internal business data, non-critical personal data like names or emails |
| 4: High sensitivity | Intellectual property, customer data, significant impact if exposed |
| 5: Critical sensitivity | Financial records, PII, legal documents, or anything that could cause major business harm |
My Data Privacy
As part of the Discovered apps feature, end users will see an “App Activity” section in their End User Portal - My Data Privacy page if their organization’s account includes access to the Extended Device Compliance feature.
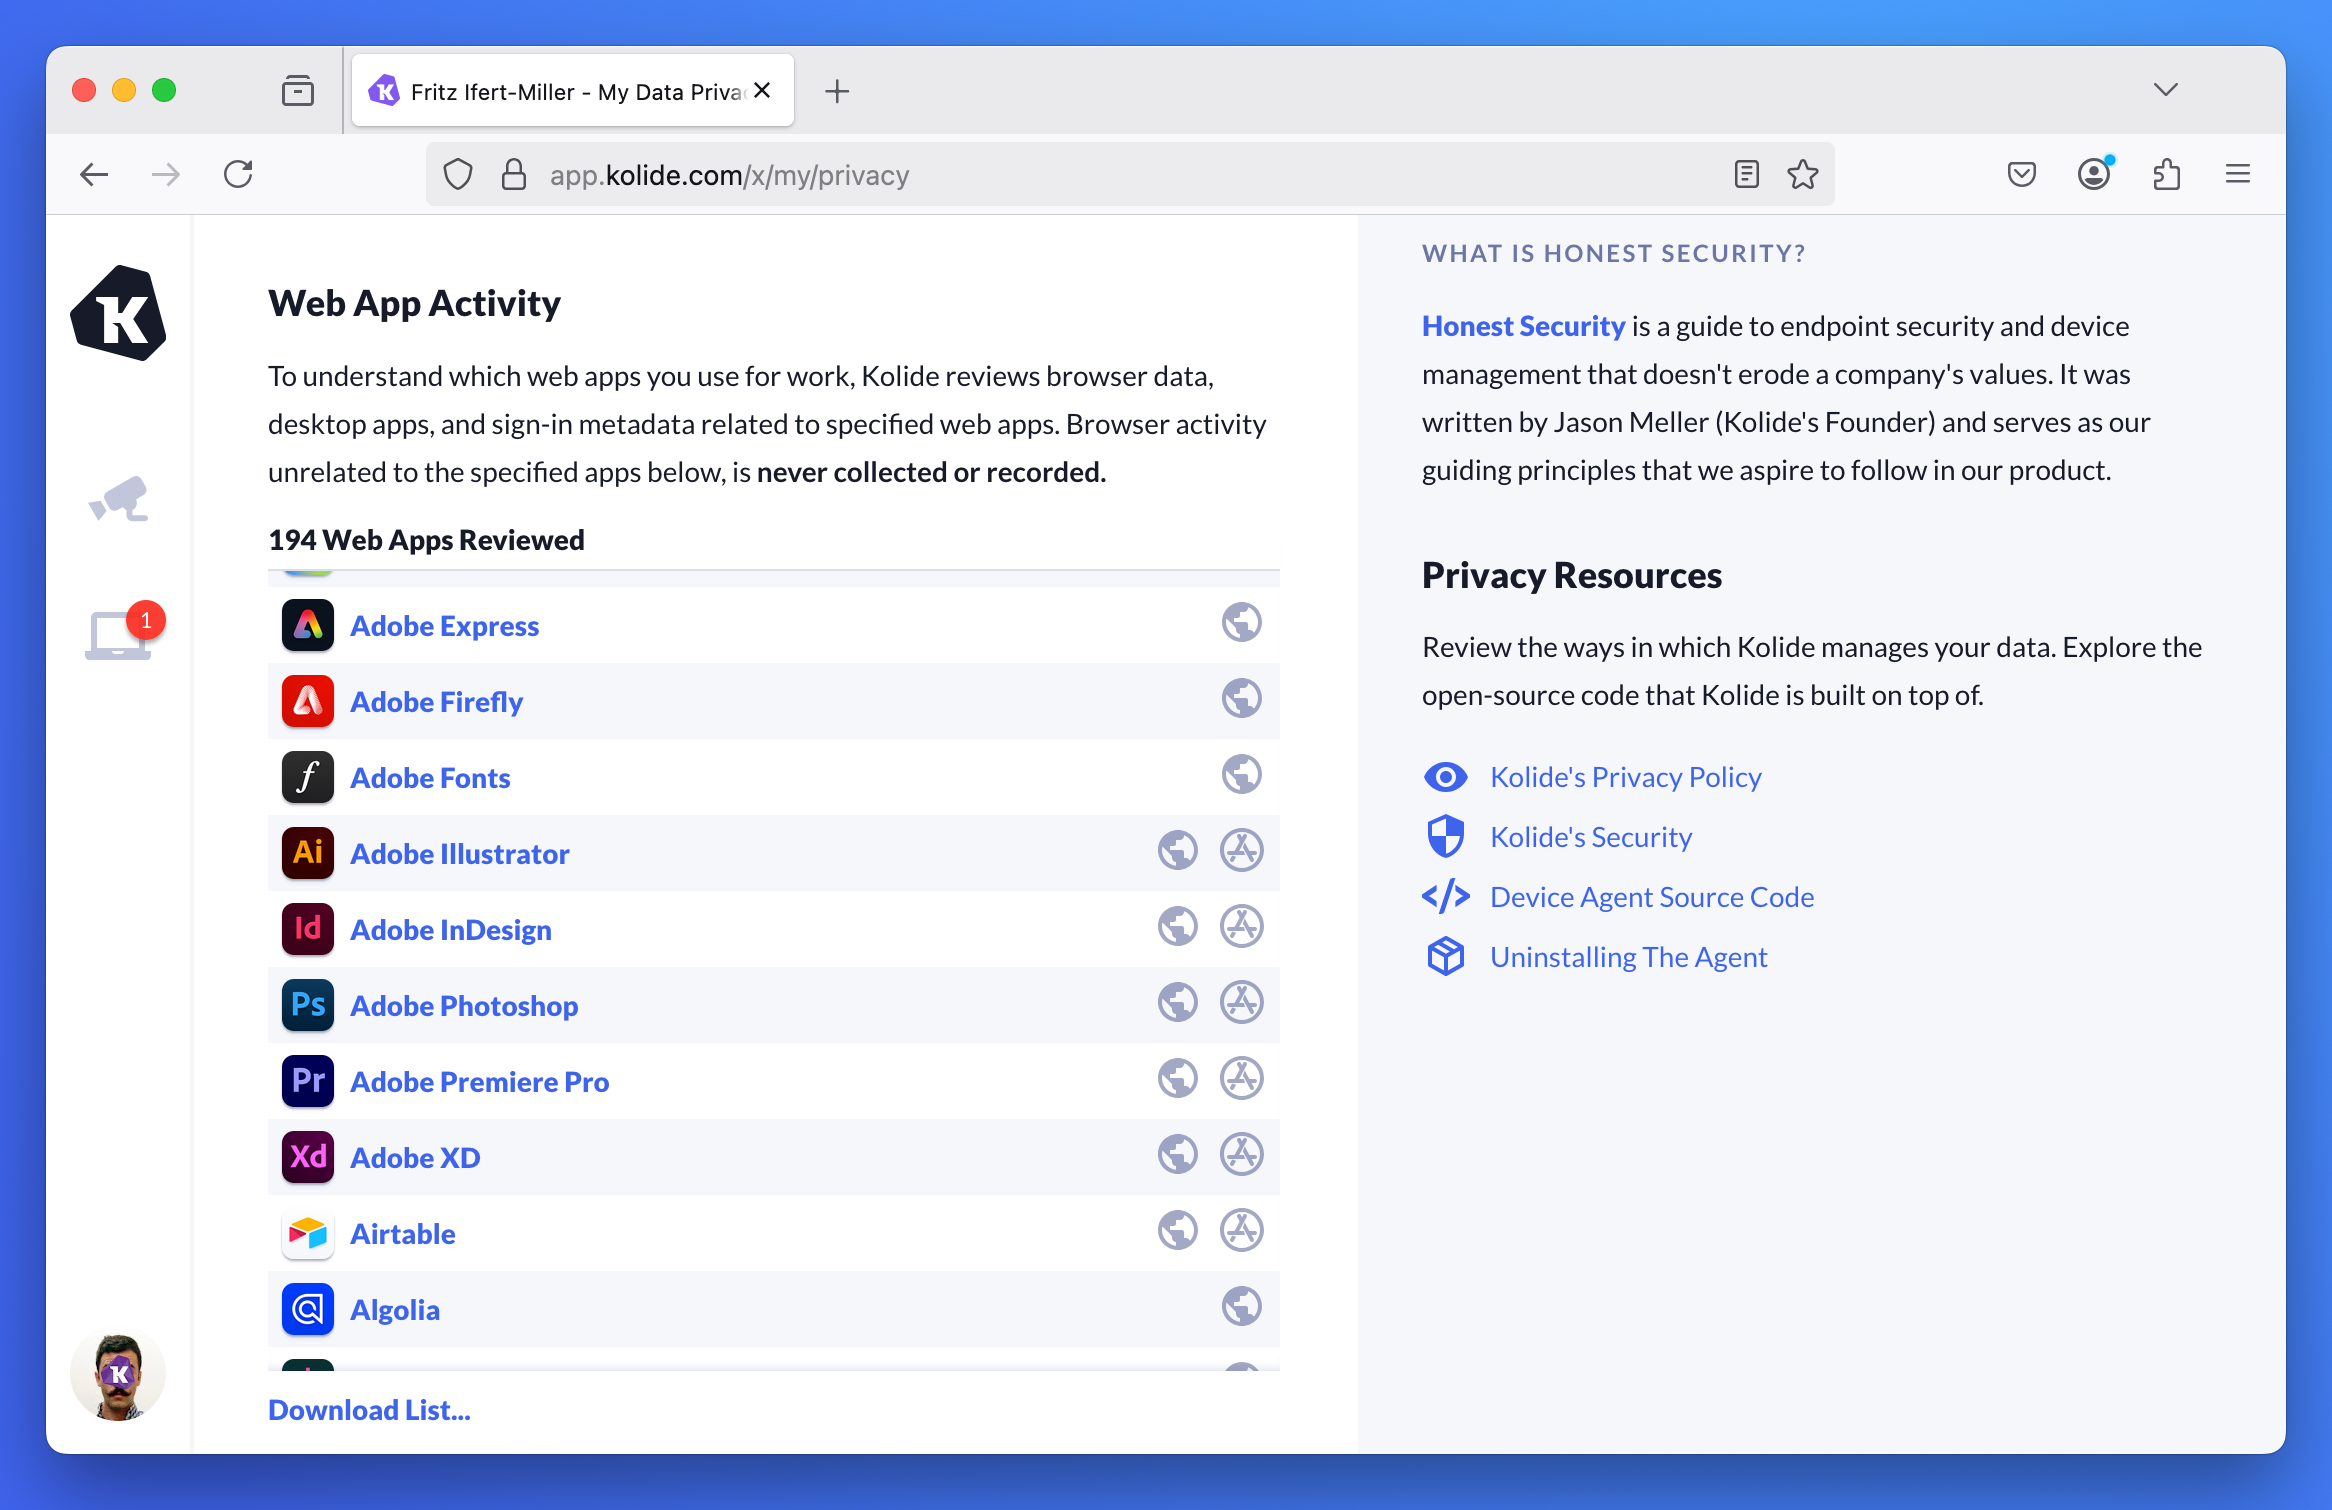
The App Activity section shows end users which work-related apps Device Trust reviews for security and compliance purposes. If browser activity collection is turned on, Device Trust may review browser data, desktop apps, and sign-in metadata related to more than 200 specified work-related apps. Browser data and installed apps are collected only on desktop platforms such as macOS, Windows, and Linux.
If browser activity collection is turned off, Device Trust still reviews the desktop apps end users have installed on macOS, Windows, or Linux, and OAuth sign-in grants from Google Workspace for the specified apps listed in App Activity.
Device Trust only collects or records activity related to the apps listed in App Activity. Browser activity unrelated to those specified apps is not collected or recorded.
The pre-defined list of work-related apps can’t be expanded or changed by administrators. To request a new app be added, contact 1Password Device Trust support. Additions are made directly to the Device Trust source code and go through rigorous code review.
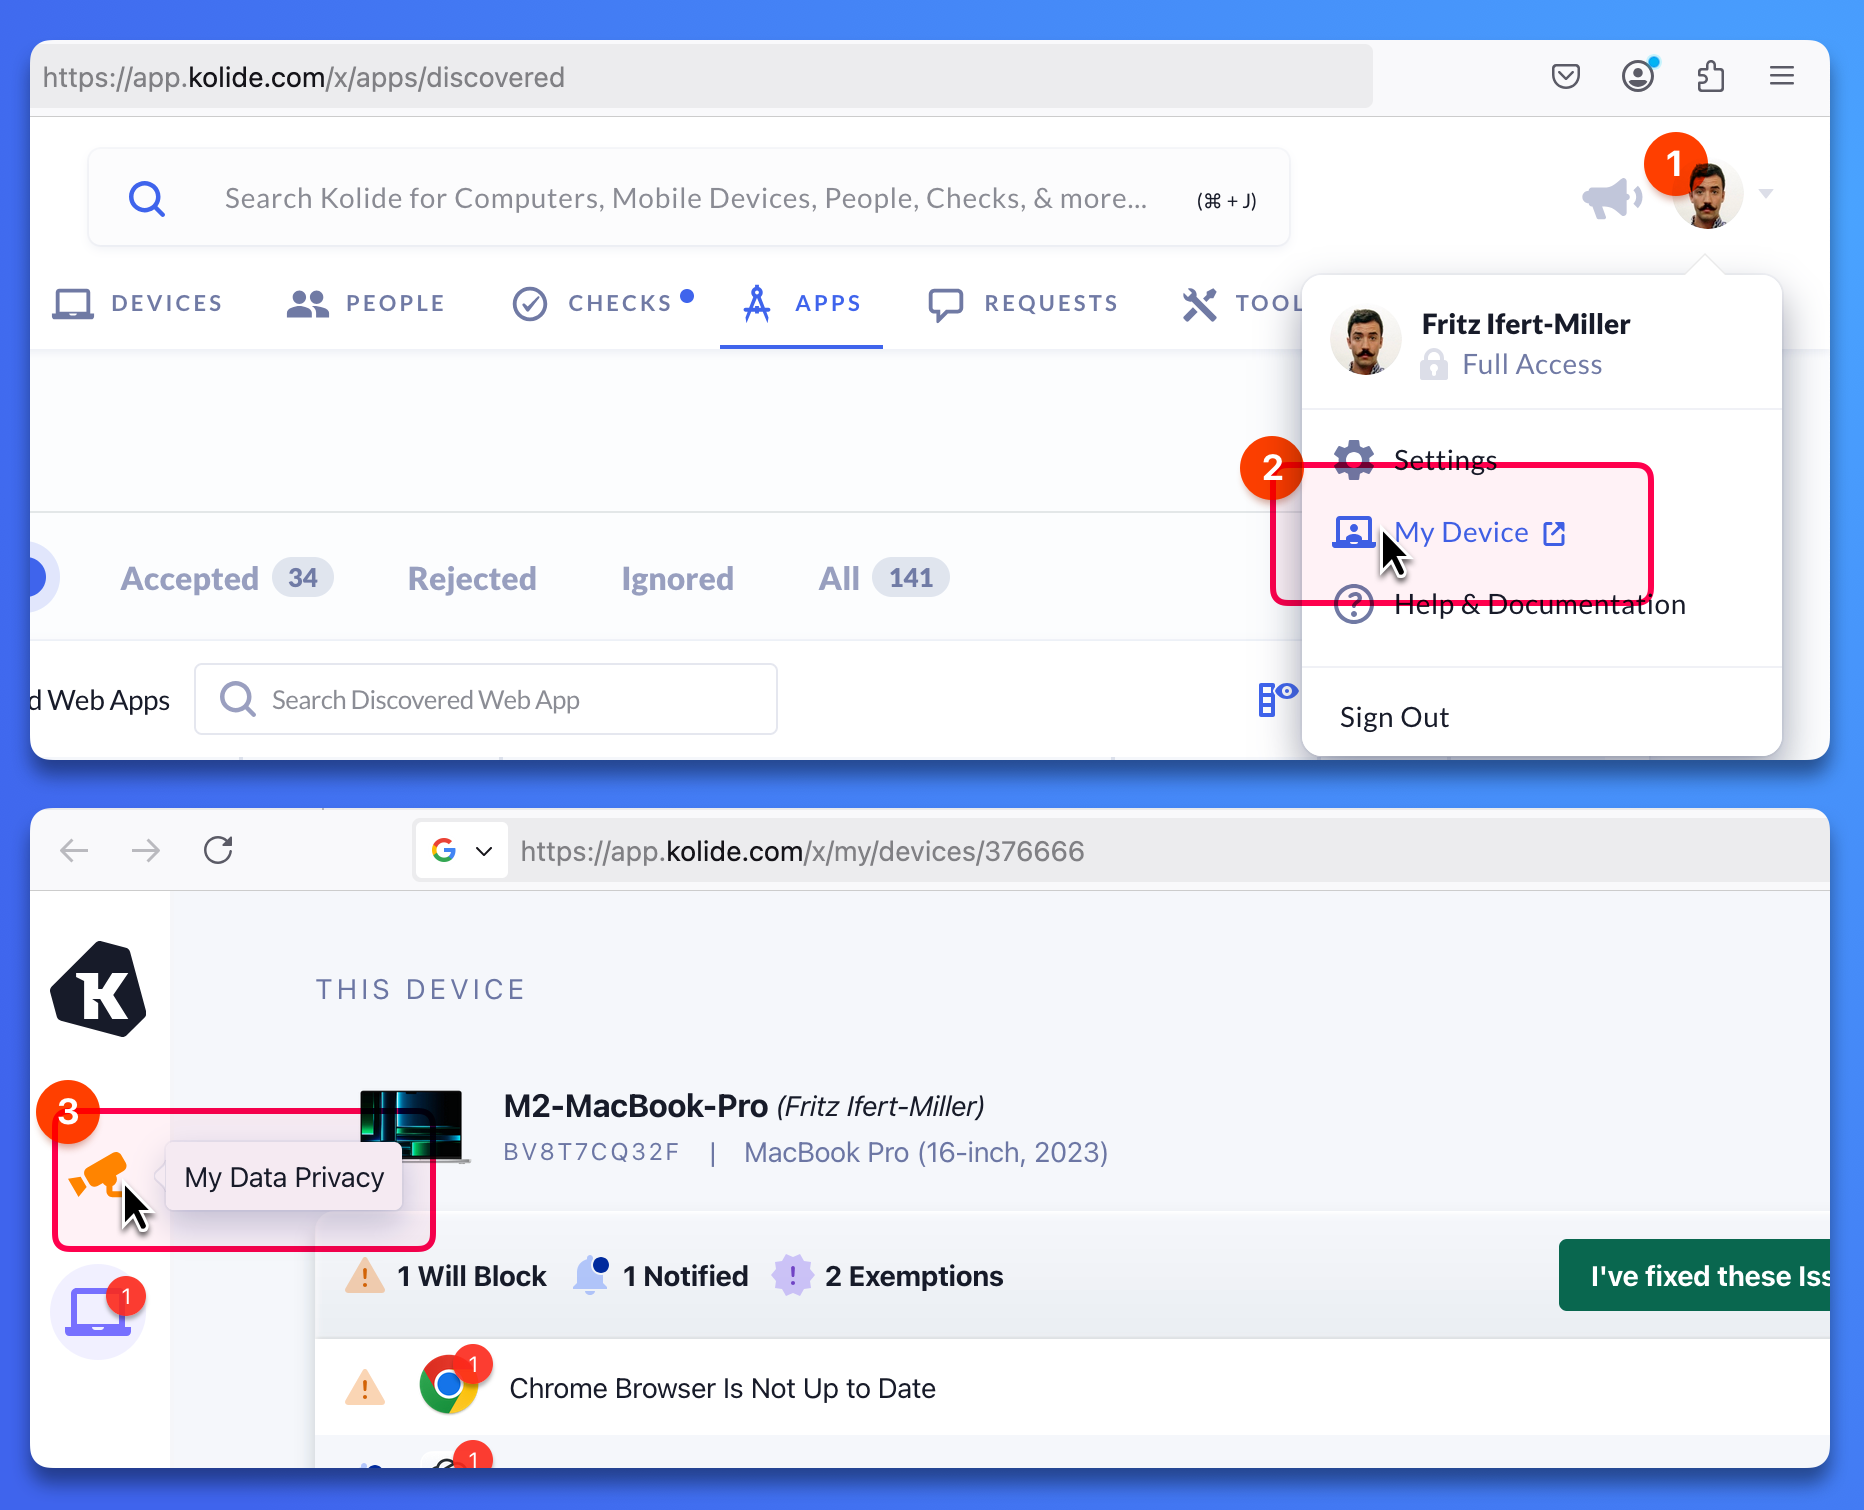
To access the My Data Privacy page, visit https://app.kolide.com/x/my/privacy.
You can also select your profile in the top-right corner of Device Trust and select My Device, then select the security camera icon.
Extended Device Compliance
Extended Device Compliance allows you to extend device health Checks to the non-SSO managed and unmanaged web applications your employees use for work.
When your team members attempt to access protected web apps, the 1Password browser extension checks their device health using Device Trust and provides self-serve remediation instructions for any failing Checks directly within the browser. If your team members don’t resolve failing Checks within a specified time frame, the 1Password extension obscures the underlying page, impeding access to the app until the user fixes the problem.
Note
Extended Device Compliance will interrupt and block access to protected apps even if the end user is already signed in.
Extended Device Compliance requirements
Extended Device Compliance requires:
- 1Password Device Trust Core or 1Password Device Trust Connect. Contact 1Password Device Trust support to upgrade.
- 1Password’s Enterprise Password Manager.
- The 1Password browser extension:
- Chrome
8.10.80.23or later - Firefox
8.11.4or later - Safari
8.11.4or later
- Chrome
- A Chrome-based web browser (for example Google Chrome, Chromium, Microsoft Edge, Brave, or Arc), Firefox, or Safari
- A Mac, Windows, or Linux computer. Mobile devices aren’t currently supported.
To learn more about how you can obtain this functionality, contact 1Password Device Trust support.
Note
Set up Extended Device Compliance
Step 1: Choose who Extended Device Compliance applies to
To choose which users experience Extended Device Compliance, select your profile in the top-right corner of the Device Trust admin console, select Settings, then choose Extended Device Compliance in the sidebar. You’ll see three options for applying Extended Device Compliance to your organization:
- No one (feature disabled): Extended Device Compliance is disabled and not applied to anyone.
- Select groups of people: Find and select the 1Password groups you want to apply Extended Device Compliance to. This is helpful when you’re rolling out the feature to a specific set of people and testing Extended Device Compliance.
- Everyone: Extended Device Compliance is applied to all People imported to Device Trust from 1Password.
Tip
Step 2: Choose which apps are protected by Extended Device Compliance
You can turn on Extended Device Compliance for an individual app by opening the app details page and toggling on Extended Device Compliance.
You can also turn on Extended Device Compliance for one or many apps on the Web Apps page:
- Select the checkbox next to the app in the Discovered Web Apps list.
- Select the Configure Extended Device Compliance dropdown, then select Enabled.
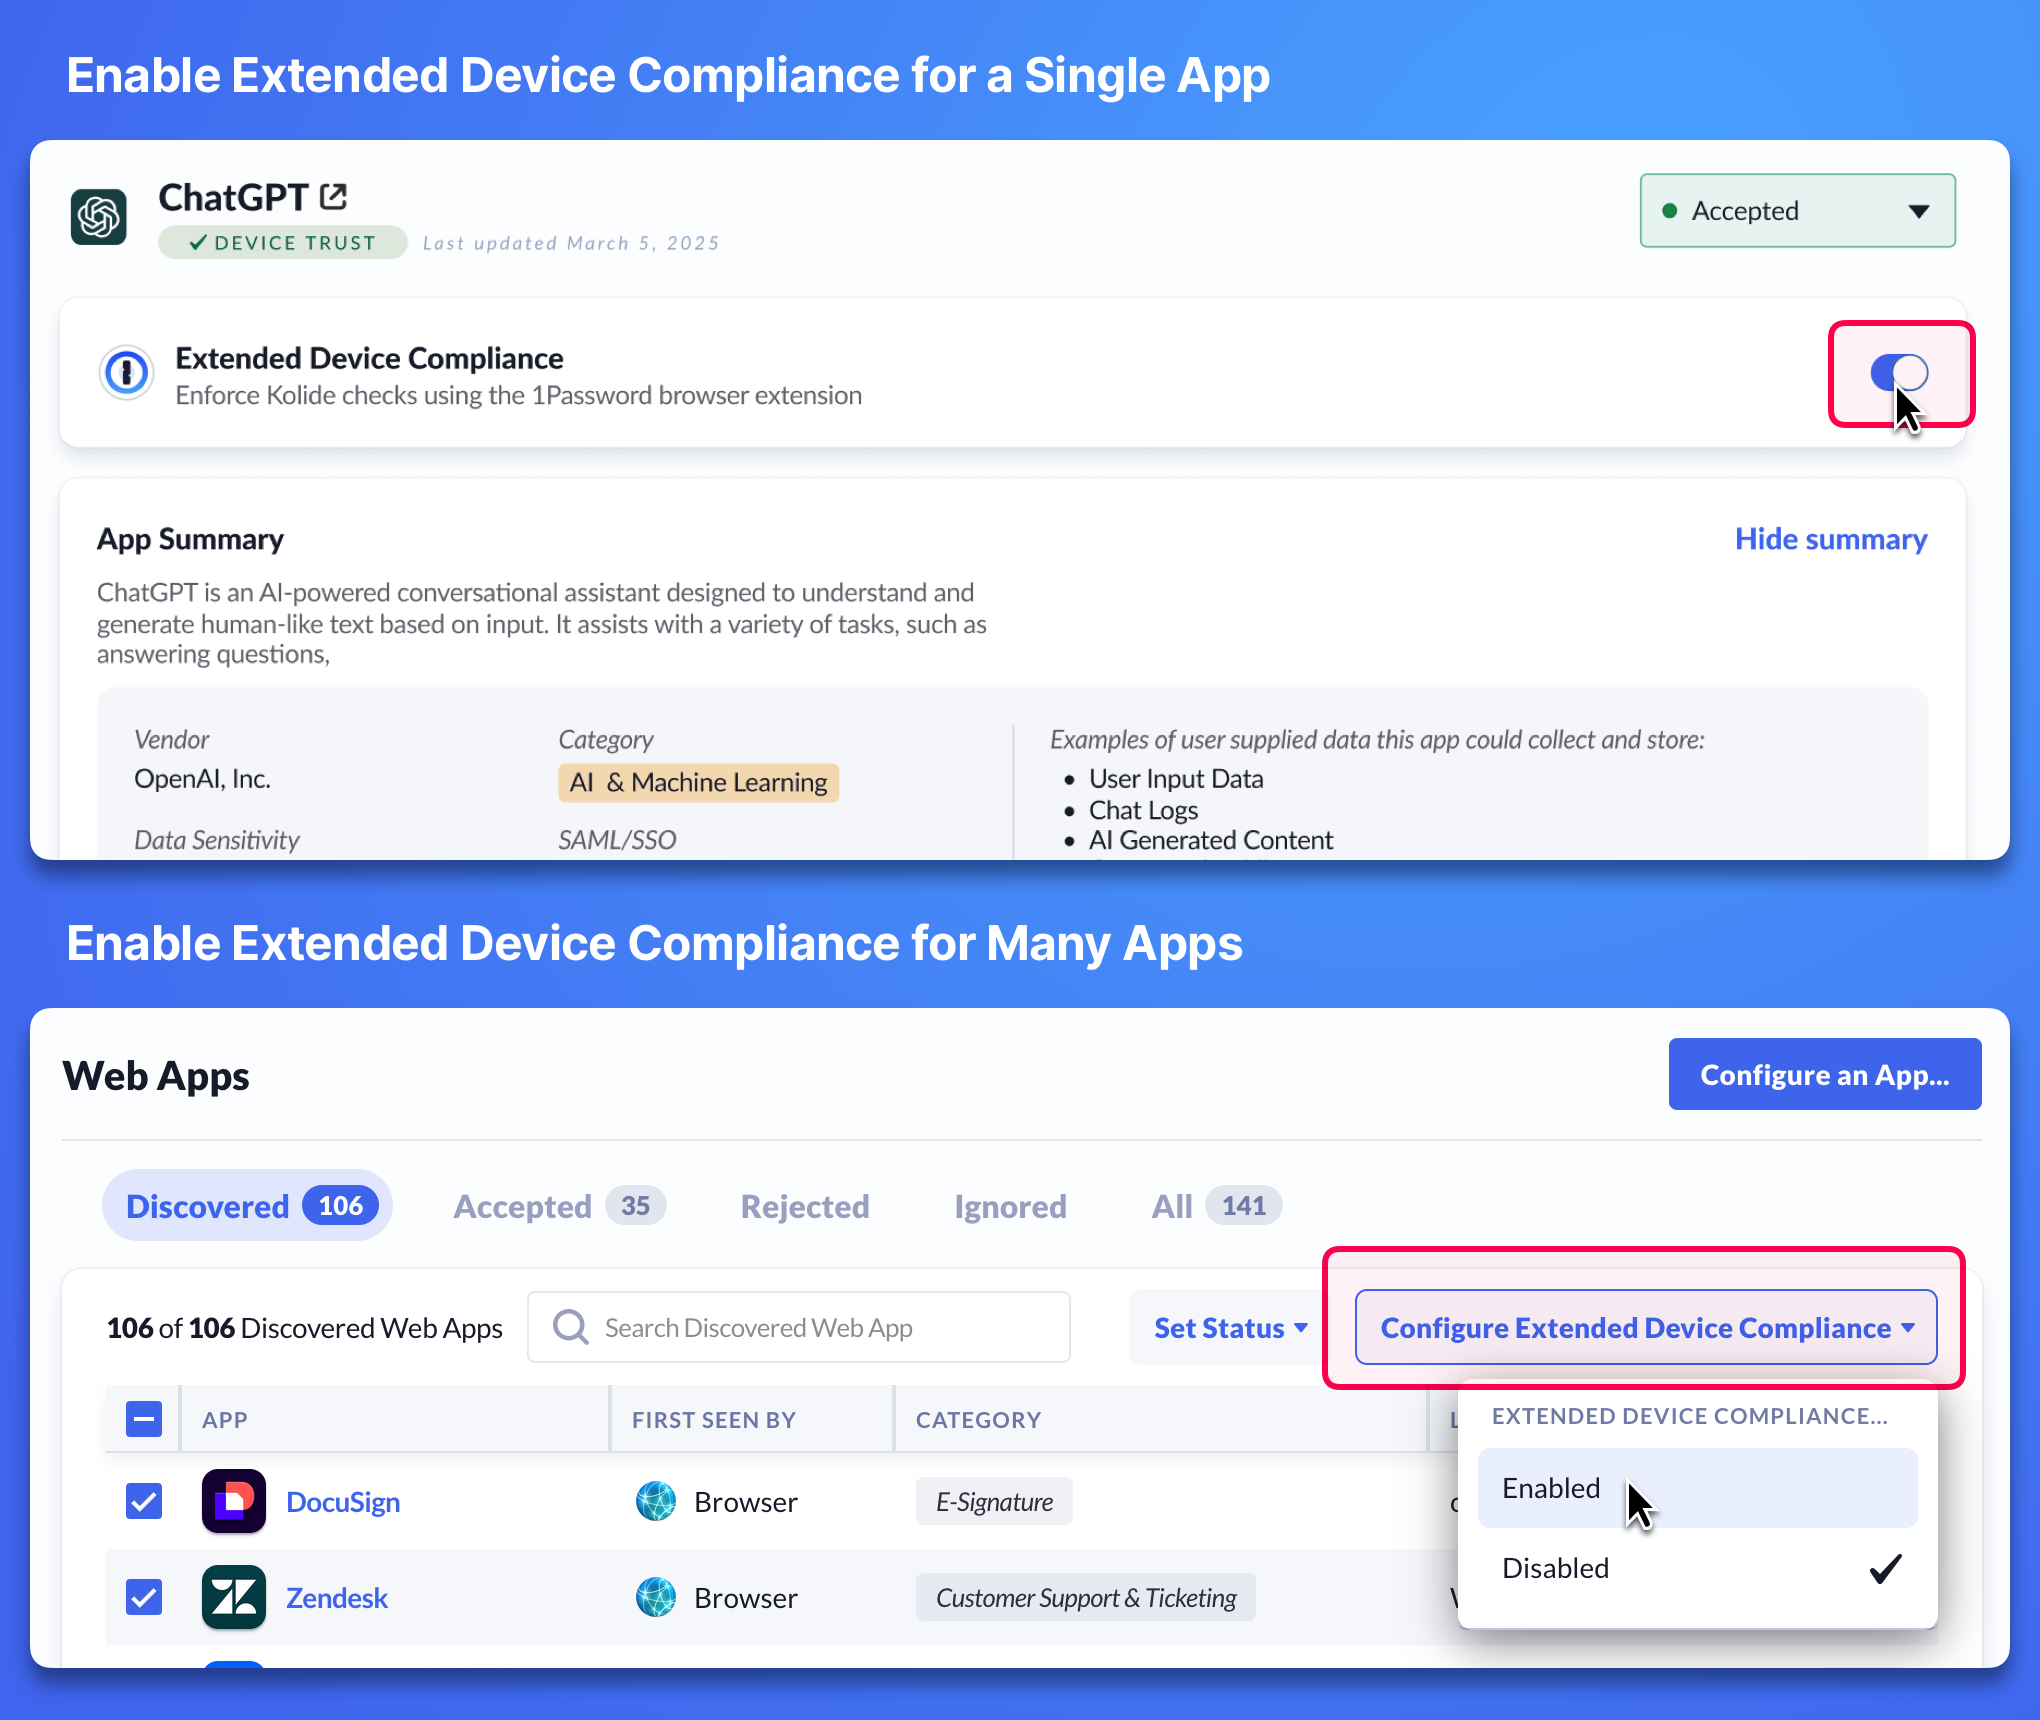
After you’ve turned on Extended Device Compliance for an app, Device Trust will block or interrupt access based on the remediation strategy you configured for any of the failing Checks detected.
Step 3: Require the 1Password browser extension for your organization
To make sure people in your organization experience Extended Device Compliance when using their default browser, you can enable the “1Password - Make sure 1Password Extension is Installed and Enabled on Default Browser” Check in Device Trust.
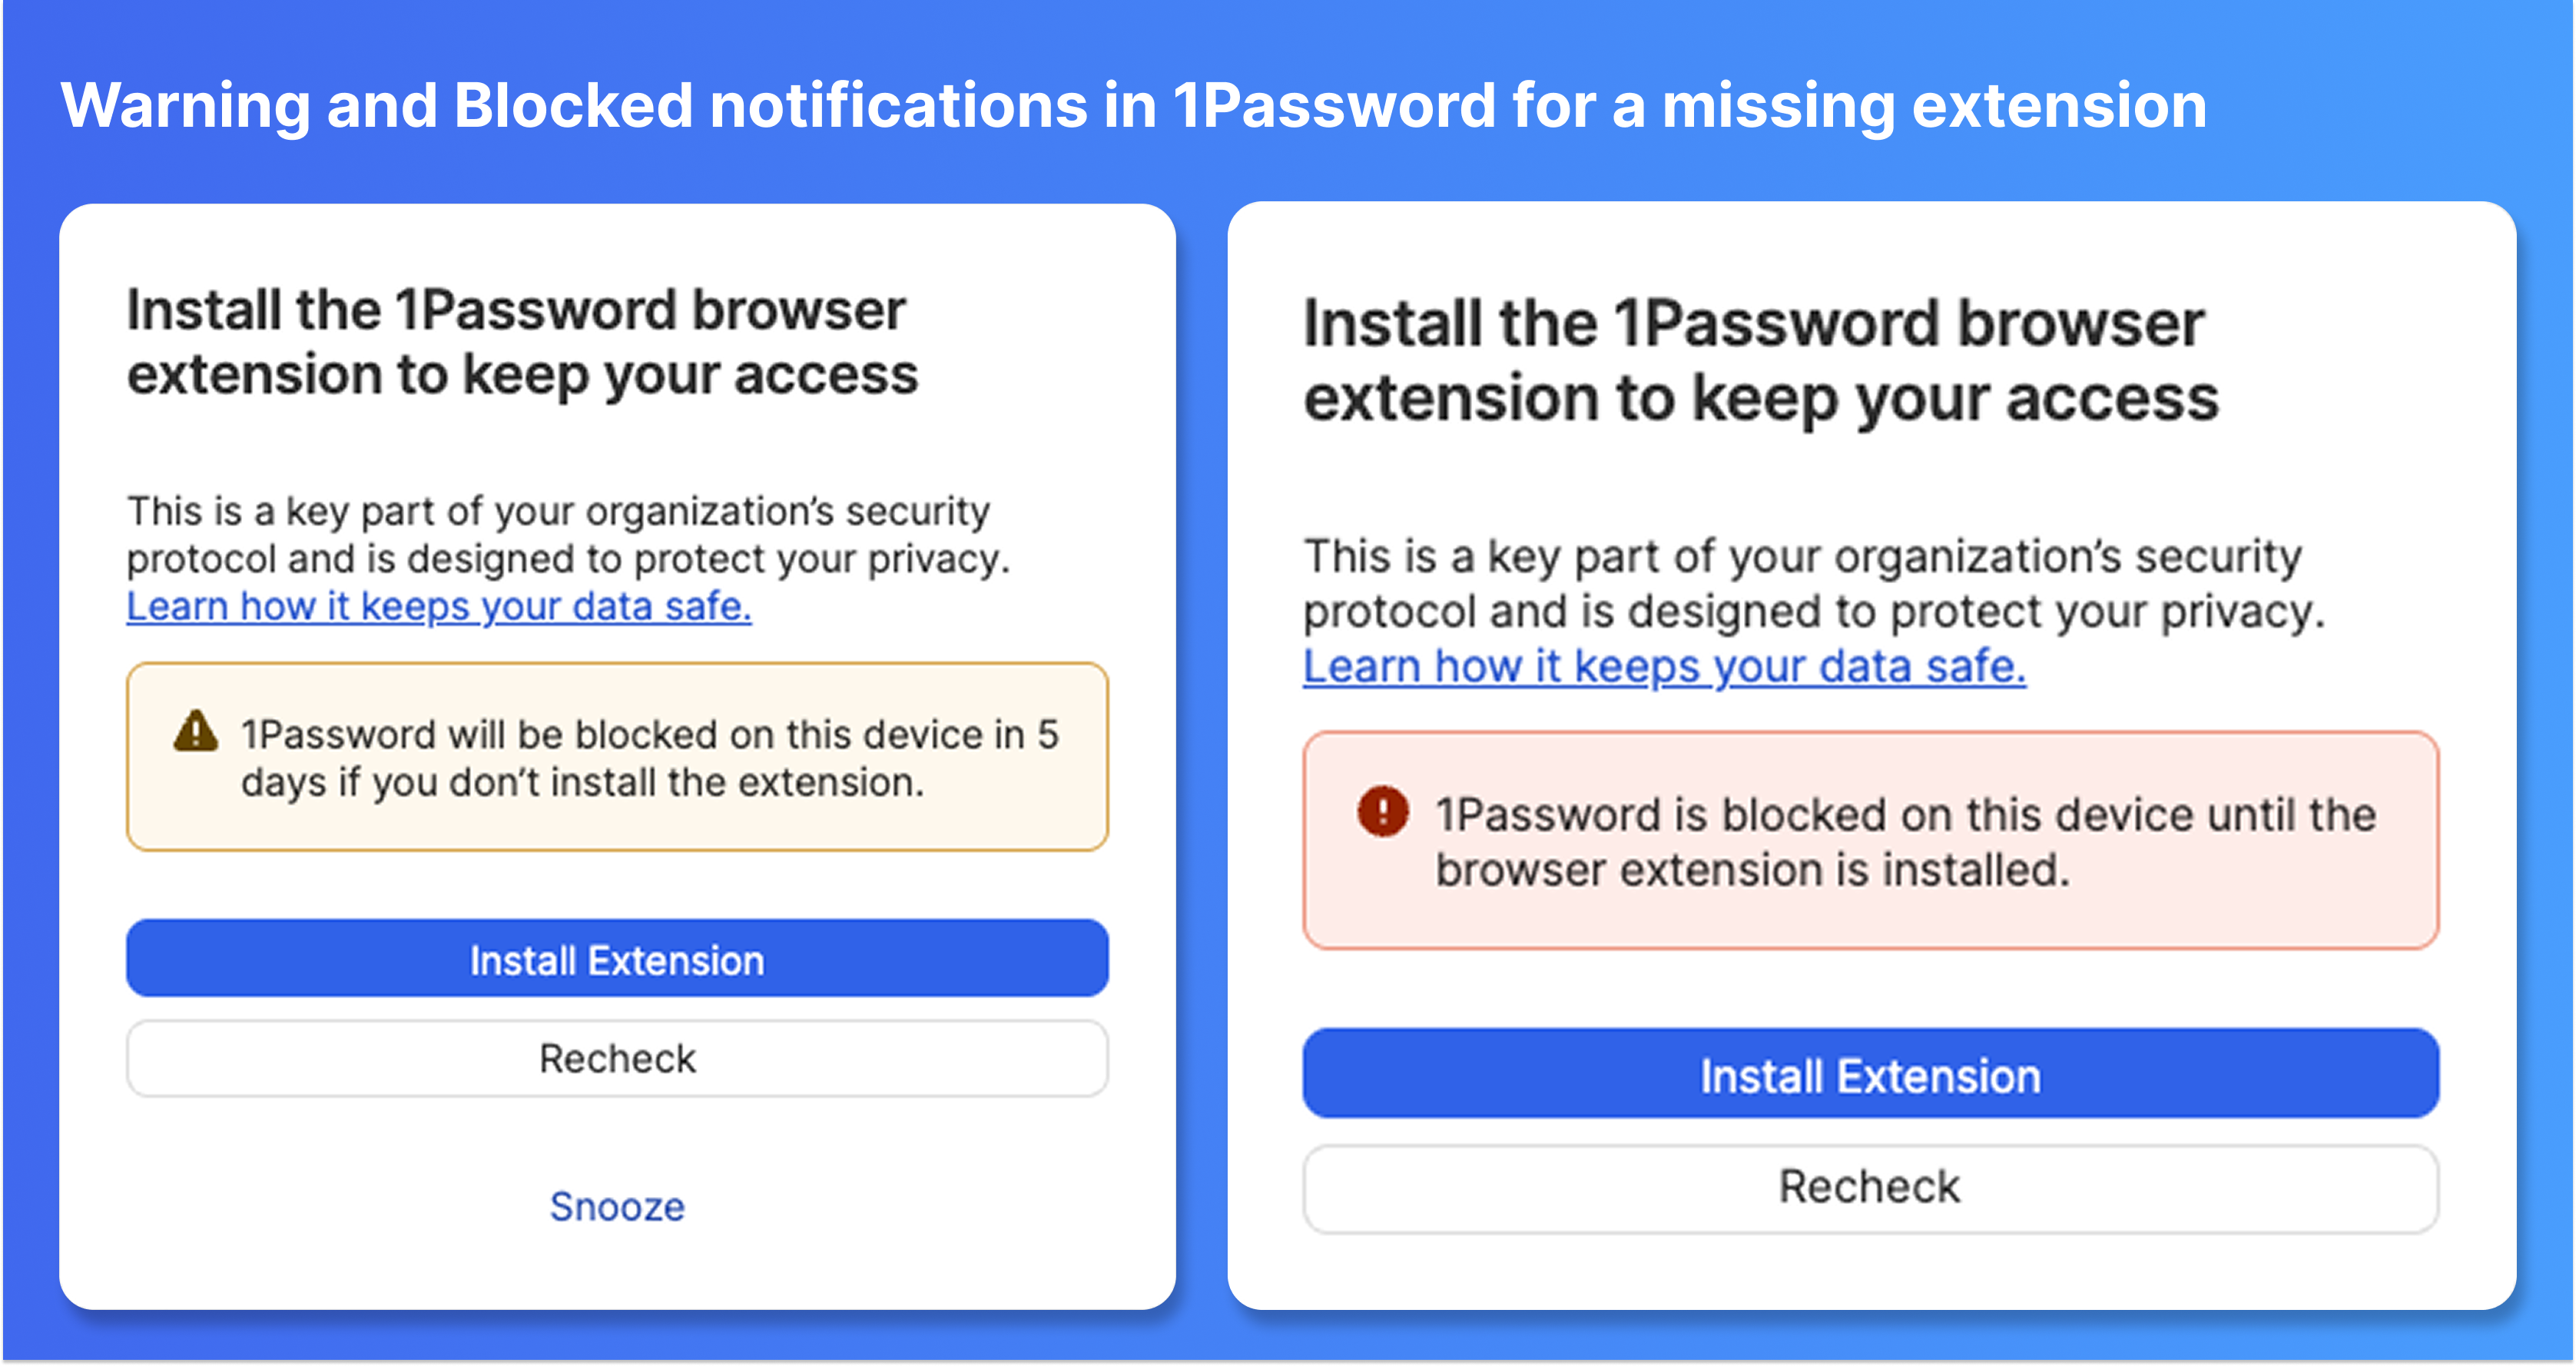
When you turn on the Check, anyone who doesn’t have the 1Password browser extension installed or enabled will see a notification that they need to install it within a set grace period or they’ll lose access to 1Password.
Once the grace period has ended, any team members who still don’t have the browser extension will see a notification in the 1Password desktop app that they’re blocked from using the app and must install the browser extension to regain access.
Note
To set up the Check in Device Trust:
- Select Checks > Add New Checks to open the Check Catalog.
- Select the “1Password - Make sure 1Password Extension is Installed and Enabled on Default Browser” Check, then select Enable.
- Configure the Check to target the people in your organization you want to experience Extended Device Compliance.
- Set the remediation strategy to Warn then Block. This makes sure your organization can’t access 1Password if they don’t have the extension installed in their default browser.
Notification states
There are 3 different states that people can encounter when they fail a Check, depending on the remediation strategy set for the Check.
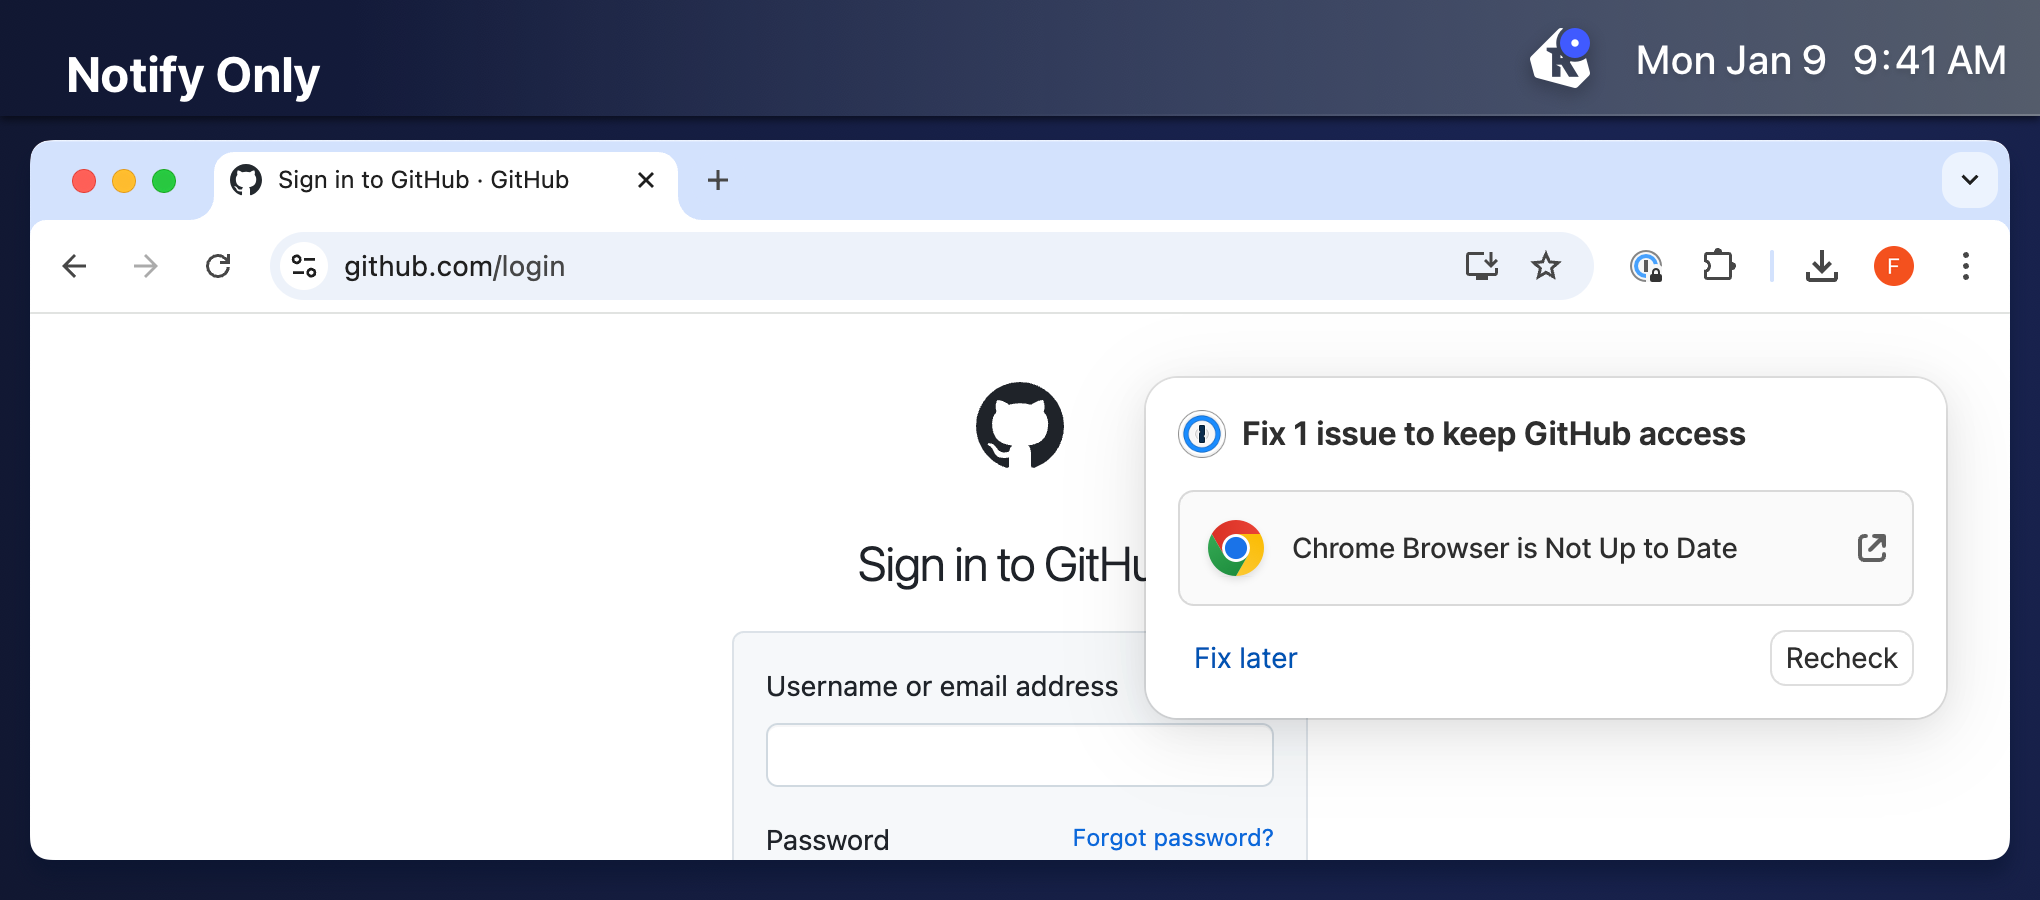
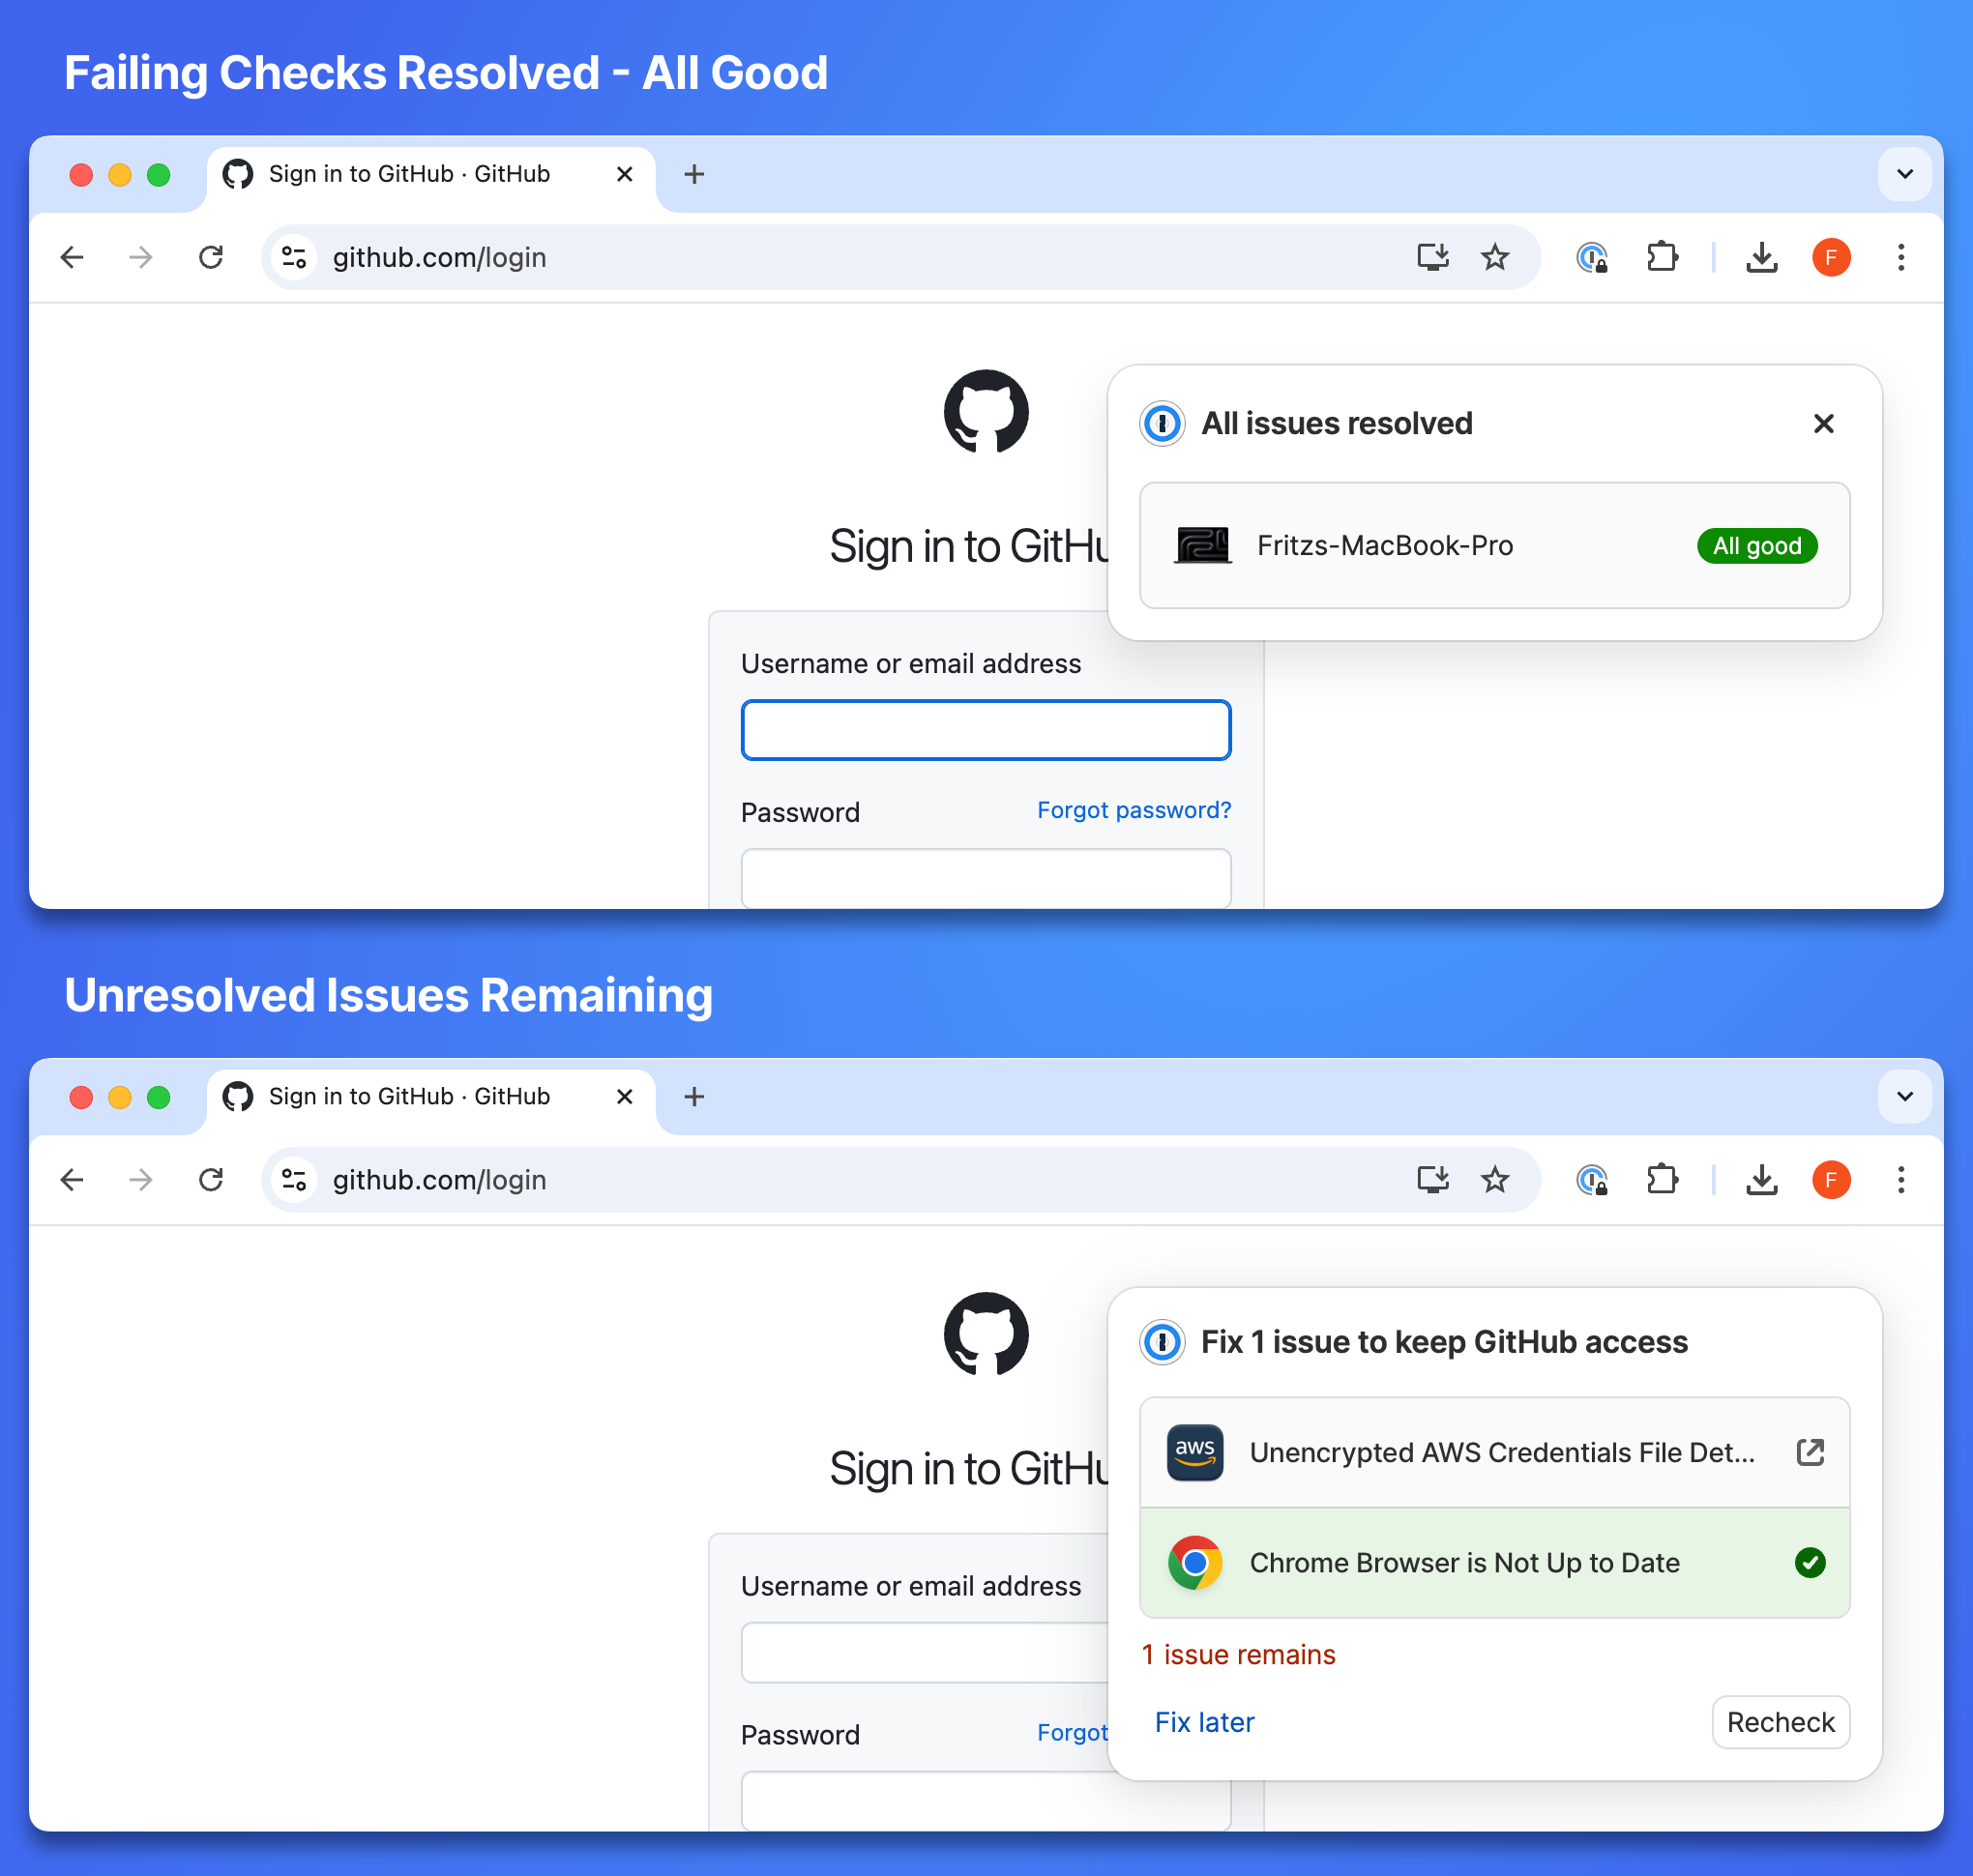
- Notify Only - The 1Password browser extension shows a pop-over notification in the top right of the active tab informing the end user that they have an issue with their device. The user can still see and interact with the webpage underneath the pop-over. The user can defer the notification without fixing the failing Check by selecting the button labeled Fix later.
- Will Block - The 1Password browser extension shows a pop-over notification in the top right of the active tab informing the end user that their device will be blocked in
xdays if they do not fix their failing Checks. The user can still see and interact with the webpage underneath the notification. The user can defer the notification without fixing the failing Check by selecting the button labeled Fix later.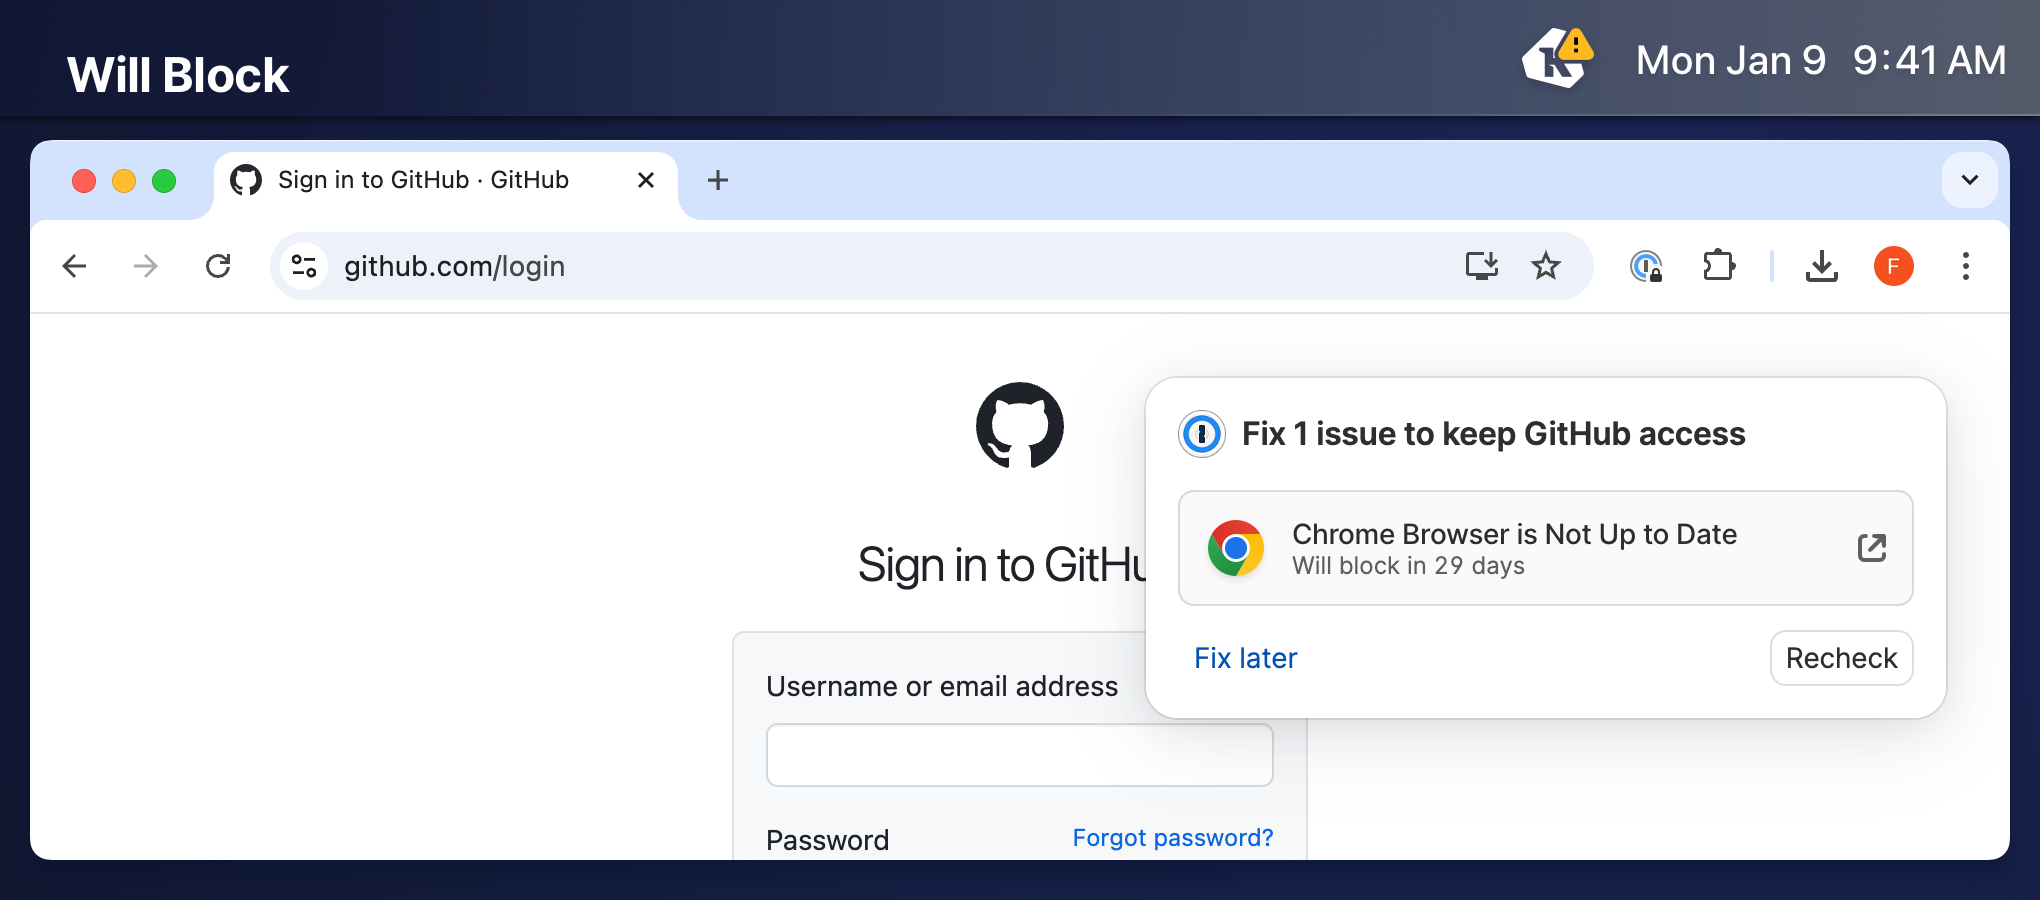
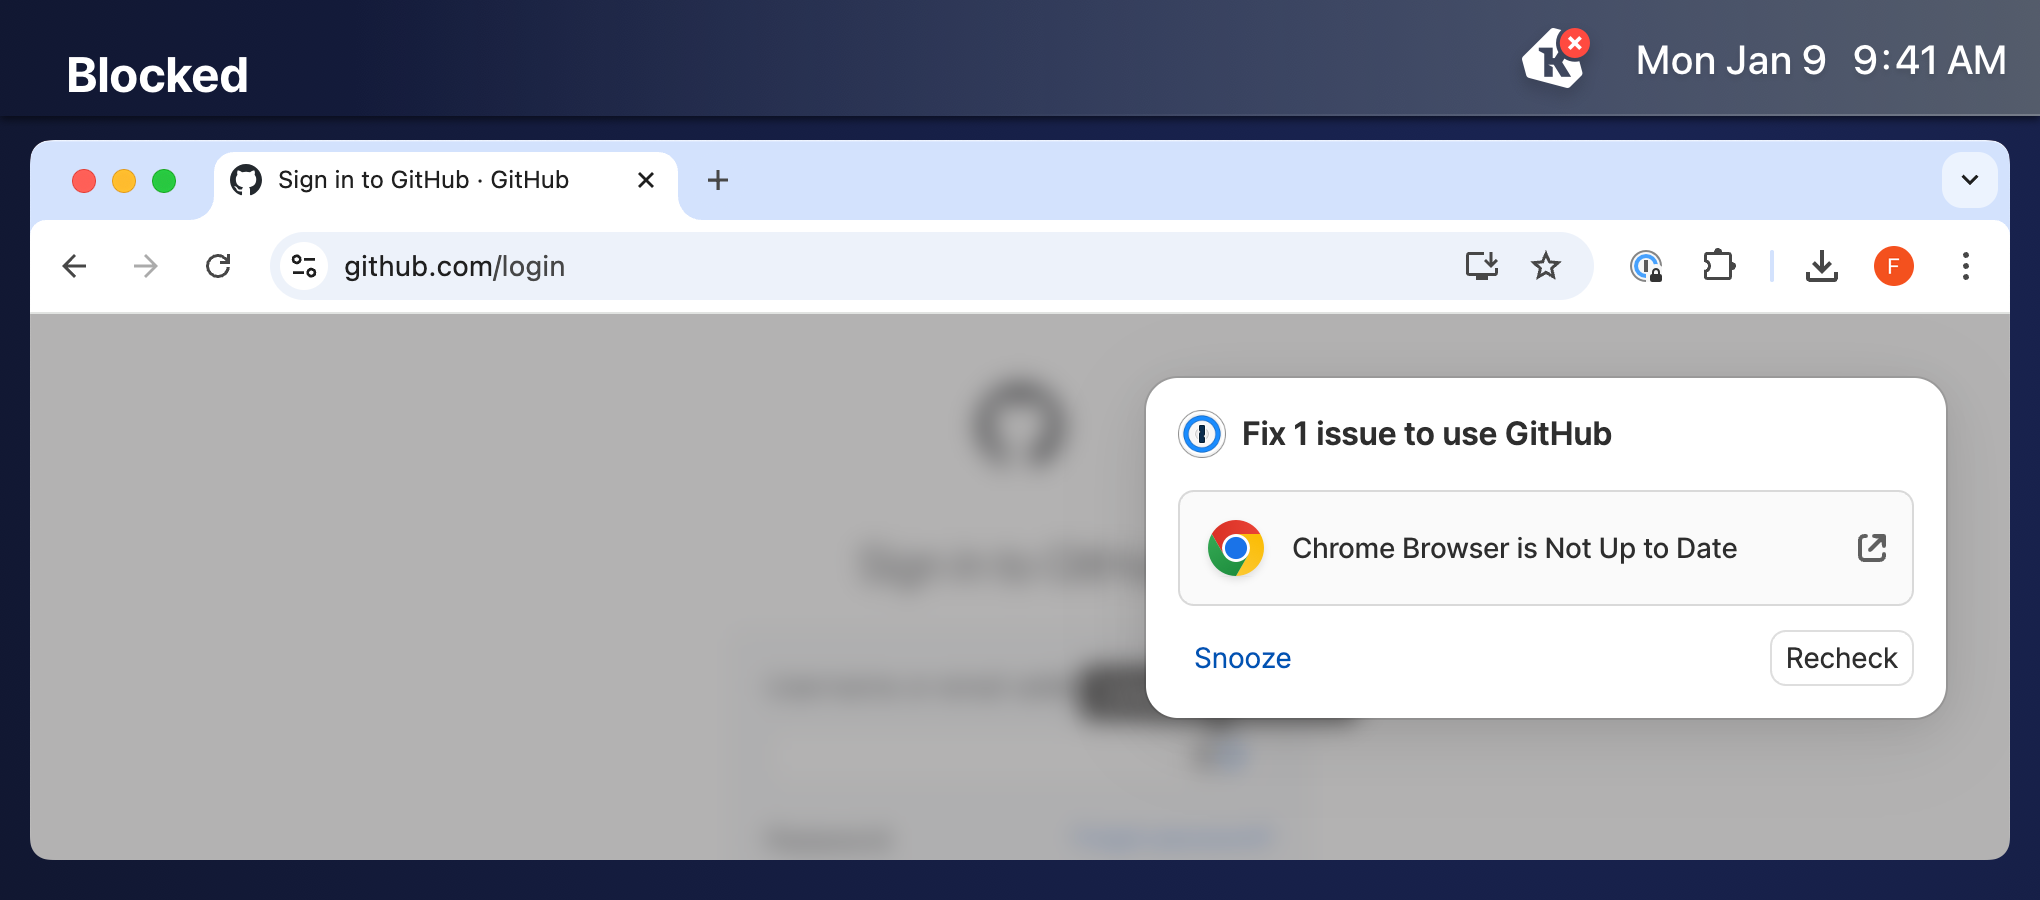
- Blocked - The 1Password browser extension obscures the webpage with a blur overlay and shows a pop-over notification in the top right of the active tab informing the user that they cannot access the web app until they fix their failing device Checks.
Fixing device issues
Note
When a user clicks an issue in the notification, the 1Password browser extension directs them to the End User Portal where they can see more details about the failing Check as well as instructions for how to self-remediate the issue.
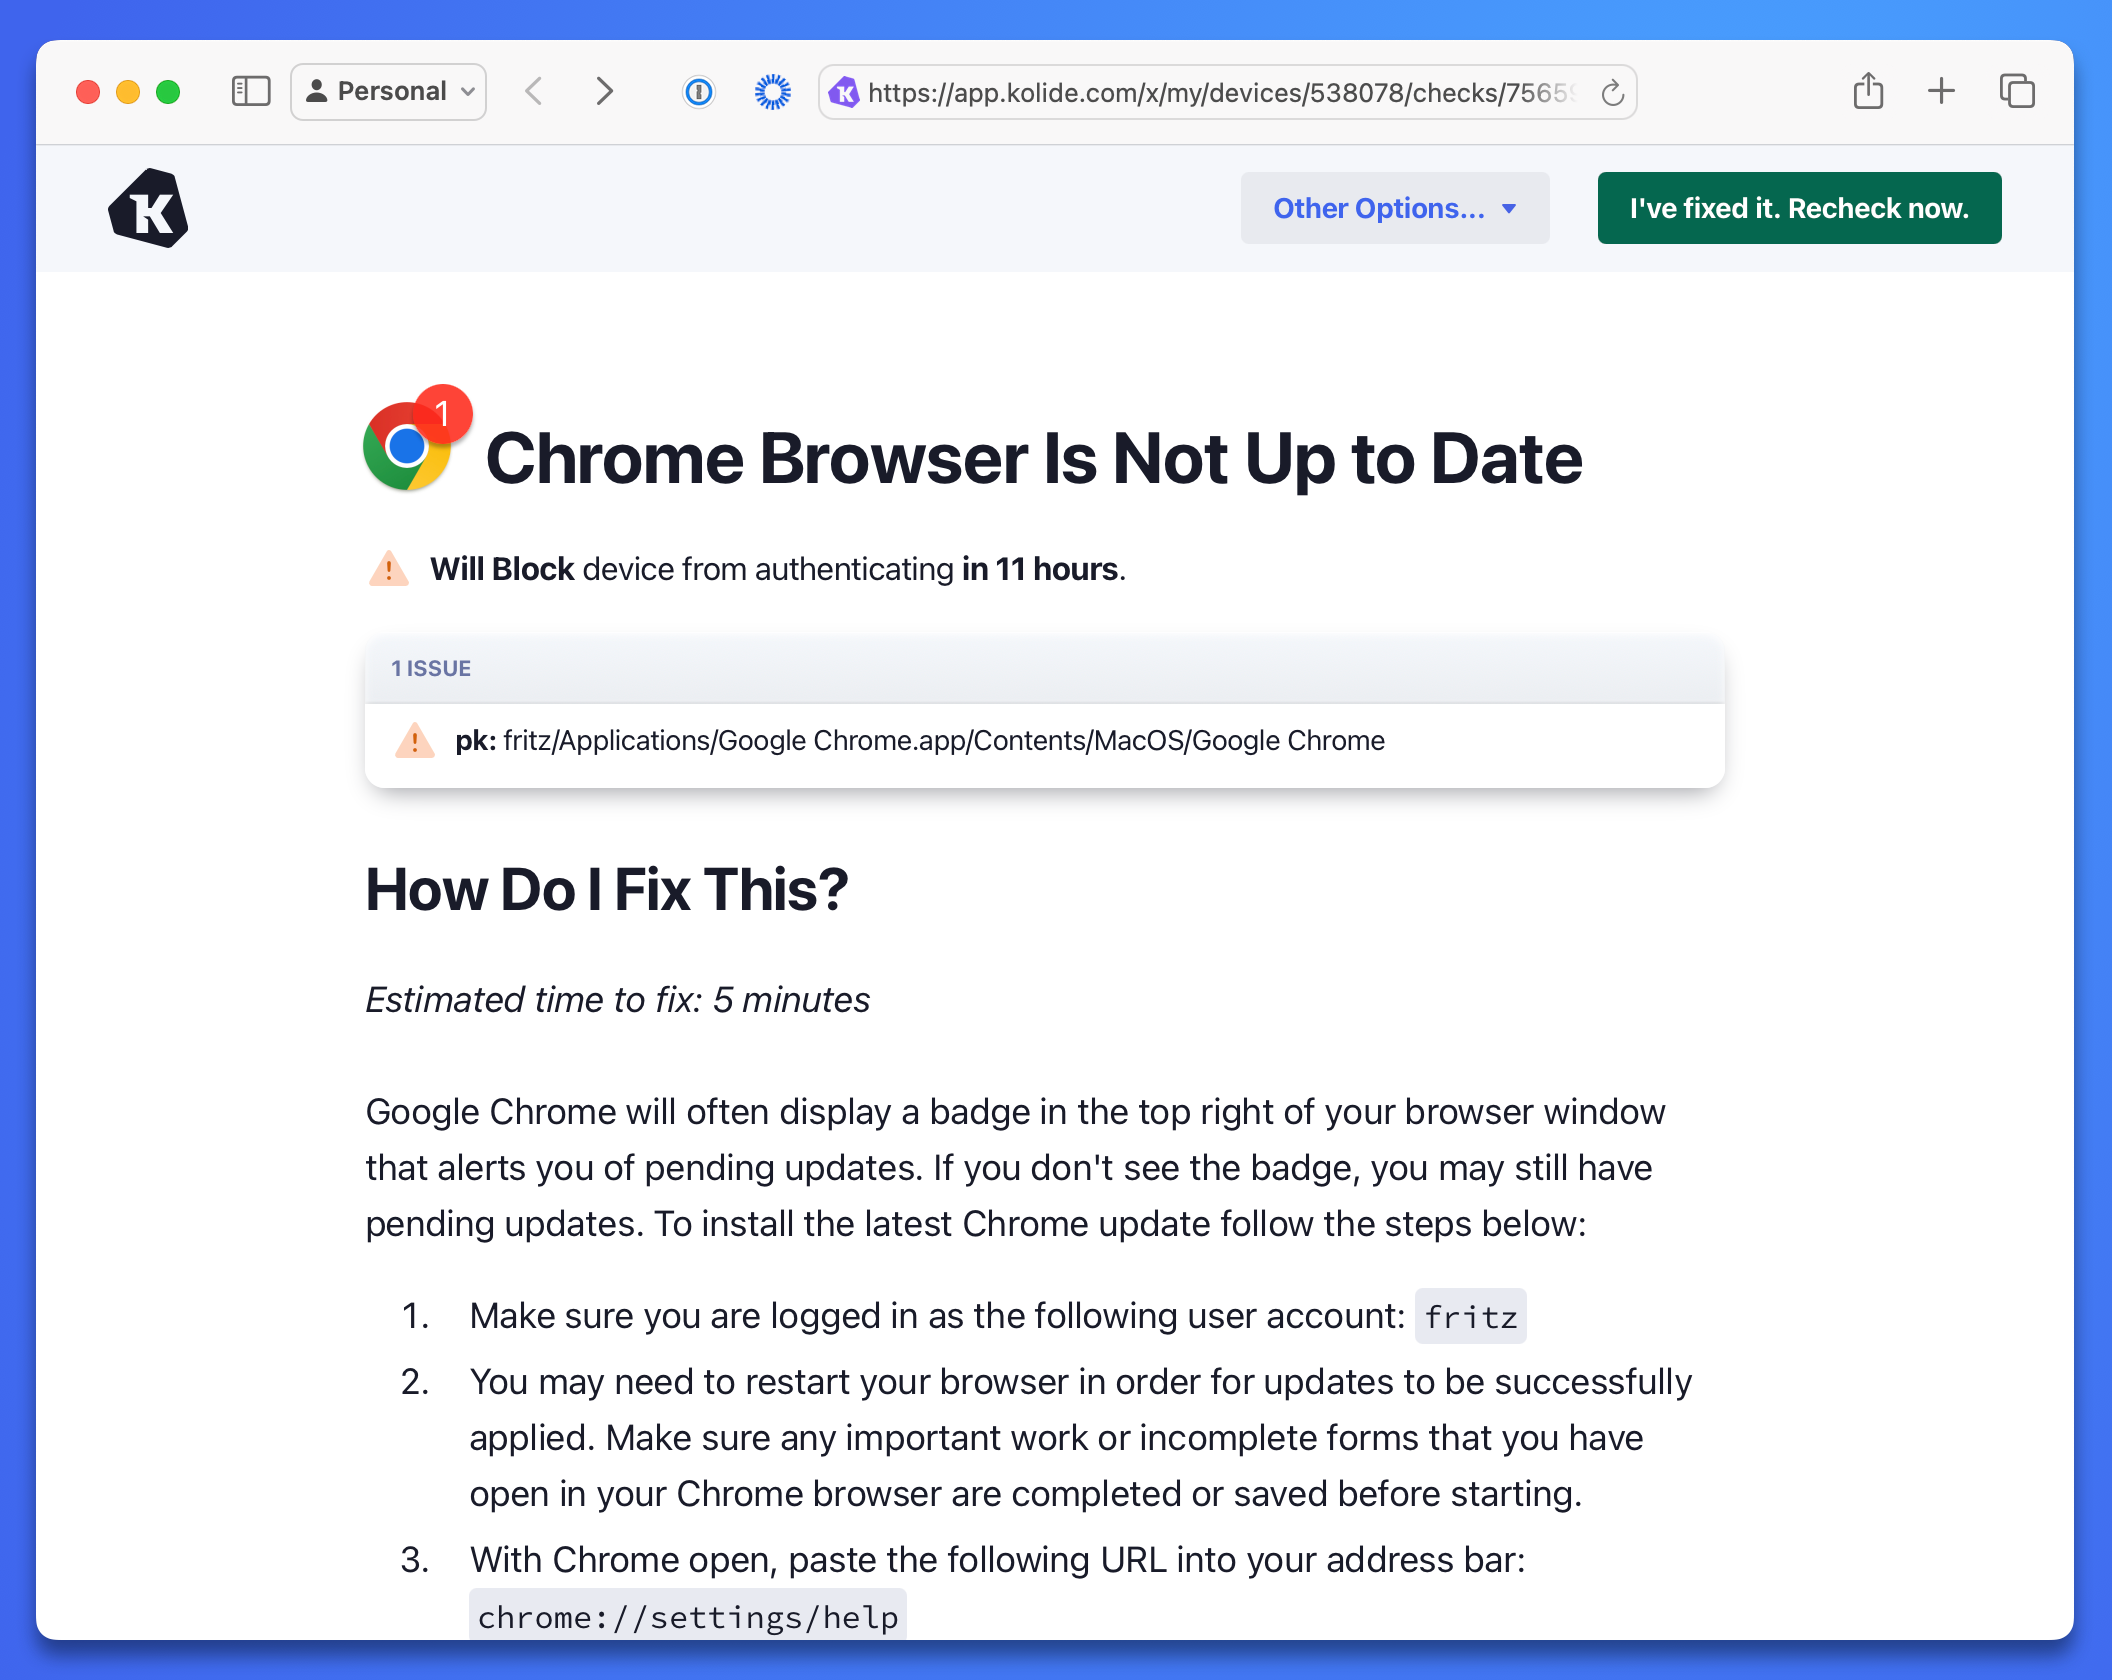
Once the user fixes the failing Check, the notification updates to let the user know that their device is “All good” and the notification can be dismissed. If the device has multiple failing Checks and only some are resolved, the notification will update to show the partial state of completion.
View Google workspace OAuth grants in Device Trust
Get insights into active Google OAuth grants across your user base. With this feature, you’ll be able to find applications your organization has signed in to using their Google accounts.
Google workspace OAuth grants requirements
The Google Workspace OAuth Grants feature requires:
- A Google Workspace Super Admin role.
- Extended Device Compliance. Contact 1Password Device Trust support to upgrade.
- 1Password’s Enterprise Password Manager.
Set up the Google workspace OAuth integration
To set up the Google Workspace OAuth integration:
- In the Device Trust admin console, select your profile in the top-right corner and choose Settings.
- Select Integrations in the sidebar.
- In the Add an App Discovery section, select the Set Up button for Google Workspace.
- Select Log in with Google Workspace.
- Make sure View audit reports for your G suite domain is checked.
- Select Continue. You’ll now see the integration in the App Discovery Integrations section.
- Select the Actions dropdown on your Google Workspace integration and choose Sync Now.
It may take a moment for the integration to sync. Once the integration has successfully synced, you’ll see a green check mark next to the integration indicating that it’s been successfully set up and has started importing events.
Find an app’s Google workspace OAuth grants
To see if an app has Google Workspace OAuth grants:
- In the Device Trust admin console, select Apps in the top navigation.
- Find and select the app you want to view.
- In the Discovered Usage section, select the OAuth Grants tab.
- If an app has Google Workspace OAuth grants, you’ll see them populated here. You can select CSV to create a CSV file of this table.
Managed app instances
Managed App Instances are individual configurations of SSO-managed, SAML-compatible, web apps that can be protected with Device Trust.
When you create a Managed App Instance, end users will complete an additional step when they attempt to sign in to the app. After entering their username and password or providing their passkey, users will be redirected to Device Trust, which will verify that the device is registered and passing all configured Checks before allowing them to sign in.
Managed app instances requirements
You can configure Managed App Instances if you have 1Password Device Trust Connect, the Password XAM Bundle, or if you use Google Workspace SSO with another legacy Device Trust plan. If you have questions about your plan or want to upgrade, contact 1Password Device Trust support.
You can only create Managed App Instances for applications that support SAML authentication providers, not OIDC apps (for example, 1Password).
Managed App Instances can’t be created for Google Workspace apps (for example Gmail or Google Docs).
Configuring a managed app instance
You can configure a Managed App Instance using the preexisting templates in the Apps catalog, by creating a new Custom App, or by adding an application from the Managed tab on the Web Apps page. All methods are detailed below.
Step 1: Add an app
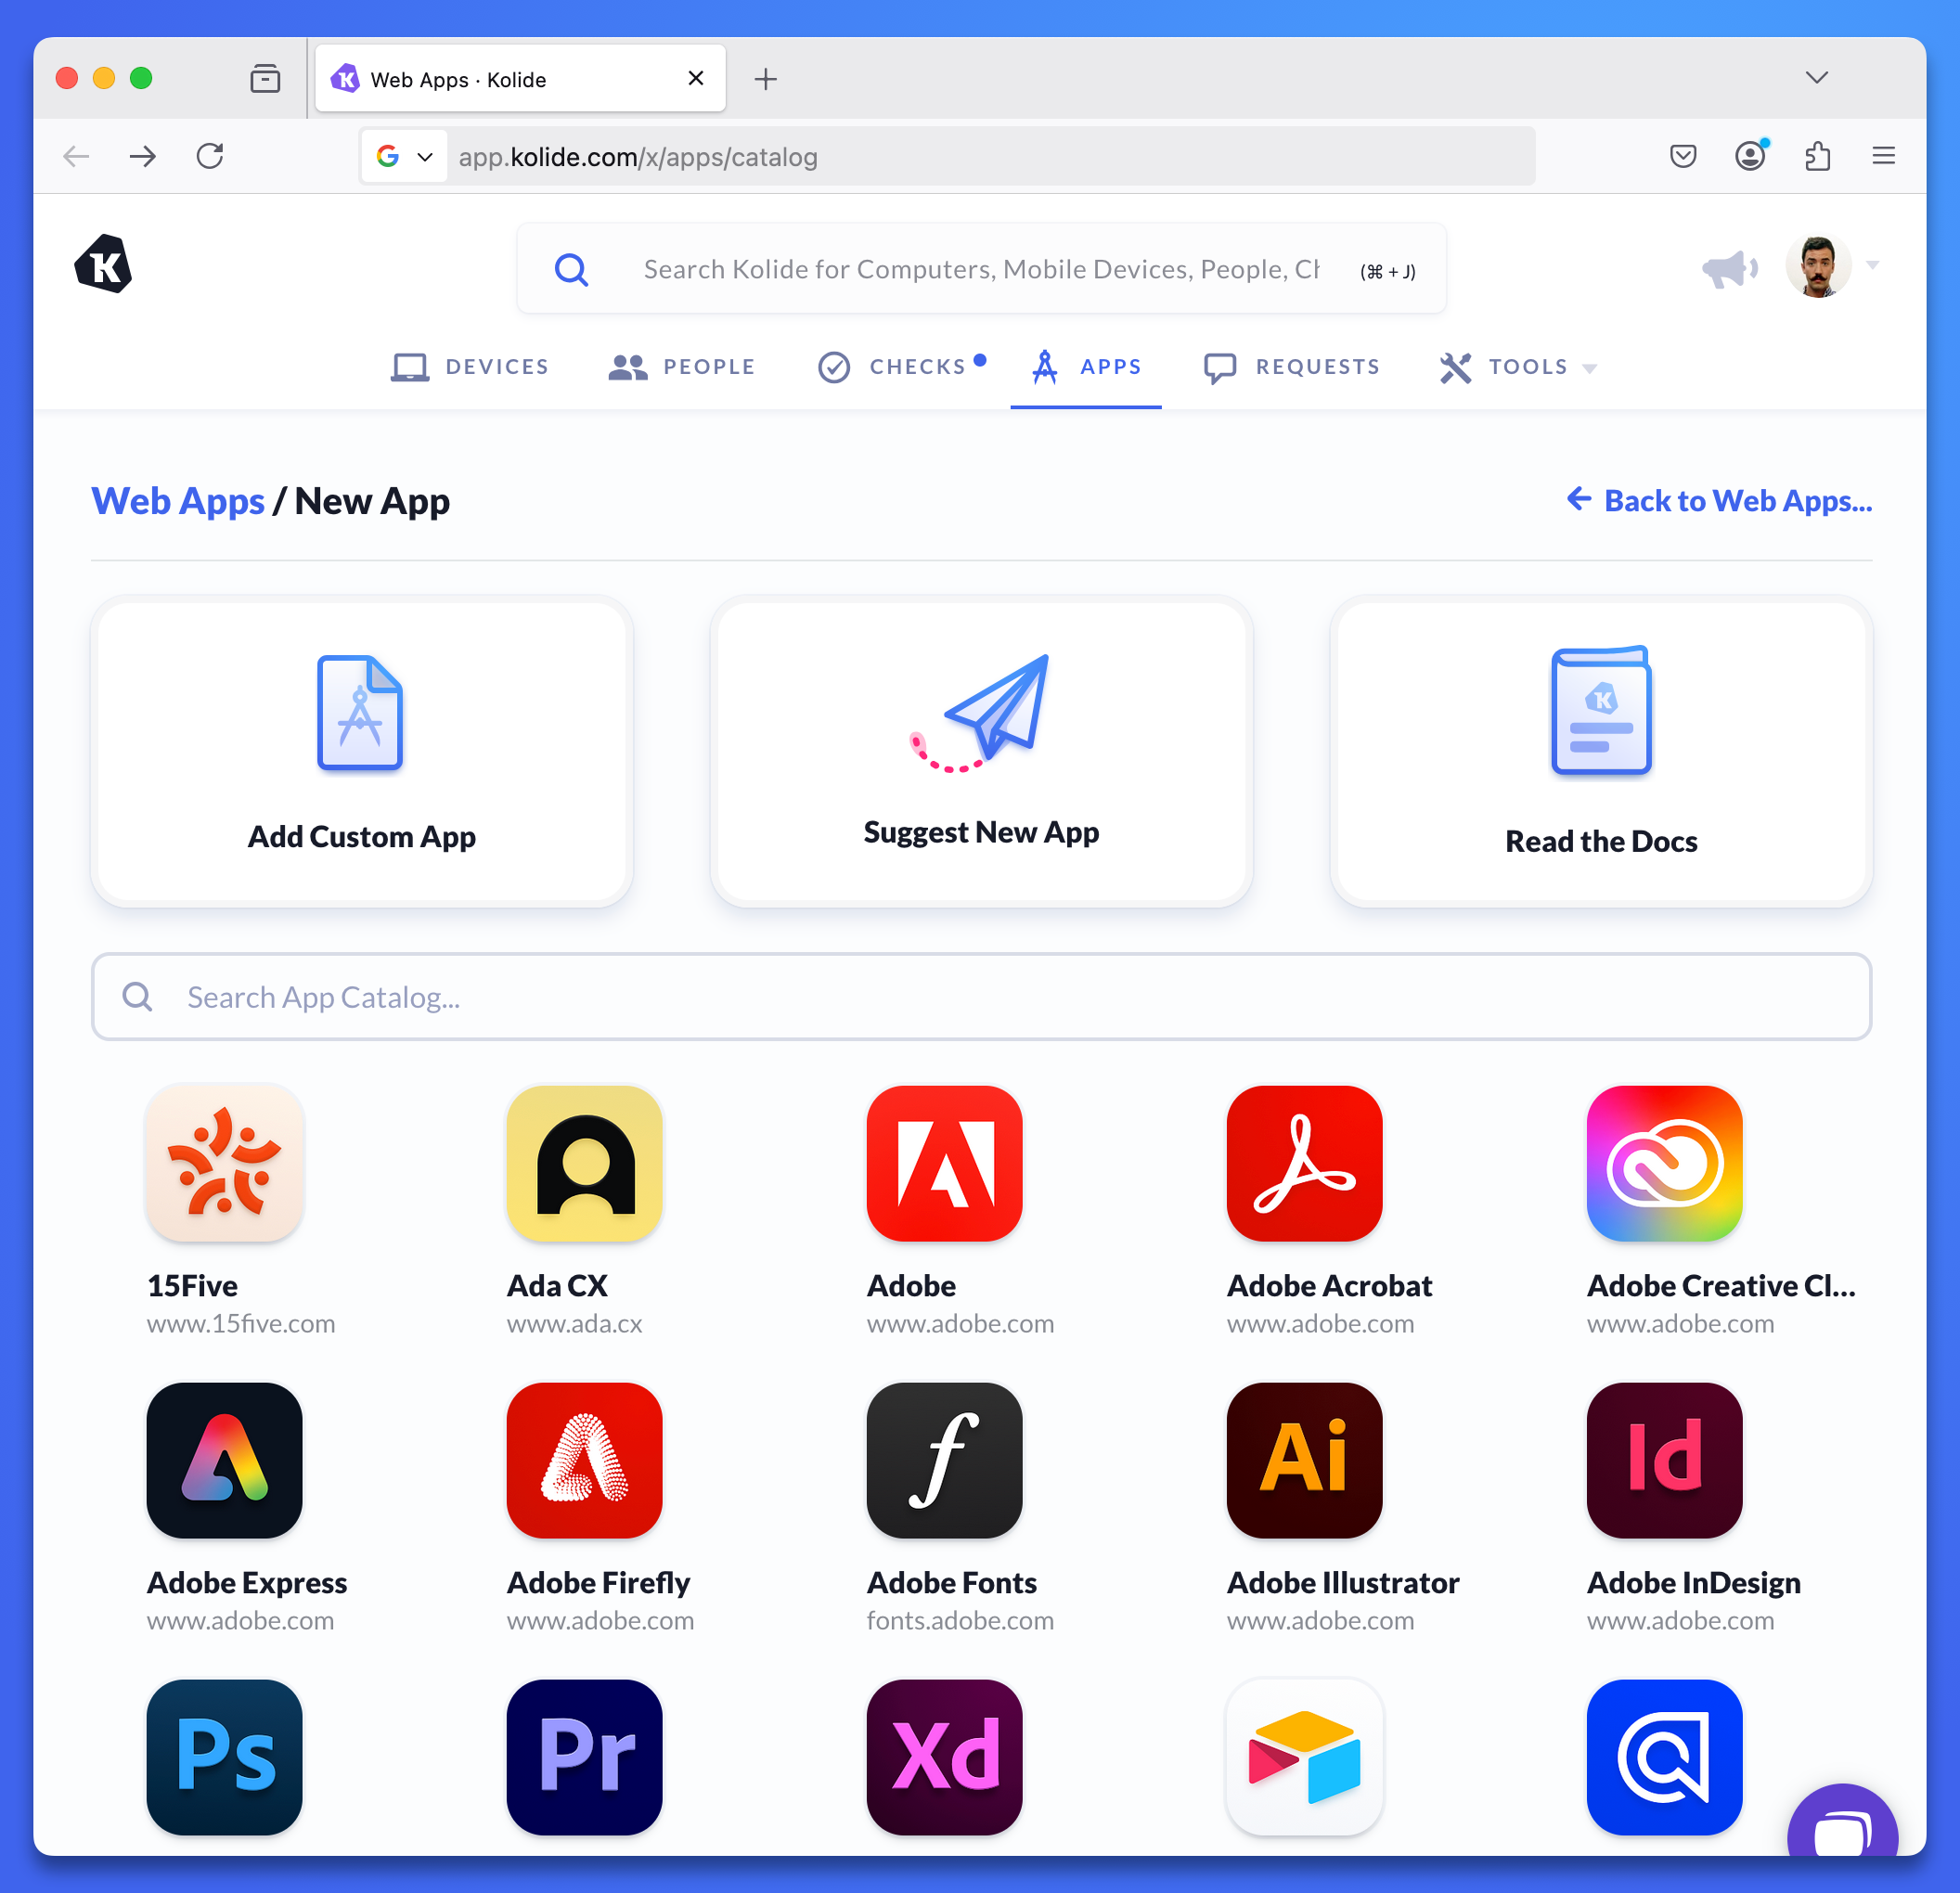
Add an app from the apps catalog
- In the Device Trust admin console, select the item labeled Apps in the top navigation.
- Select + Add Application. If you’re a Core or Connect customer, select Configure an app.
- Search or scroll to find the app you want to add, then select it.
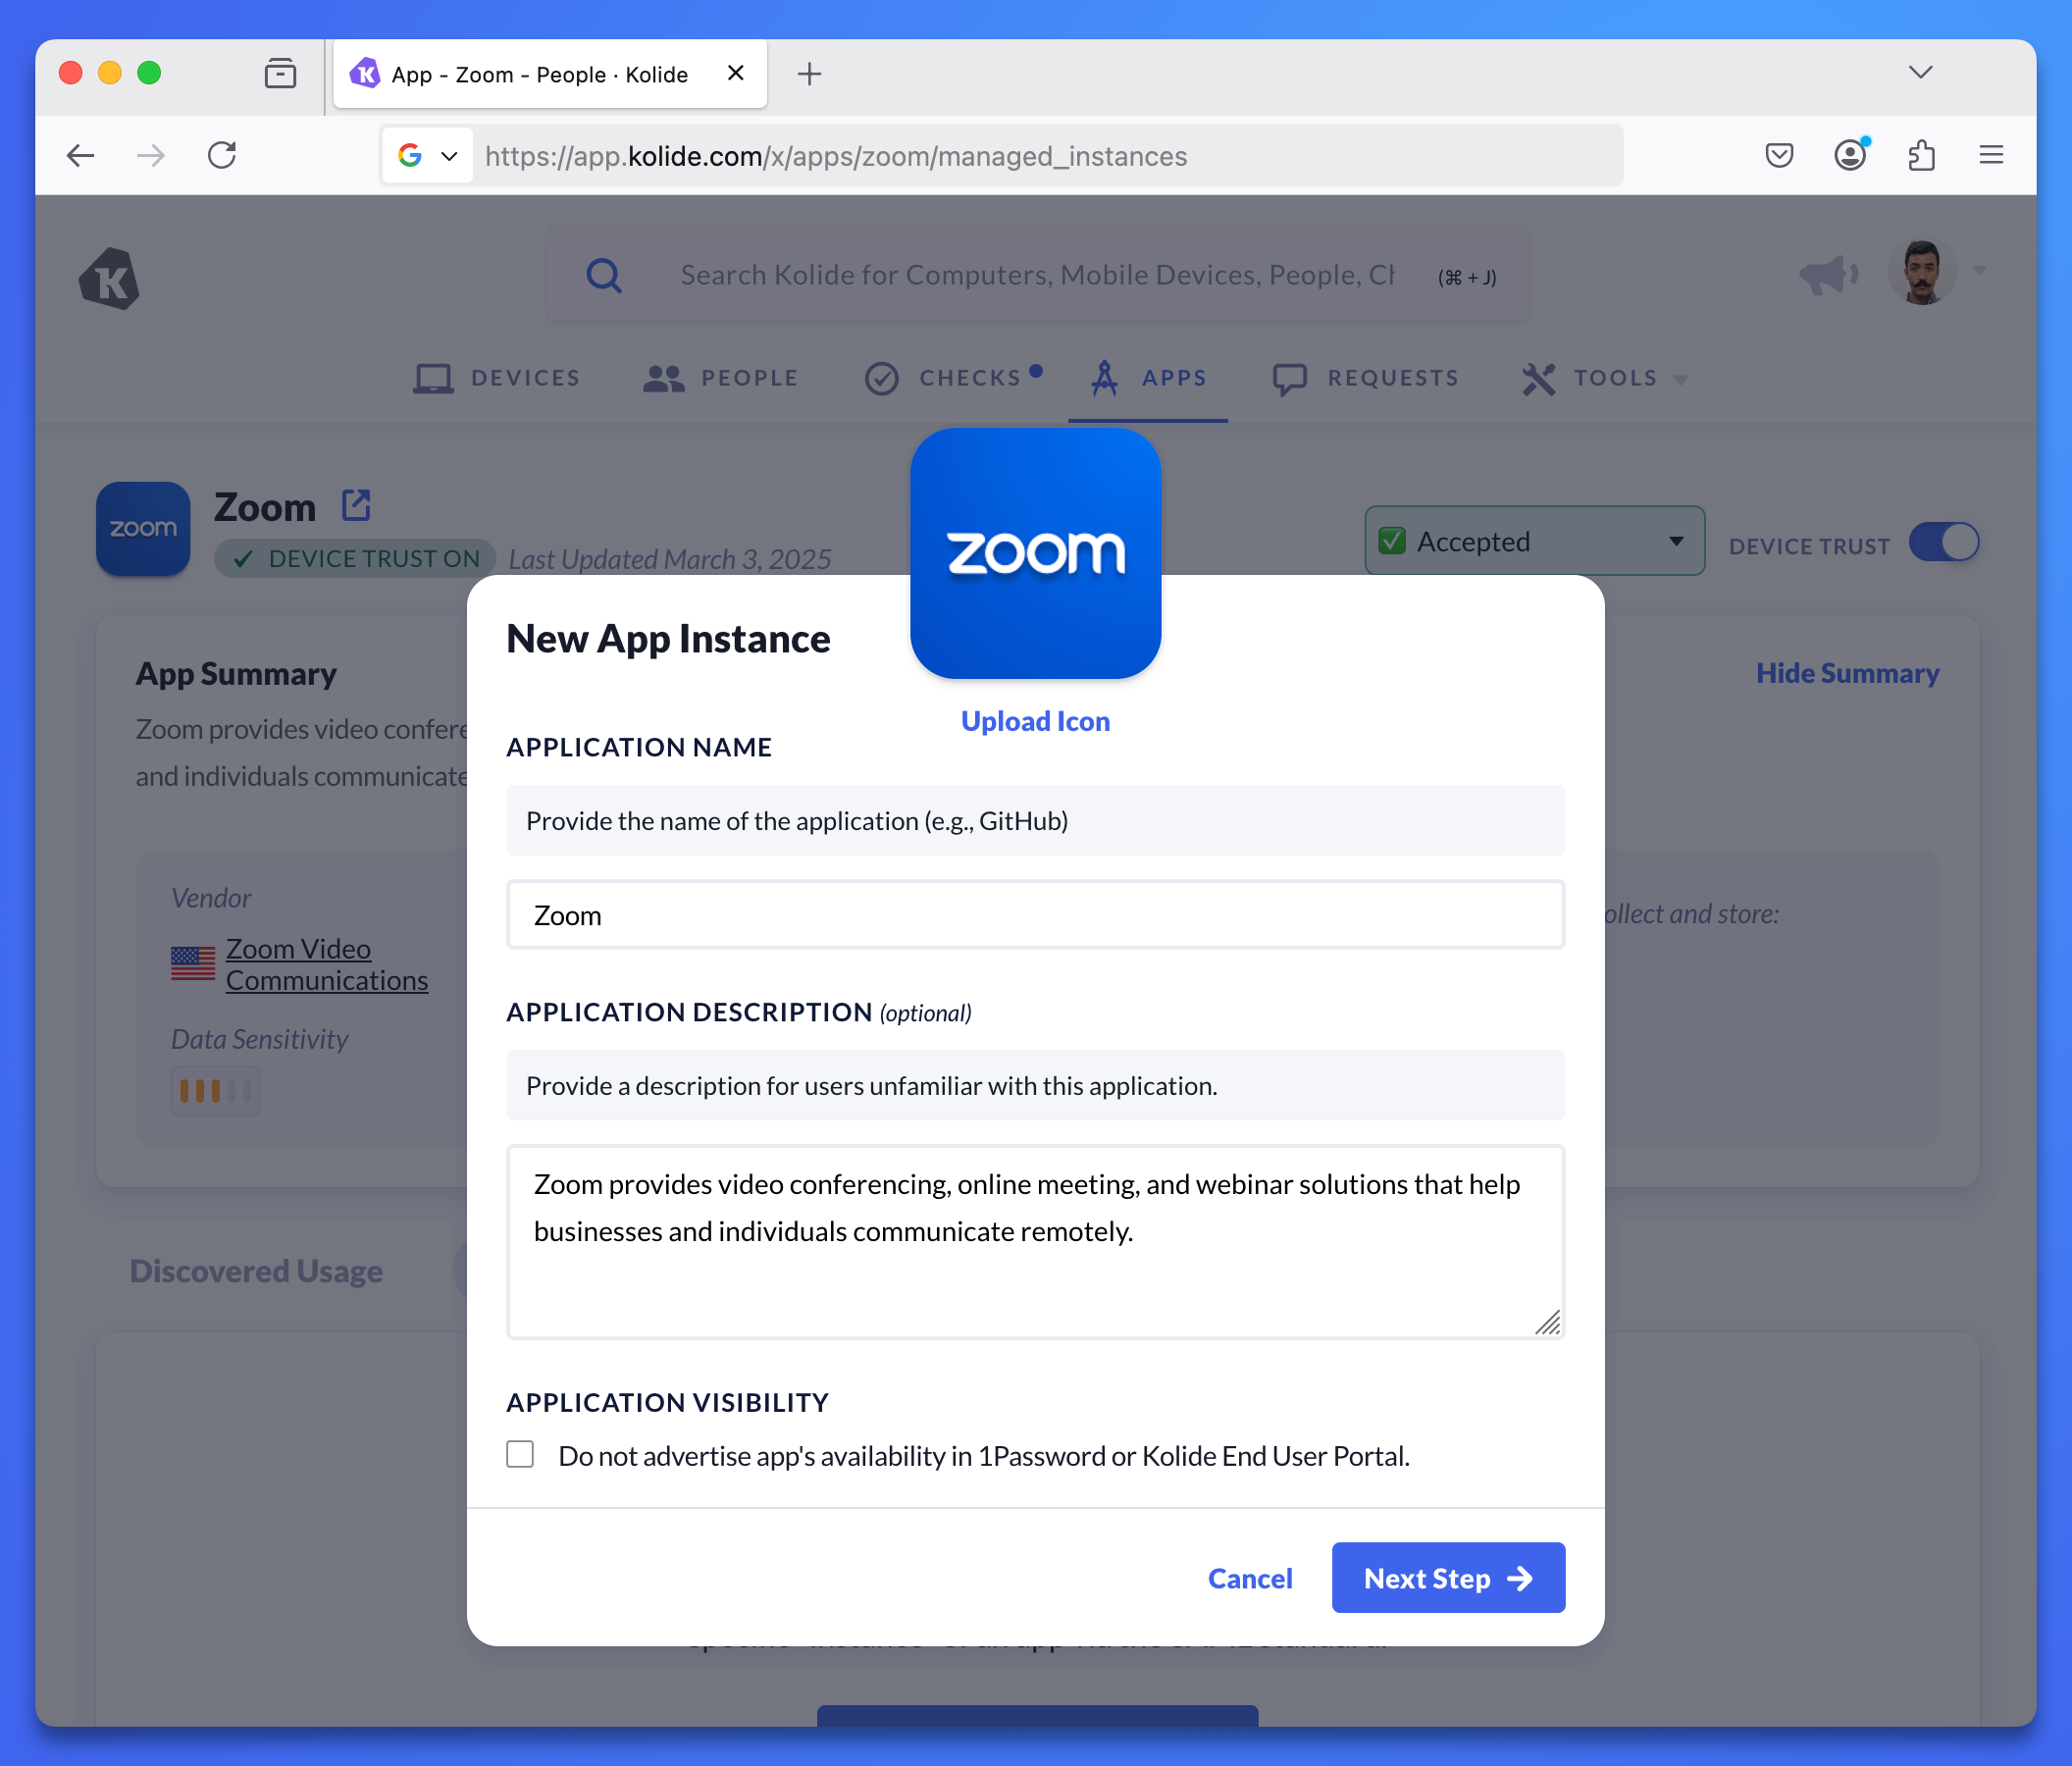
- Optionally edit the app’s name, description, or icon.
- Choose whether you want the application to be visible in the 1Password browser extension app launcher or the Device Trust End User Portal.
- Select Next Step, then configure the app settings.
Add a custom app
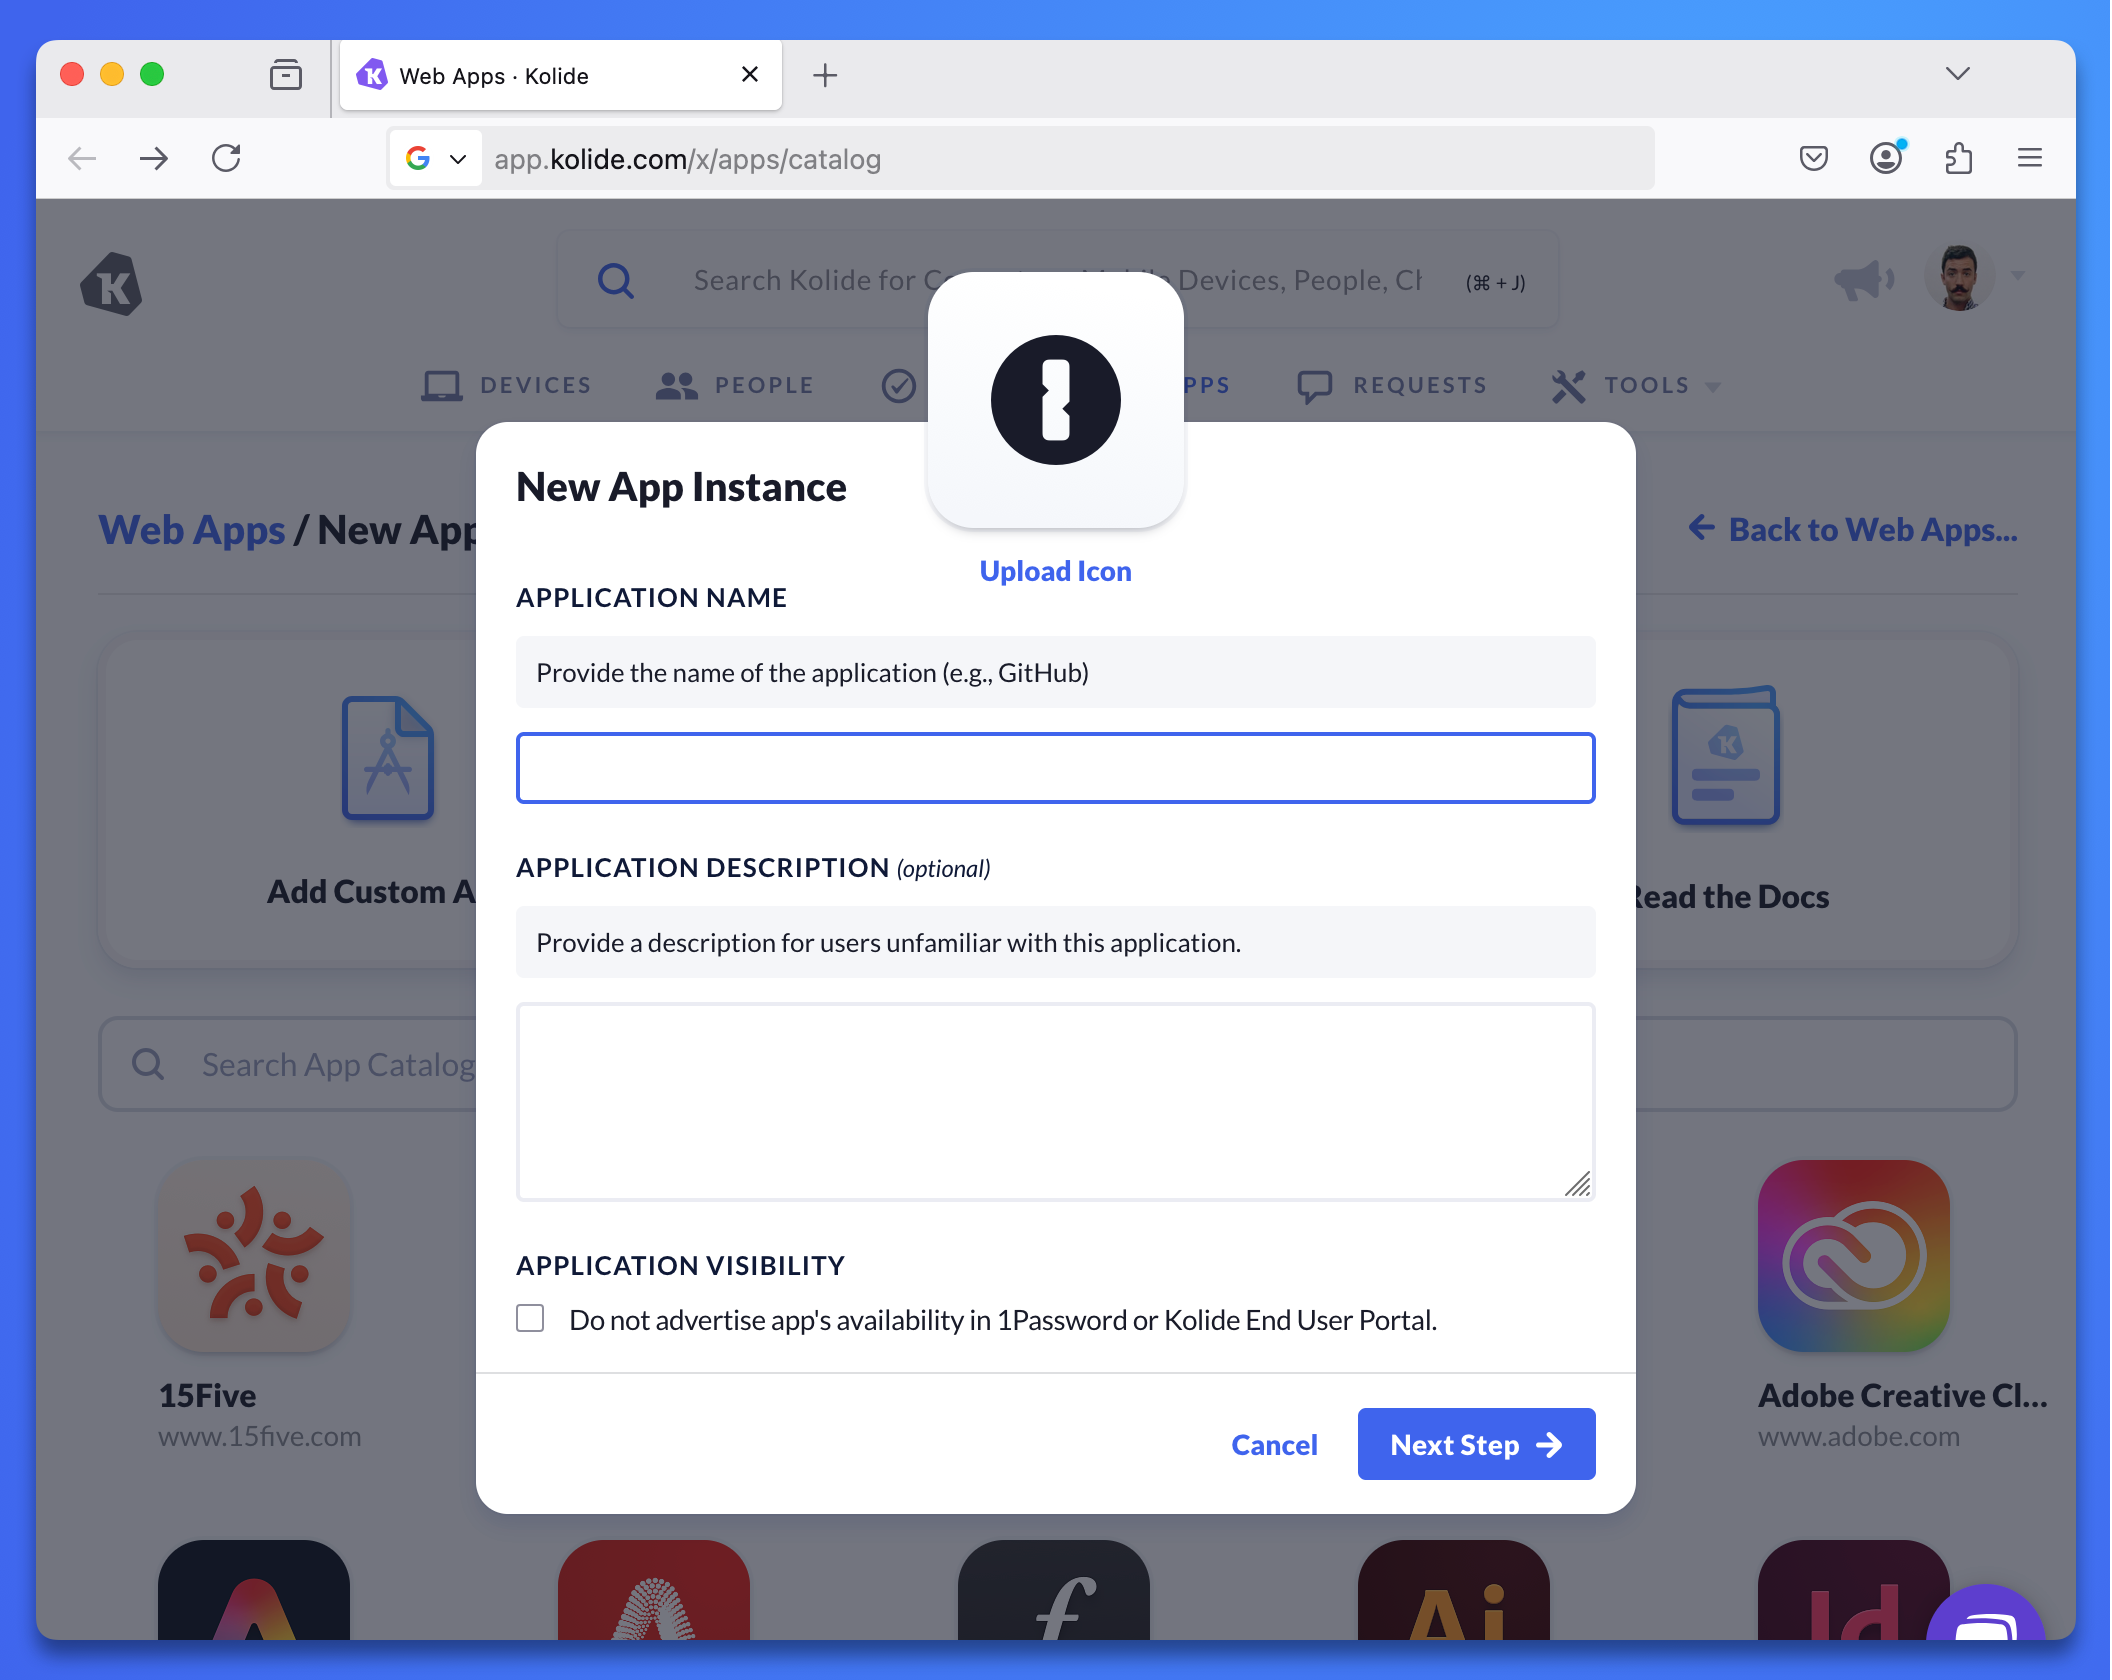
If the SAML app you want to create a managed instance for doesn’t exist in the Device Trust Apps catalog, you can add it manually:
- In the Device Trust admin console, select the Apps tab.
- Select + Add Application. If you’re a Core or Connect customer, select Configure an app.
- Select New Custom SAML App.
- Enter the name of the app. Optionally, add a description and custom icon.
- Choose whether you want the application to be visible in the 1Password browser extension app launcher or the Device Trust End User Portal.
- Select Next Step, then configure the app settings.
Add an app from the managed tab
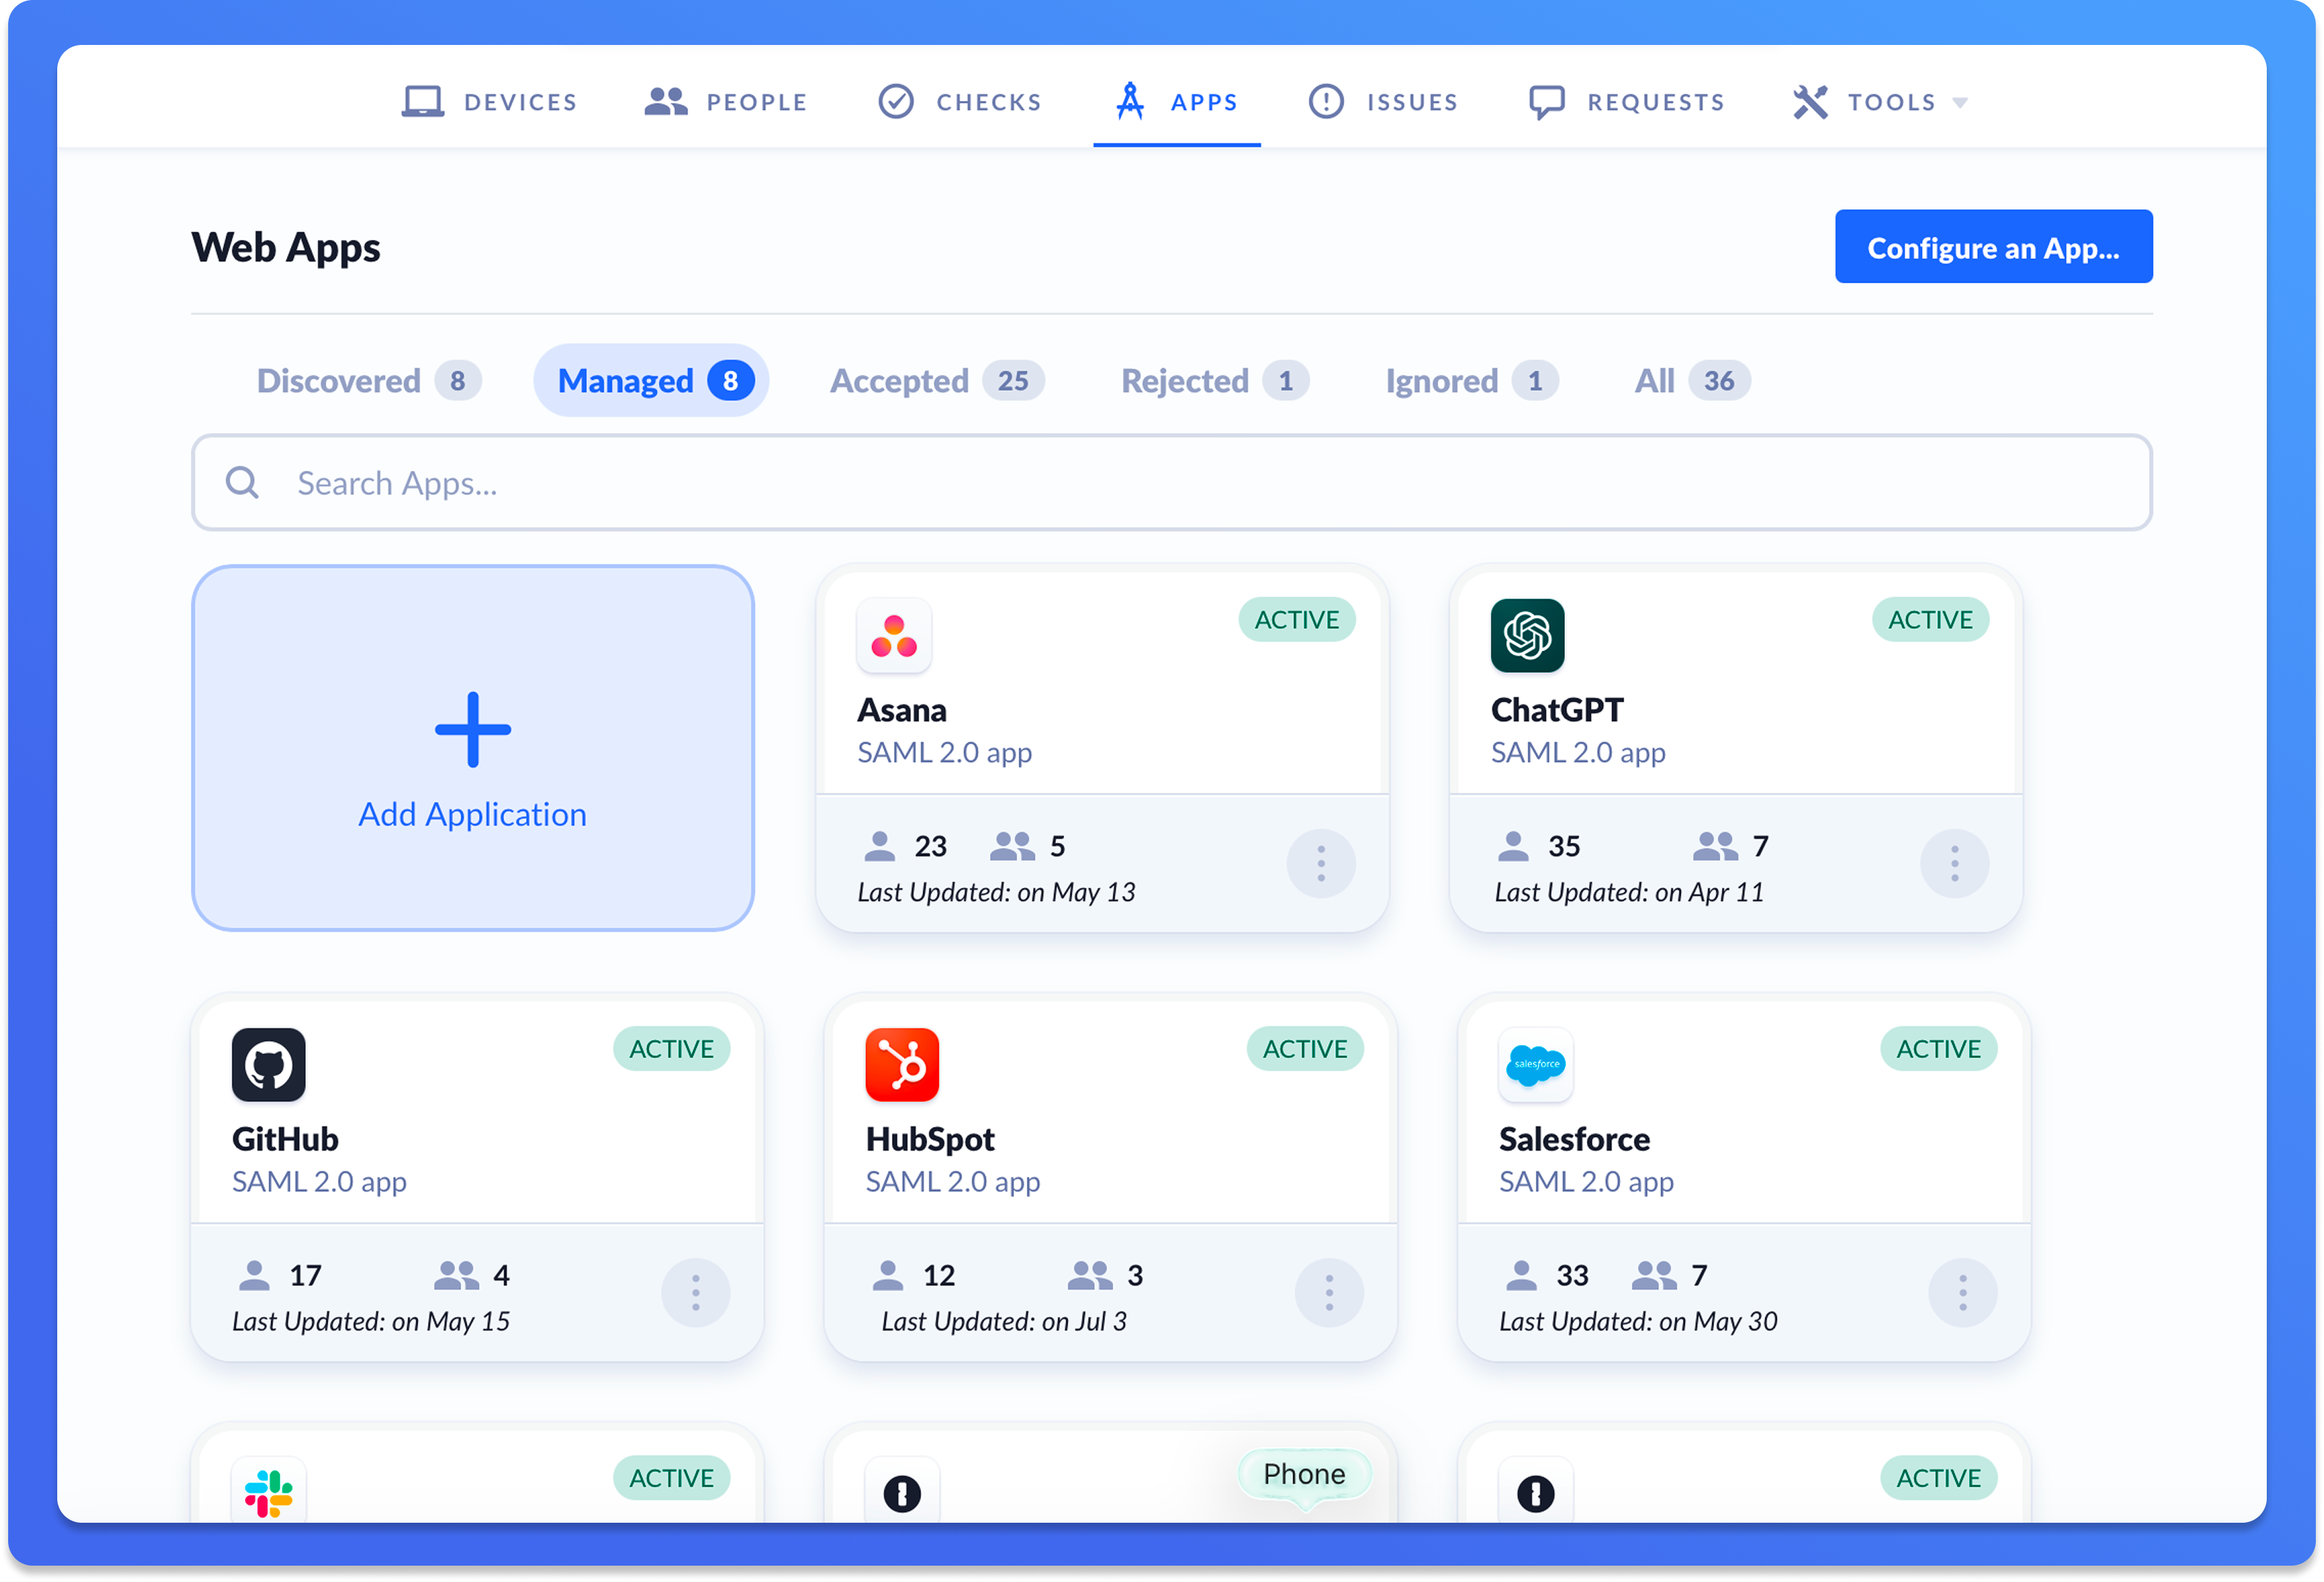
- In the Device Trust admin console, select the item labeled Apps in the top navigation.
- Select the Managed tab.
- Select + Add Application.
- Search or scroll to find the app you want to add and select it, then configure the app settings.
Step 2: configure app settings
To connect your app to Device Trust, you’ll need to copy and paste configuration details between the two. If you’re adding an app from the Apps catalog, select the Docs button to learn where to find your app’s configuration details. If you’re adding a custom app, check your app’s documentation. Configuration setting names can vary by app.
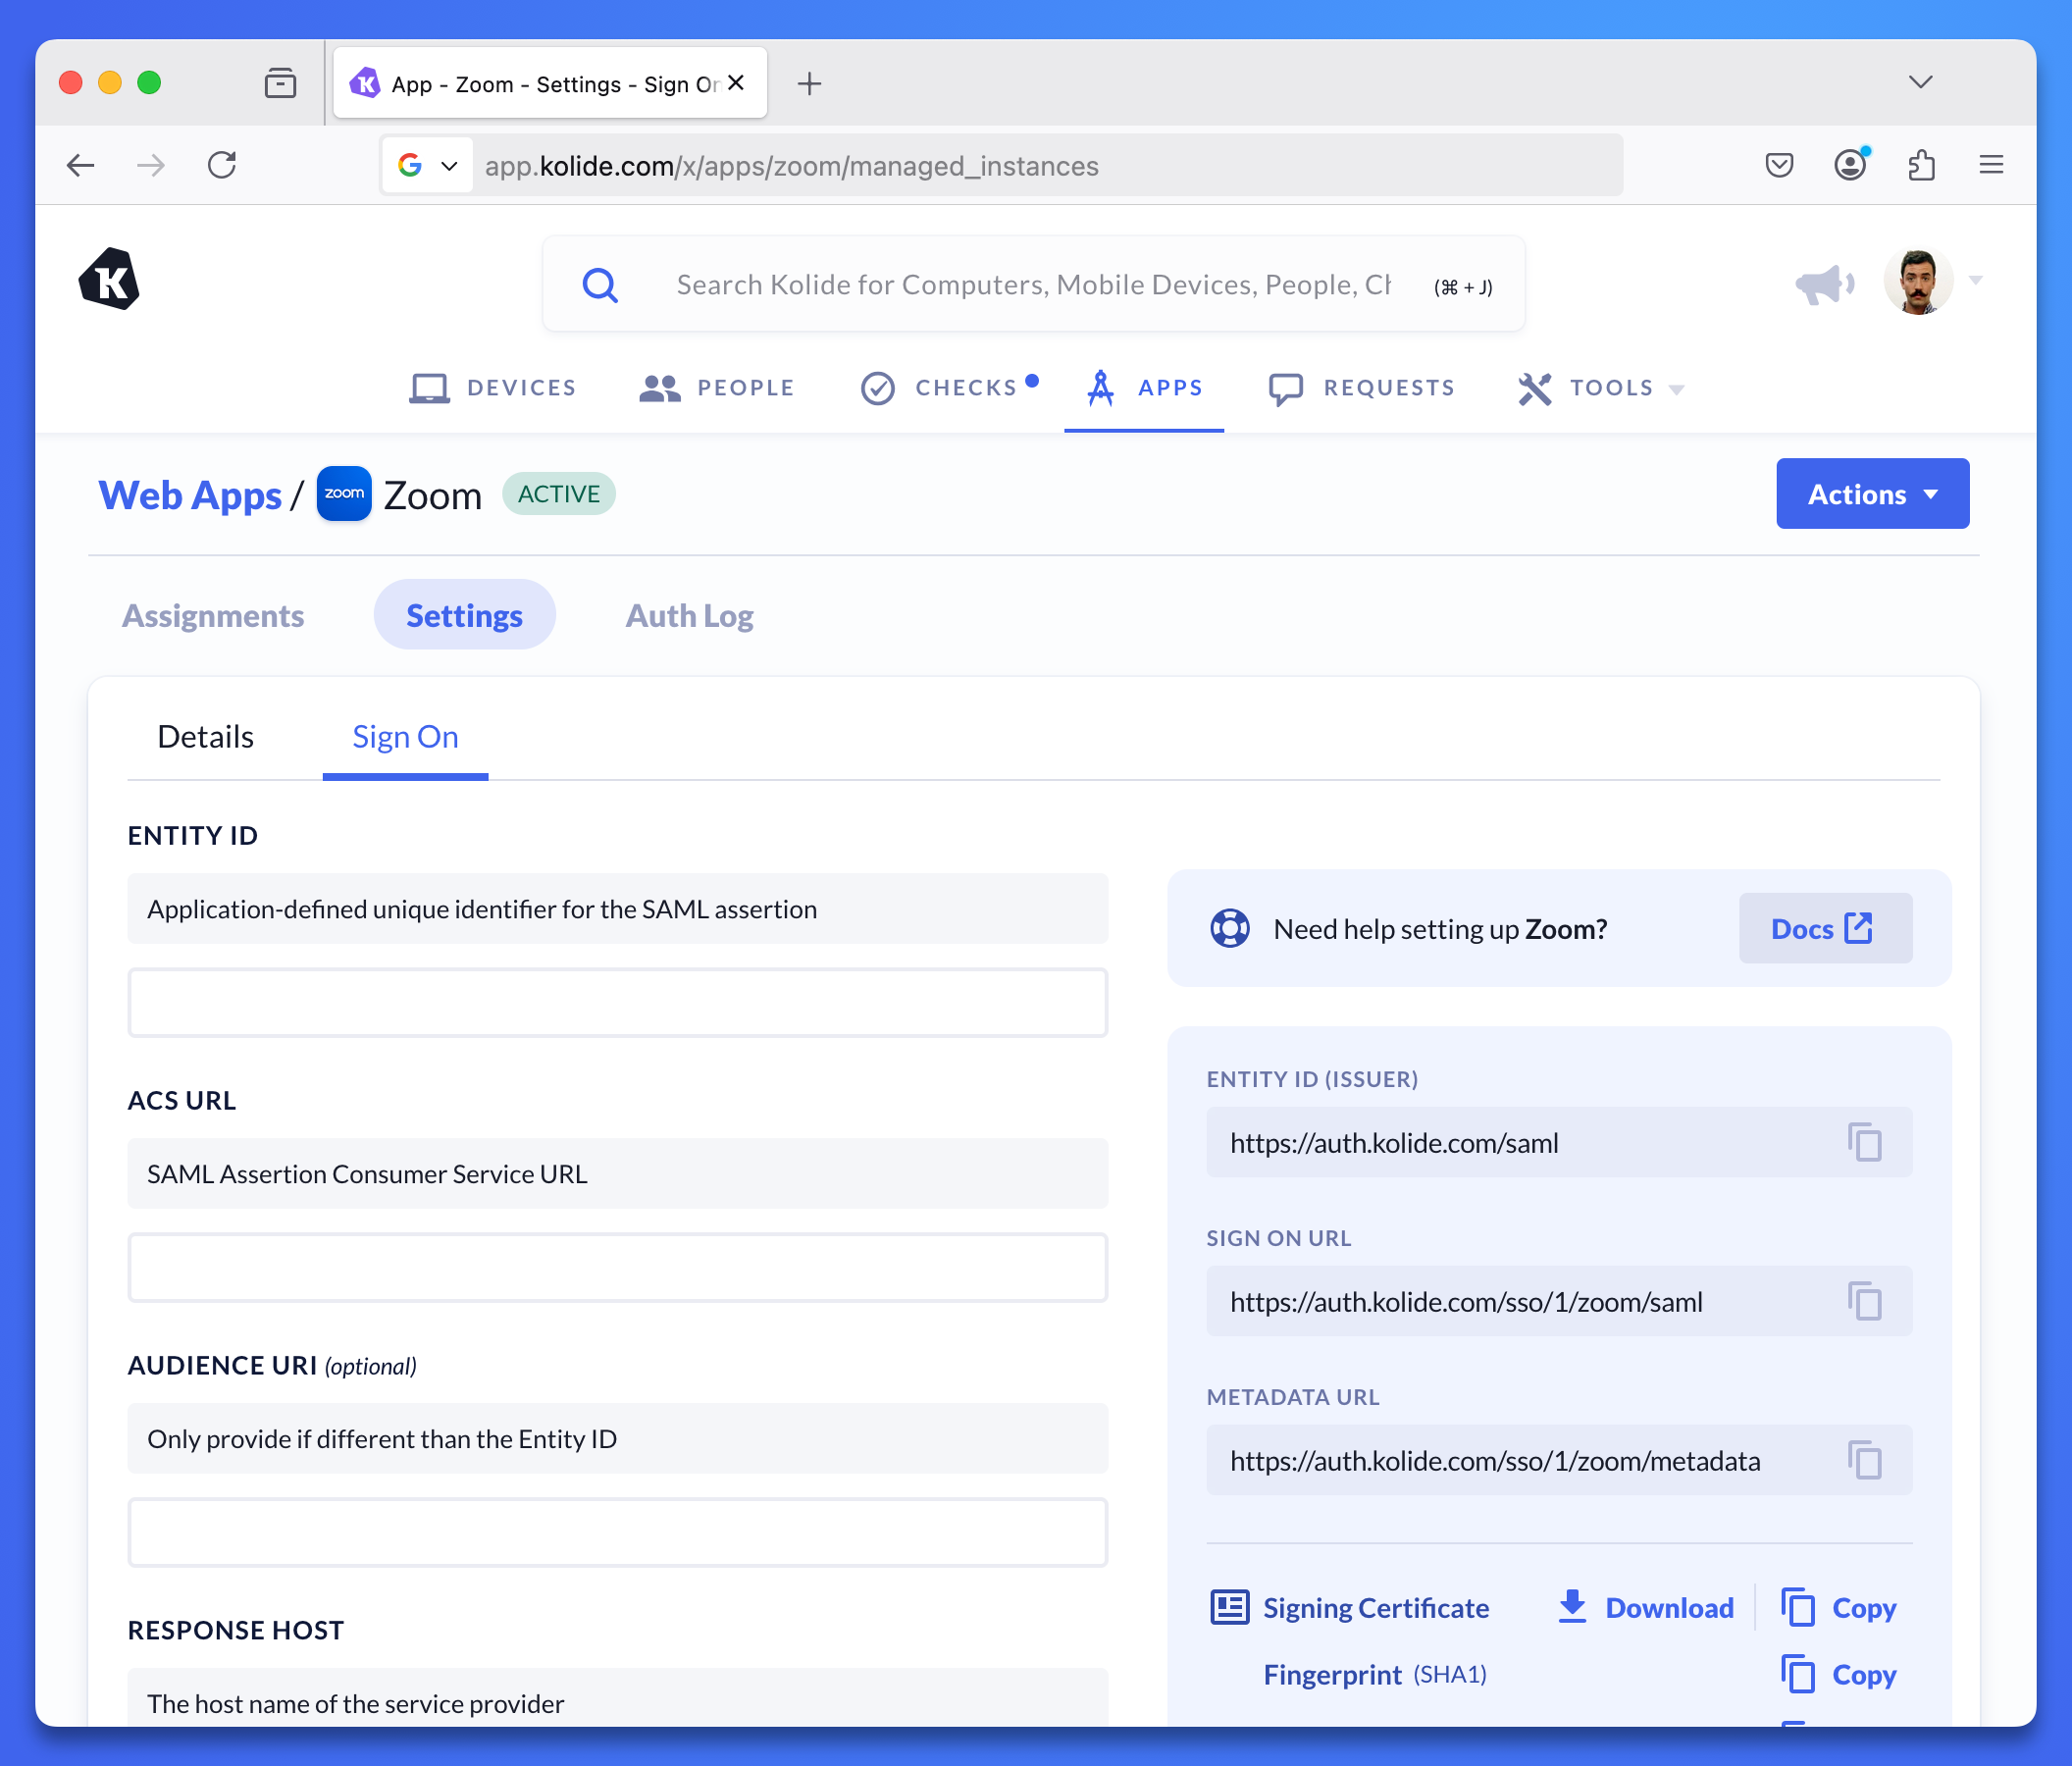
Provide your app’s configuration details to Device Trust
- Copy the Entity ID from your app and paste it into the Entity ID field in Device Trust.
- Copy the ACS URL from your app and paste it into the ACS URL field in Device Trust.
- If your app’s Audience URI is the same as the Entity ID, leave the Audience URI field blank. If the Audience URI field is different from the Entity ID, copy the Audience URI from your app and paste it into the Audience URI field in Device Trust.
- Copy the Response Host (name of the service provider) from your app and paste it into the Response Host field.
- If your app requires the SAML response to be signed for authentication, select the checkbox next to Sign Response Body. Check your app’s documentation or configuration requirements to determine if this setting is necessary.
Provide Device Trust’s configuration details to your app
- Copy the Entity ID (Issuer) from Device Trust and paste it into the Entity ID (Issuer) field in your app.
- Copy the Sign On URL from Device Trust and paste it into the Sign On URL field in your app.
- Copy the Metadata URL from Device Trust and paste it into the Metadata URL field in your app.
- Copy the Signing Certificate from Device Trust and paste it into the Signing Certificate field in your app.
Optional app settings
If your app allows signing AuthnRequests or requires sending information like Name ID Format, Single Sign-On URL, or Logout URL, add them to the Optional Settings fields in Device Trust.
Was this article helpful?
Glad to hear it! If you have anything you'd like to add, feel free to contact us.
Sorry to hear that. Please contact us if you'd like to provide more details.