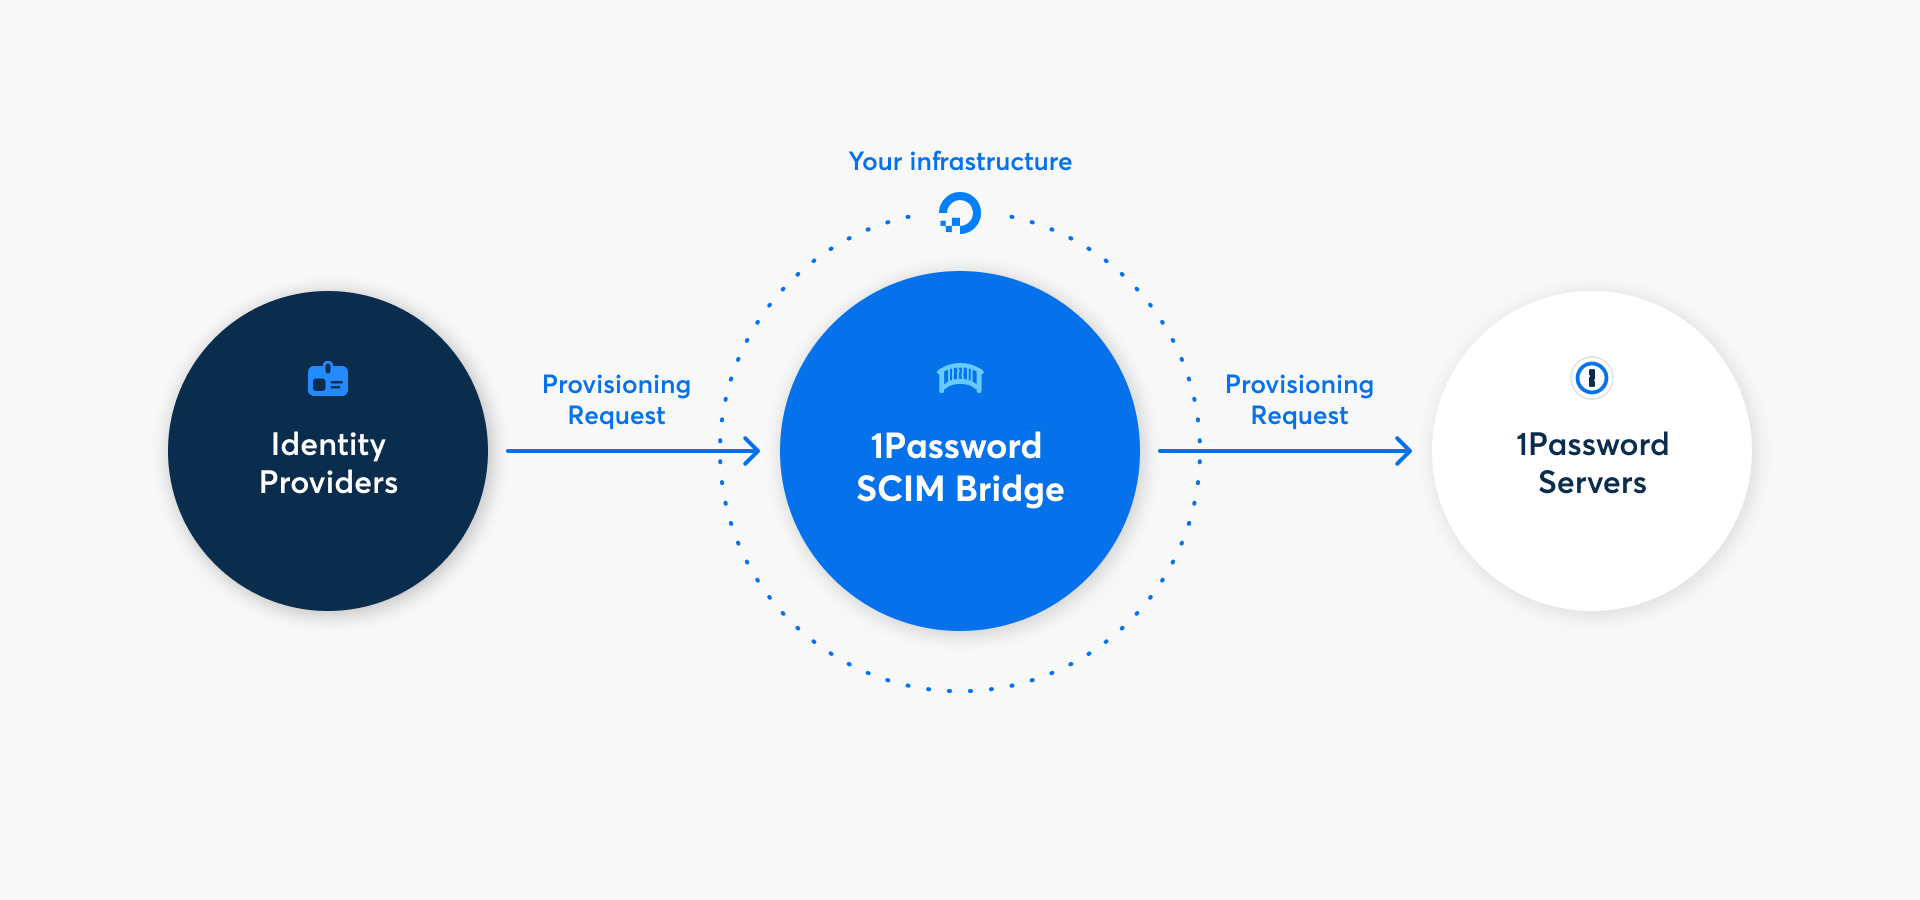
With 1Password Business, you can automate many common administrative tasks using 1Password SCIM Bridge. It uses the System for Cross-domain Identity Management (SCIM) protocol to connect 1Password with your existing identity provider, like Google Workspace, JumpCloud, Microsoft Entra ID, Okta, OneLogin, or Rippling.
When you deploy 1Password SCIM Bridge with DigitalOcean App Platform instead of the DigitalOcean Marketplace, you can save on costs and keep management simpler without the need to create a DNS record or TLS certificate. You’ll need a DigitalOcean account with available quotas for two droplets.
Step 1: Generate credentials in 1Password
- Sign in to your account on 1Password.com.
- Select Integrations in the sidebar.
- Choose your identity provider from the User Provisioning section.
- Select Custom, then select Next.
- Select Save in 1Password for both the
scimsessionfile and bearer token to save them as items in your 1Password account. Save each item in an appropriate shared vault. - Select the down arrow
beside the
scimsessionfile and save it to your computer.
Step 2: Create resources in DigitalOcean
These steps were recorded in December 2023 and might have changed since. Refer to the DigitalOcean documentation for the most up-to-date steps.
Before you begin the deployment, download the app spec template op-scim-bridge.yaml from the 1Password SCIM Bridge deployment examples repo on GitHub
. Then follow these steps.
2.1: Add the 1Password SCIM Bridge app
- Go to the DigitalOcean Apps portal , then select Create App.
- Select Docker Hub from the service provider list, then enter
1password/scimin the Repository field, then select Next. - Select Edit beside
1-password-scim, then select Edit beside the Name field. - Enter
op-scim-bridgein the Resource Name field, then select Save. Select Back at the bottom of the page. - Select Edit Plan, then select Basic.
- From the Instance Size menu, select $5.00/mo - Basic, then select Back.
- Select Next on the Resources page, then select Next on the Environment page.
- On the Info page, select Edit in the App Info section.
- Enter
op-scim-bridgein the Name field, then select Save. - If you’d like to change the region, select Edit beside it, then select a region. Select Save.
- Select Next on the Info page, then scroll down on the Review page, then select Create Resources.
The deployment of 1Password SCIM Bridge will start and after a few minutes fail, which is expected because the configuration has not been defined. After you see the “deployment failed” message, continue to step 2.2.
2.2: Upload the app manifest
- Select the Settings tab on the app page, then scroll down, then select Edit beside App Spec.
- Select Upload File, then select the
op-scim-bridge.yamlfile you downloaded earlier. - Select Replace, then wait a moment for the SCIM bridge to deploy.
Step 3: Configure and deploy your SCIM bridge
After you see the “deployment went live” message at the top of the page, select op-scim-bridge from the Components list, then scroll down, then select Edit beside Environment Variables.
Select the trash beside
OP_SESSIONto remove it. You’ll upload your own in a moment.Open a terminal window on your computer, then get the Base64 encoded contents of your
scimsessionfile:Bash:
cat ./scimsession | base64PowerShell:
[Convert]::ToBase64String([IO.File]::ReadAllBytes((Join-Path $PWD.Path 'scimsession')))
Copy the output value. You’ll need it to create the secret for the deployment.
Go back to the Environment Variables section of your app’s Component Settings in DigitalOcean.
Create a new environment variable and enter
OP_SESSIONin the Keys field, then paste the base64 value of yourscimsessionsecret in the Values field.Select Encrypt beside the value, then select Save. The deployment will take a moment to update.
After the deployment is live, use the Live App button at the top of the page to open your SCIM bridge. You can also use the URL link at the top of the page below your project name.
Enter your bearer token, then select Verify.
Step 4: Connect your identity provider to the SCIM bridge
Important
If you’ve already been using 1Password Business, make sure the email addresses and group names in your 1Password account are identical to those in your identity provider.
- If anyone is using a different email address in 1Password, ask them to change it.
- If you have existing groups in 1Password that you want to sync with groups in your identity provider, adjust the group names in 1Password.
Because 1Password SCIM Bridge provides a SCIM 2.0-compatible web service that accepts OAuth bearer tokens for authorization, you can use it with a variety of identity providers.
Connect to the load balancer where you’ve configured the SCIM bridge (for example: https://scim.example.com) and authenticate using your OAuth bearer token.
Learn how to connect your identity provider:


Update your SCIM bridge
The latest version of 1Password SCIM Bridge is posted on the release notes website. To update your SCIM bridge:
- Navigate to the DigitalOcean Apps portal
, then select your SCIM bridge (by default,
op-scim-bridge) from the list of apps. - Select op-scim-bridge in the Compute section.
- Select Edit in the Source section.
- Change the version number in the Tag field to match the latest version from the SCIM Bridge release notes page .
- Select Save. The SCIM bridge will redeploy with the new version.
- Navigate to your SCIM bridge URL and sign in with your bearer token.
- Check the version in the top left of the page.
Get help
Get help with the SCIM bridge, like if you lose your bearer token or session file.
To get more help or share feedback, contact 1Password Business Support or join the discussion with the 1Password Support Community.