Tip
If you don’t use Azure Kubernetes Service, you can still automate provisioning with Azure Container Apps or another deployment environment.
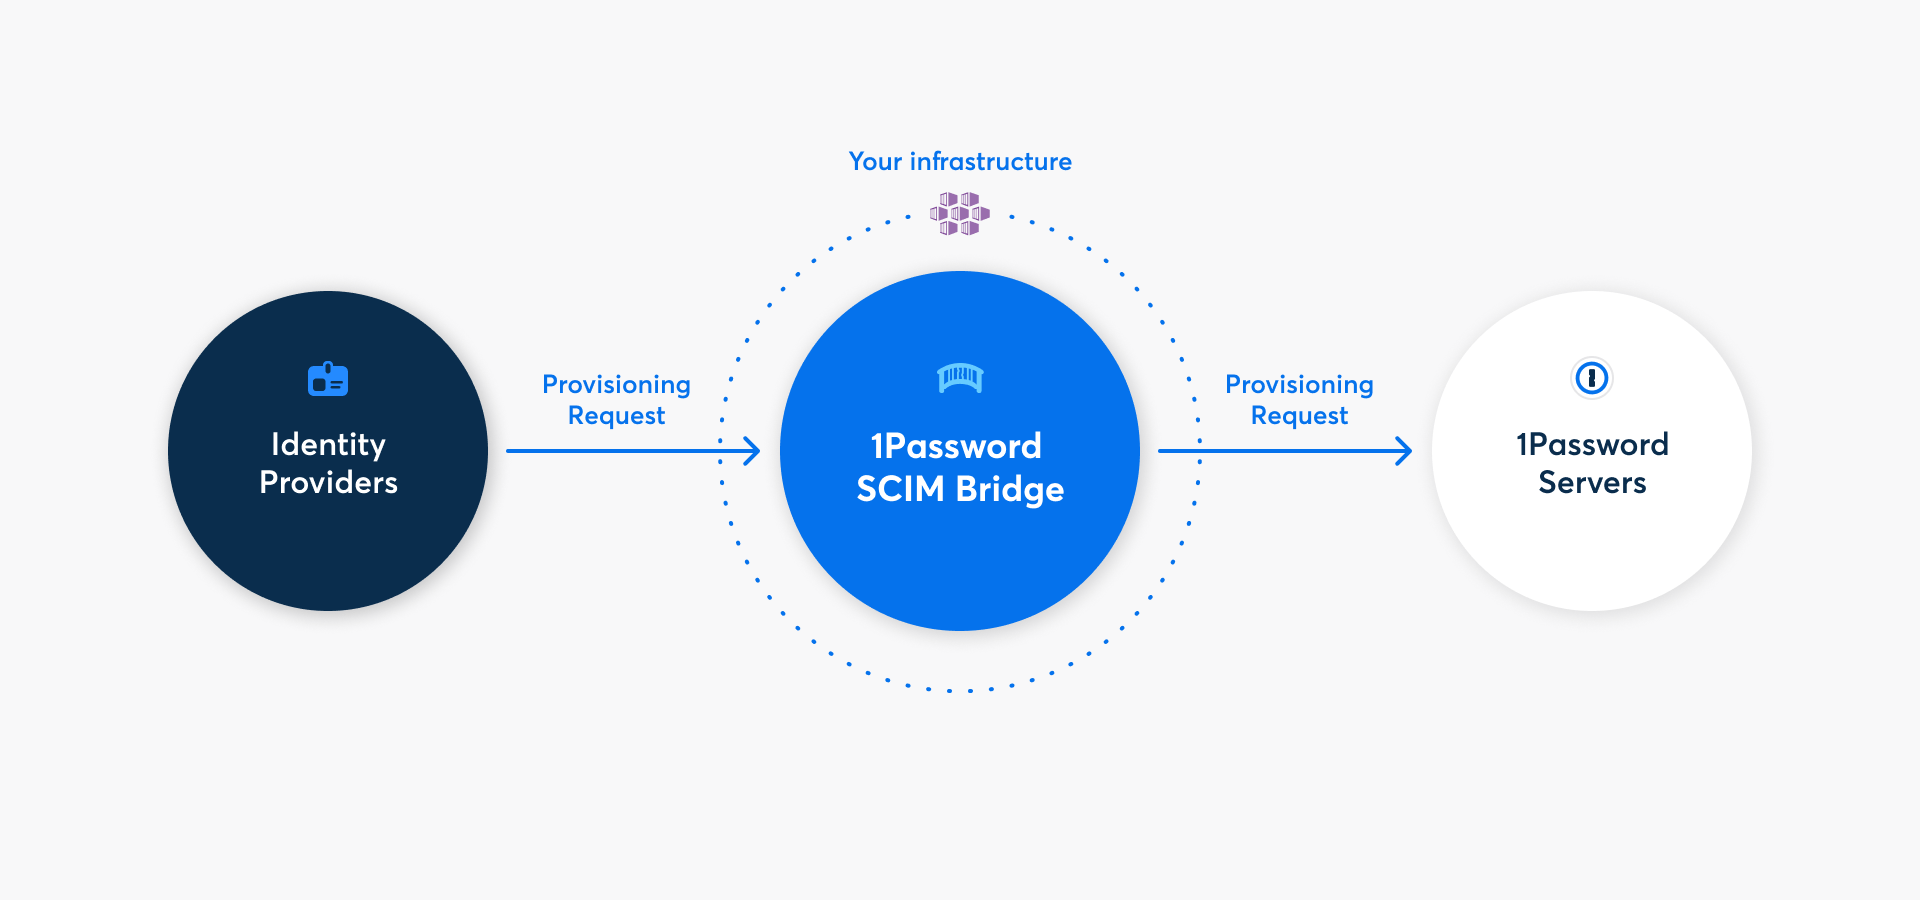
With 1Password Business, you can automate many common administrative tasks using 1Password SCIM Bridge. It uses the System for Cross-domain Identity Management (SCIM) protocol to connect 1Password with your existing identity provider, like Google Workspace, JumpCloud, Microsoft Entra ID, Okta, OneLogin, or Rippling.
Step 1: Add provisioning to your 1Password account
Before you can deploy 1Password SCIM Bridge, you’ll need to add the provisioning integration and get credentials for it. Select Get Started, sign in to your 1Password account, and follow the onscreen instructions.
If you see the details for an existing provisioning integration, you’ll need to deactivate it first. Select More Actions, then select Deactivate Provisioning.
After you complete the setup process, you’ll get a scimsession file and bearer token. Save them both in 1Password and save the scimsession file to your computer. You’ll need these to deploy the SCIM bridge and connect your identity provider.
Important
The bearer token and scimsession file you receive during setup can be used together to access information from your 1Password account. You’ll need to share the bearer token with your identity provider, but it’s important to never share it with anyone else. And never share your scimsession file with anyone at all.
Step 2: Create and configure the Kubernetes cluster
2.1: Gather information about your environment
Sign in to your account on the Microsoft Azure portal.
Select the Cloud Shell in the top right.
Get a list of your Azure subscriptions:
az account list -o tableFind a subscription you’d like to use for the SCIM bridge deployment, then make note of its
NameorSubscriptionID.Get a list of available locations in your Azure account:
az account list-locations -o tableFind your preferred server location (region) for the deployment and make note of its
Name, such aseastus.Choose an existing resource group or create a new one.
To get a list of existing resource groups:
az group list -o tableTo create a new resource group:
az group create --name <desiredName> --location <locationName>
Make note of the name of the resource group you want to use for the deployment.
After you complete these steps, you should have the following details:
- Subscription
NameorSubscriptionID. - Location (region).
- Resource group name.
2.2: Create the cluster
The SCIM bridge must be deployed to an Azure Kubernetes Service cluster. To create the Azure Kubernetes Service cluster you’ll deploy the SCIM bridge to, copy the relevant command for your shell to a text editor and change the <placeholders> to the values you noted in step 2.1.
Bash:
az aks create -n op-scim \
	--enable-cluster-autoscaler \
	--node-count 1 \
	--min-count 1 \
	--max-count 3 \
	--node-vm-size Standard_B2s \
	--load-balancer-sku basic \
	--node-osdisk-size 32 \
	--resource-group <resourceGroupName> \
	--generate-ssh-keys
PowerShell:
az aks create -n op-scim `
	--enable-cluster-autoscaler `
	--node-count 1 `
	--min-count 1 `
	--max-count 3 `
	--node-vm-size Standard_B2s `
	--load-balancer-sku basic `
	--node-osdisk-size 32 `
	--resource-group <resourceGroupName> `
	--generate-ssh-keys
After you edit the command for your deployment, run it in the Cloud Shell. It may take a few minutes for Azure to create your cluster.
When you see a shell notification that the cluster has been created, continue to the next step.
Step 3: Set up and deploy 1Password SCIM Bridge
Tip
If you manage more than 1,000 team members, refer to the resource recommendations appendix on GitHub to customize your deployment for your needs.
3.1: Connect to your Kubernetes cluster
- Open the Kubernetes Services Page.
- Select the name of the cluster you just created. If you kept the name in the template above, it will be called
op-scim. - Select Connect at the top of the page, then select Open Cloud Shell to connect to the cluster.
If you already have the Cloud Shell open, run the Set the cluster subscription and Download cluster credentials commands listed in the Connect pane.
3.2: Clone the scim-examples repository
All the configuration files you need to deploy the SCIM bridge are available in the scim-examples repository on GitHub.
Switch to the directory where you want to clone the repository, then run the following command:
git clone https://github.com/1Password/scim-examples.git
Switch to the Kubernetes directory in the cloned repository:
cd scim-examples/kubernetes
3.3: Upload your scimsession file
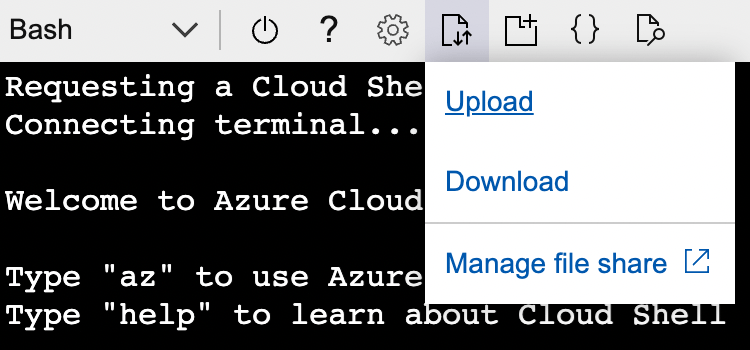
Before you create the Kubernetes Secret, upload your scimsession file to the Cloud Shell:
- Select the Upload/Download files button, then select Upload.
- Find the
scimsessionfile that you saved to your computer, then select it. - Make note of the upload destination, then select Complete.
3.4: Create the Kubernetes Secret
To create the Kubernetes Secret, run the following command:
Bash:
kubectl create secret generic scimsession --from-file=scimsession=/home/$USER/scimsessionPowerShell:
kubectl create secret generic scimsession --from-file=scimsession=/home/$Env:USER/scimsession
3.5: Deploy 1Password SCIM Bridge
1Password SCIM Bridge uses a Redis instance to store and cache your Let’s Encrypt TLS certificate. Deploy the configuration, 1Password SCIM Bridge, Redis, and the load balancer using the following command:
kubectl apply -f .
3.6: Create the DNS record
1Password SCIM Bridge requires a public DNS record on a domain that you manage. Before you create the DNS record, get the external IP address of the load balancer:
kubectl get services
If you don’t see the IP address in the External IP column, wait a few minutes and try again.
Add an A record that points to the public IP address for the load balancer. For example, if your domain is example.com, use scim.example.com.
Tip
All SCIM bridge traffic uses port 443. If you use Azure Firewall or are restricting ingress to 1Password SCIM Bridge, open port 443 for your Azure Kubernetes cluster. Let’s Encrypt requires ingress on port 443 to renew the TLS certificate every 60 days.
3.7: Configure and enable Let’s Encrypt
1Password SCIM Bridge uses a TLS certificate provided by Let’s Encrypt to secure communication with your identity provider.
Set the fully qualified domain name (FQDN) based on the DNS record you created in the last step (for example: scim.example.com) as the value for OP_TLS_DOMAIN:
kubectl set env deploy/op-scim-bridge OP_TLS_DOMAIN=scim.example.com
Step 4: Test your SCIM bridge
Important
Before you connect the SCIM bridge to your identity provider, make sure that you can connect to the SCIM bridge:
- over a secured (HTTPS) connection
- with a valid TLS certificate
To check that the DNS has propagated and the SCIM bridge is deployed successfully, visit the domain you configured in the previous step in your browser. You’ll see a 1Password SCIM Bridge status page. Enter your OAuth bearer token to verify it’s correct.
Use your bearer token and domain (for example: scim.example.com) to test the connection to 1Password:
curl --header "Authorization: Bearer <bearer_token>" https://<domain>/scim/Users
If you see a list of the users in your 1Password account, your SCIM bridge is deployed correctly.
Step 5: Connect your identity provider to the SCIM bridge
Important
If you’ve already been using 1Password Business, make sure the email addresses and group names in your 1Password account are identical to those in your identity provider.
- If anyone is using a different email address in 1Password, ask them to change it.
- If you have existing groups in 1Password that you want to sync with groups in your identity provider, adjust the group names in 1Password.
Because 1Password SCIM Bridge provides a SCIM 2.0-compatible web service that accepts OAuth bearer tokens for authorization, you can use it with a variety of identity providers.
Learn how to connect your identity provider:


Get help
Get help with the SCIM bridge, like if you lose your bearer token or session file.
To get more help or share feedback, contact 1Password Business Support or join the discussion with the 1Password Support Community.