Tip
If you don’t use Azure Container Apps, you can still automate provisioning with Azure Kubernetes Service or another deployment environment.
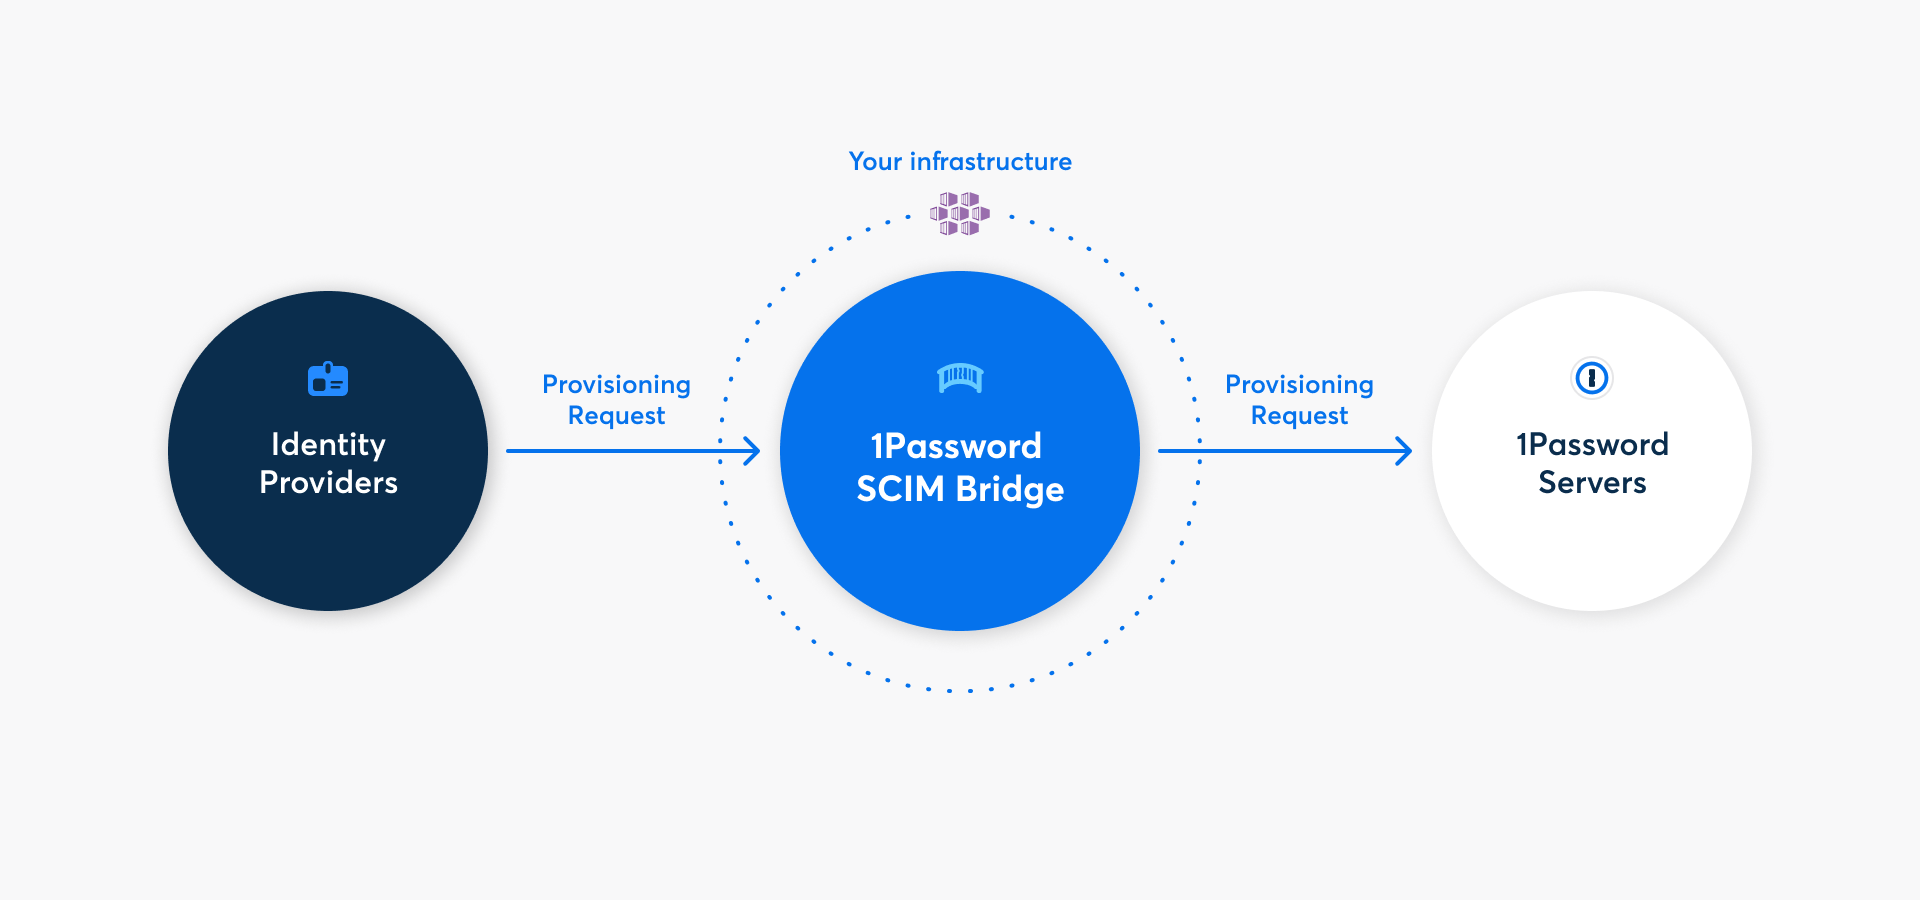
With 1Password Business, you can automate many common administrative tasks using 1Password SCIM Bridge. It uses the System for Cross-domain Identity Management (SCIM) protocol to connect 1Password with your existing identity provider, like Google Workspace, JumpCloud, Microsoft Entra ID, Okta, OneLogin, or Rippling.
You can deploy 1Password SCIM Bridge on Azure Container Apps by following the steps below. Alternatively, you can deploy on Azure Kubernetes Service.
Step 1: Add provisioning to your 1Password account
Before you can deploy 1Password SCIM Bridge, you’ll need to add the provisioning integration and get credentials for it. Click Get Started, sign in to your 1Password account, and follow the onscreen instructions.
If you see the details for an existing provisioning integration, you’ll need to deactivate it first. Click More Actions and choose Deactivate Provisioning.
After you complete the setup process, you’ll get a scimsession file and bearer token. Save them both in 1Password and save the scimsession file to your computer. You’ll need these to deploy the SCIM bridge and connect your identity provider.
Important
The bearer token and scimsession file you receive during setup can be used together to access information from your 1Password account. You’ll need to share the bearer token with your identity provider, but it’s important to never share it with anyone else. And never share your scimsession file with anyone at all.
Step 2: Create and configure the Container App
2.1: Gather information about your environment
Sign in to your account on the Microsoft Azure portal.
Click the Cloud Shell in the top right.
Run the following command to add the Azure Container App extension:
az extension add --name containerapp --upgradeGet a list of available locations in your Azure account:
az account list-locations -o tableFind your preferred server location (region) for the deployment and make note of its
Name, such aseastus.
2.2: Define variables
To define variables for the deployment, copy the appropriate command for your shell to a text editor and change the Location value to the one you noted in step 2.1. If you have an existing resource group you want to use, you can set it. To create a new resource group, see step 2.3.
Bash:
ResourceGroup="op-scim-bridge-rg"
Location="eastus"
ConAppEnv="op-scim-bridge-con-app-env"
ConAppName="op-scim-bridge-con-app"
YamlURL="https://raw.githubusercontent.com/1Password/scim-examples/main/azure-container-apps/aca-op-scim-bridge.yaml"
PowerShell:
$ResourceGroup="op-scim-bridge-rg"
$Location="eastus"
$ConAppEnv="op-scim-bridge-con-app-env"
$ConAppName="op-scim-bridge-con-app"
$YamlURL="https://raw.githubusercontent.com/1Password/scim-examples/main/azure-container-apps/aca-op-scim-bridge.yaml"
2.3: Create a resource group (optional)
If you want to create a new resource group for your SCIM bridge, run the following command:
az group create --name $ResourceGroup --location $Location
2.4: Create the Container App Environment
Run the following command to create the Container App Environment:
az containerapp env create --name $ConAppEnv --resource-group $ResourceGroup --location $Location --enable-workload-profiles falseGet help if you encounter an error that a subscription is not registered.
Upload your
scimsessionfile to the Cloud Shell. Click the Upload/Download files button in your Cloud Shell and choose Upload.Select the
scimsessionfile that you saved to your computer.Make note of the upload destination, then click Complete.
2.5: Create your Container App Secret
Run the following command to create your Container App Secret.
Bash:
az containerapp create \
	--resource-group $ResourceGroup \
	--environment $ConAppEnv \
	--name $ConAppName \
	--secrets scimsession="$(cat $HOME/scimsession)"
PowerShell:
az containerapp create `
	--resource-group $ResourceGroup `
	--environment $ConAppEnv `
	--name $ConAppName `
	--secrets scimsession="$(Get-Content $HOME/scimsession)"
Step 3: Set up and deploy 1Password SCIM Bridge
Tip
If you manage more than 1,000 team members, refer to the resource recommendations appendix on GitHub to customize your deployment for your needs.
Run the following command to use the template file from our repository on GitHub (aca-op-scim-bridge.yaml) to deploy your SCIM bridge.
Bash:
curl --silent --show-error $YamlURL |
	az containerapp update --resource-group $ResourceGroup --name $ConAppName \
		--yaml /dev/stdin --query properties.configuration.ingress.fqdn
PowerShell:
Invoke-RestMethod -Uri $YamlURL |
	az containerapp update --resource-group $ResourceGroup --name $ConAppName `
		--yaml /dev/stdin --query properties.configuration.ingress.fqdn
Step 4: Test your SCIM bridge
Important
Before you connect the SCIM bridge to your identity provider, make sure that you can connect to the SCIM bridge:
- over a secured (HTTPS) connection
- with a valid TLS certificate
The fully qualified domain name for your SCIM bridge will be displayed in the Cloud Shell console. You can also find the domain by clicking your app on the Container Apps page and referring to the Application Url.
Visit your SCIM bridge domain in a web browser and you’ll see a 1Password SCIM Bridge status page. Enter your bearer token to verify it’s correct, then use your bearer token and domain (for example: scim.example.com) to test the connection to 1Password:
curl --header "Authorization: Bearer <bearer_token>" https://<domain>/scim/Users
If you see a list of the users in your 1Password account, your SCIM bridge is deployed correctly.
Step 5: Connect your identity provider to the SCIM bridge
Important
If you’ve already been using 1Password Business, make sure the email addresses and group names in your 1Password account are identical to those in your identity provider.
- If anyone is using a different email address in 1Password, ask them to change it.
- If you have existing groups in 1Password that you want to sync with groups in your identity provider, adjust the group names in 1Password.
Because 1Password SCIM Bridge provides a SCIM 2.0-compatible web service that accepts OAuth bearer tokens for authorization, you can use it with a variety of identity providers.
Learn how to connect your identity provider:


Get help
Get help with the SCIM bridge, like if you lose your bearer token or session file.
If you see an error in step 2.4 that a subscription is not registered, copy the following command, replace <subsciptionIDorName> with your subscription ID or name, then run the command.
az account set --subscription <subsciptionIDorName>
To get more help or share feedback, contact 1Password Business Support or join the discussion with the 1Password Support Community.